Showing posts with label Anita Frame Pop Up. Show all posts

Saturday, May 6, 2017

Thanks So Very Much


Hi everyone,

It’s challenge time with the “Crazies” over on the Crazy 4 Challenges blog. Being a new month it is time to introduce our new challenge hostess which is Barb Anders.

Today is National Nurses Day in the US. Barb is a retired nurse, so this day is special to her and she is forever grateful to all the wonderful nurses she has worked with or who have cared for her in some way. My challenge today is to make a thank you card. you can make it nurse or medical themed if you want but it's not necessary.


I had such fun play with the Negative Die Cutting and Split Negative techniques when I created my card for the ECD Die Cut Designer Challenge earlier in the week that I decided to create another one for today's challenge.


This design did cause a few extra challenges especially when I tried to have the top flower centred on the card. Those little pieces on the flower didn't like being card down the middle, so plan b was to off set the flower so it was all on the one side. Problem solved.


Of course with this technique you are able to create two cards which is what I have done here.


For the inside of my card I created a pop up card using the Pop it Ups Anita Frames Pop Up Card die set.

As you can see I added two of the 'positive' flowers on either side of the card.

Don't forget to check out the rest of the “Crazies” cards over on the Crazy 4 Challenges blog and also their individual blogs for more details.


Lori Tecler (May Guest Designer)


Stamps: Occasions Clear Stamps - Elizabeth Craft Designs
Paper: White; Time for Teal; Rich Black Soft Finish Cardstock - Elizabeth Craft Designs
Dies: Pop it Ups Anita Frames; ModaScrap Ready to Bloom; Dotted Scallop Rectangles; Stitched Rectangles; Thanks - Elizabeth Craft Designs
Other: Black Ink; Clear Double Sided Adhesive Tape 152mm - Elizabeth Craft Designs


Saturday, April 1, 2017

Rainbow Day


Hi everyone,

It’s challenge time with the “Crazies” over on the Crazy 4 Challenges blog. It's a brand new month, but I am continuing as challenge hostess this month.

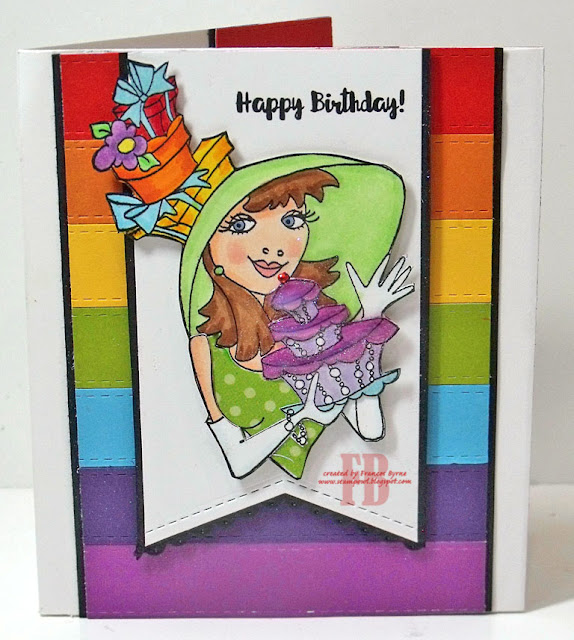
Monday 3rd April is Rainbow Day ... So let's make rainbow cards this week. Note you don't have to include a real rainbow unless you wish .... create a card with multiple colors. It's up to you whether you stick to true rainbow colors or not.


For my card I decided to go with true Rainbow colors .... Red; Orange; Yellow; Green; Blue; Indigo and Violet. I used the second smallest banner from the ModaScrap Stitched Fishtail Banners die set to die cut a banner from each color and then adhered that to card and cut off the fishtail and the stitching from the ends.

For the larger fishtail on the front of the card  used two of the Fishtail Border dies to cut the fishtail edge at the end of the card. I love that you can make your fishtail banner any size you like.

I decorated the tag using the Birthday Beauty stamp set from Loralie Art Stamps.


For the inside of the card I created a pop up card using the Pop it Ups Anita Frames Pop Up which I die cut from white cardstock. For the rainbow panels on the side of the card, I die the same as I did on the front of the card and then cut it down the middle.

Don't forget to check out the rest of the “Crazies” cards over on the Crazy 4 Challenges blog and also their individual blogs for more details.
Kristine Reynolds (April Guest Designer)

Stamps: Birthday Beauty - Loralie Art Stamps; All Aboard - Kraftin' Kimme Stamps; Square Sayings 4 x 5 3/4 - Simon Says Stamp
Paper: White; Black; Red; Orange; Yellow; Green; Blue; Indigo; Violet
Dies: Pop It Ups Anita Frames Pop Up; ModaScrap Stitched Fishtail Banners; Fishtail Borders - Elizabeth Craft Designs
Other: Black Ink; Foam Tape; Copics


Sunday, January 22, 2017

Pawsitively Doggone Great Day


Hi everyone,

I am still playing with those cute digital stamps I purchased recently from Bugaboo Digi Stamps.


 For my card today I created a Pop Up Card using the Pop It Ups Anita Frames Pop Up die set designed by Karen Burniston for Elizabeth Craft Designs.


To decorate the front of the card I used a Happy Birthday sentiment die and added another of the cute puppy images to the top of the sentiment

Stamps: Birthday Pup 1; Birthday Pup 2; Birthday Pup 3 - Bugaboo Digi Stamps; "Paws"itively Doggone Great Day - Rubbernecker
Paper: White; Brown; Red; Yellow; Antique DP - Kaisercraft
Dies: Pop It Ups Anita Frames - Elizabeth Craft Designs; Grand Happy Birthday - Memory Box
Other: Black Ink; Foam Tape; Copics


Saturday, December 10, 2016

Have Yours-ELF a Merry Little Christmas


Hi everyone,

It’s challenge time with the “Crazies” over on the Crazy 4 Challenges blog. I am the challenge hostess for December and today I am issuing the final challenge for 2016 as we are all taking a break so we can spend time with our families. We will be back next year with lots more fun challenges to play along with!

For our challenge this week we are creating a card using your favorite "Crazy" sketch from our 2016 sketches.


For my card today I decided to use the March sketch C4C328 to create another Christmas Card. I change my card from a rectangle shaped card to a square but otherwise the sketch is the same.

To decorate my card I used the A Way with Words Merry Christmas die set. Along the top of the card I added one of the borders from the Holiday Garlands 1 die set. Both these dies are available from Elizabeth Craft Designs.

I also added two elves from the Elf'd stamp set from Essential by Ellen, as I love doing Elf on the Shelf each year I just had to buy this stamp/die set last year when it was released ... I actually used it as a prop with my elves last year 😀.


For the inside of my card I used the Anita Frames pop up die set designed by Karen Burniston for Elizabeth Craft Designs.

As you can see I added a few more elves from the stamp set and also a sentiment.

Don't forget to check out the rest of the “Crazies” cards over on the Crazy 4 Challenges blog and also their individual blogs for more details.


Stamps: Elf'd - Essentials by Ellen
Paper: White; Red; Green; Retro Christmas DP - Authentique
Dies: Anita Frames Pop Up - designed by Karen Burniston for Elizabeth Craft Designs; A Way with Words Merry Christmas - Elizabeth Craft Designs
Other: Black Ink; Foam Tape; Copics


Thursday, December 1, 2016

Snowman


Hi everyone,

It's challenge time with my friends over on the CCEE Stampers challenge blog. Being the beginning of the month it is time to introduce our new challenge hostess, which is Maryann Einam.


Today is Eat a Red Apple Day, so in the spirit of Christmas let’s create something that includes the color red.


For my card today I have used a Snowman image from Darcie's Country Folk. This is a stamp set I have had in my stash for a number of years.

For the layers of my card I used the Elizabeth Craft Designs Fitted Squares and Dotted Scallop Squares die sets.


For the inside of my card I created a pop up card using the Anita Frames Pop Up die set designed by Karen Burniston for Elizabeth Craft Designs.

The sentiments are from the Holiday Clear Stamp set.

Don't forget to check out the CCEE Stampers blog (goes live 12 AM EST) to see the rest of the creations the CCEE Stampers created this week. You can also see more details of their creations on their individual blogs:


Stamps: Snowman - Darcie's Country Folk; Holiday Clear Stamps - Elizabeth Craft Designs
Paper: White; Red; Green; DP - DCWV
Dies: Anita Frames Pop Up - designed by Karen Burniston for Elizabeth Craft Designs; Fitted Squares; Dotted Scallop Squares - Elizabeth Craft Designs
Other: Black Ink; Foam Tape; Copics


Wednesday, November 9, 2016

90th Slider Card


Hi everyone,

Today I am sharing another birthday card that I have created for my mother's 90th birthday which happens later this week. This one I made for one of my daughters to give to her.


On Monday Raquel Mason shared a card she created for the Hats Pop It Ups Designer Challenge where she used the main die from the Ring Accordion Card die set to create a slider card. Of course when I say her card I thought it was a fantastic idea ... who doesn't like finding more ways to use products that we already own.  Of course I had to make one too!

Instead of using the Ring Accordion, I decided to use the Circle Accordion to create my slider card. 

To decorate my card I used two of the gifts from the Gifts Peel Off Stickers set. I attached the stickers to adhesive tape and added Warm Diamond Silk Microfine Glitter and then colored the images with copic markers.

I added the number "90" to the centre of the circle which also has glitter on it.


 Here is an animation of the slider in action. Of course each gift only slides in it's own track either the top or bottom track.


For the inside of the card I used the Anita Frames Pop Up die set to create a pop up card. I added the negative of two of the gifts left over from the Gifts Peel Off Stickers. 

Stamps: Square Sayings - Simon Says Stamp
Paper: White; Pink; Green; Enchanting DP - Three Bugs in a Rug
Dies: Anita Frames Pop Up; Circle Accordion Card; Labels & Circles; Twist Circle Pop Up;  - designed by Karen Burniston for Elizabeth Craft Designs; Hi Rise Alphabet - MFT Stamps; Grandma - Cottage Cutz
Other ECD Products: Gifts Peel Off Stickers; Clear Double Sided Adhesive Tape 64mm; Warm Diamond Silk Microfine Glitter; Transfer Sheet
Other: Black Ink; Foam Tape; Copics


Wednesday, October 5, 2016

The Great Pumpkin


Hi everyone,

It's my turn to post a Pop It Ups Wednesday tutorial on the Elizabeth Craft Designs blog today. With Halloween only being about 3 1/2 weeks away I thought I would create a Halloween Card. 

When Karen Burniston first shared the Anita Frame Pop Up with the Design Team, I mentioned that I could see a face, well ever since then I have been wanting to play with the die to create a face. The inside of the card is supposed to be a pumpkin with the face carved like they do for Halloween sitting in some grass. If you can't see a pumpkin, well I am sure you can see a monster which still works for Halloween ... so either way! This idea might also work to create a Santa face for Christmas, Frankenstein or even an Owl!


Here's how I created my card:

1. Cut a piece of orange cardstock so it measures 10 inches x 6 1/2 inches. Score along the 10 inch side at 5 inches to create a side folding card.


  • Place the main pop up die from the Anita Frames Pop Up die set so that the centre alignment nubs of the die are lined up with the centre fold of the card. Run through die cutting machine. 
  • Refer to Karen Burniston's Anita Frames video on how to assemble the Anita Frames Pop Up card for easier assembly.

2. Use the Petite Flourish Stage it Stencil to sponge some texture to the sides and top and bottom of the card using Carved Pumpkin Distress Ink. Be careful not to get ink on the Pop Up panel of the card.


3. Cut a piece of black card that measures 5 inches x 5 inches. Score and fold along the 2 1/2 inch line and adhere behind the open part of the back of the card.


  • Cut a scrap piece of black card approx 3 1/2 inches x 2 inches. Fold in half along the 3 1/2 inch side. Use the main pop up die from the Anita Frames Pop Up die set and line the bottom section of the die on the score line to cut the bottom piece that fold into the fold of the card. Cut this piece off from the paper and glue over the orange piece on the card. Refer to photo above.
  • Using black card that has Clear Double Sided Adhesive Tape on the back, die cut the decorative corners that are included in the Anita Frames Pop Up die set. Adhere these to the top part of the pop up to create "eyebrows"
  • Die cut two of the middle size labels included in the Anita Frames Pop Up die set from white card. Adhere these to the labels on the card using foam tape.
  • Die cut two Triangle Banners included in the Anita Frames Pop Up die set, adhere these to the centre of each eye.
  • Die cut one Fishtail Banner included in the Anita Frames Pop Up die set, fold in half and cut off the tips of the fishtail. Adhere this to the bend  in the mouth area on the bottom of the card to become teeth.
4. Using the Crooked Tree from the Halloween Scene die set, die cut one tree from Green Card. Cut down the centre of the tree to create two pieces. Adhere each piece to the top of the card where the first cut line was created from the pop up die, to create the stalk/vines.

5. Cut two pieces of green cardstock that measures 2 1/2 inches x 5 1/2 and another two pieces of green cardstock that measures approx 1 inch x 5 1/2 inches. Use the grass die from the Outdoor Edges die set to create grass.
  • Sponge around the blades of grass using green ink.
  • Adhere the tall piece of grass to each side of the bottom of the card and then adhere the short pieces of grass to these panels.

The Front of the Card:

5. Cut a piece of orange cardstock so it measures 10 inches x 6 1/2 inches. Score along the 10 inch side at 5 inches to create a side folding card.
  • Use the Petite Flourish Stage it Stencil to sponge the design all over the front of the card.
6. Using the largest label from the Labels & Circles die set, die cut one label from black cardstock.
  • Using the second largest label from the Labels & Circles die set, die cut one label from white cardstock.
  • Stamp the "Happy Halloween Sentiment" from the Halloween Clear Stamp set to the top portion of the white label using black ink. Adhere label to the black label and then attach both labels to the centre of the front of the card.

7. Using the Pumpkin from the Halloween Charms die set, die cut the following:
  • (1) solid pumpkin from black cardstock
  • (1) detail pumpkin from orange cardstock
  • (1) Stalk/Vine from green cardstock
  • Assemble pieces to create pumpkin. 
  • Adhere pumpkin to the bottom of the label on front of card.
8. Cut a piece of black cardstock 3/4 inches x 2 inches.
  • Cut a piece of orange cardstock 3/8 inch x 2 inches
  • Adhere the orange strip of cardstock to the centre of the black strip.
  • Cut strip in half.
  • Adhere the strips of card to either dies of the centre of the label on front of card.
  • Add a Black/Silver Glitter Dot Peel Off Sticker to each of the strips.


Thanks for stopping by today, I hope you enjoyed my tutorial.

Supplies:

Elizabeth Craft Designs:

Other:
Inks - Black; Peeled Paint Distress Ink; Carved Pumpkin Distress Ink
Cardstock - White; Black Orange; Green
Foam Tape
Die Cutting Machine


Saturday, October 1, 2016

Tree-mendous Day


Hi everyone,

It’s challenge time with the “Crazies” over on the Crazy 4 Challenges blog.  Being the beginning of the month it is time to introduce our new challenge hostess which is Caz Counsell.

Caz has given us the challenge .... Forest fun... a forest scene or your favorite forest critters.


As you can see I have created my card using the Anita Frames Pop Up Card die set designed by Karen Burniston for Elizabeth Craft Designs. Along the bottom edge of the card I added grass using two of the dies from the Outdoor Edges die set.

To decorate my card I used the Taylored Expressions Birch Tree Border on either side of the card and added the animals from the Stampendous Cling Pop Up Forest Stamp/Die set.

My sentiments are both computer generated.


For the front of my card I added some more grass to the bottom edge of the card and another of the Birch Trees to the left hand side of the card. I also added three of the animals from the stamp set I used on the inside.

This card look like it could work for a male card ... I never have enough of those! So I turned it into a Father's Day card even though that won't come round till next September. I added the "D@d" sentiment using die from Lil Inkers Designs.


Don't forget to check out the rest of the “Crazies” cards over on the Crazy 4 Challenges blog and also their individual blogs for more details.
Heidi Green (October Guest Designer)


Stamps: Cling Pop Up Forest - Stampendous
Paper: White; Blue; Green; Brown, Tan
Dies: Anita Frames Pop Up;  Outdoor Edges - designed by Karen Burniston for Elizabeth Craft Designs;  Birch Tree Border - Taylored Expressions; Pop Up Forest Die Cut Set - Stampendous; Dad - Lil Inkers Designs; Fishtail Flags Stax 1 & 2 - MFT Stamps
Other: Black Ink;  Brushed Corduroy Distress Ink; Peel Paint Distress Ink; Foam Tape; Copics


Monday, September 26, 2016

September 2016 Pop It Ups Designer Challenge #2


Welcome to our second Pop It Ups challenge for September. This time round the challenge is hosted by Caz Counsell and she has challenged us to "Be Inspired" - Take inspiration from a fellow teammate for a card or technique of any theme!

I must admit that I love this type of challenge as it gives me the opportunity to use some of those wonderful ideas my fellow teammates have come up with in the past.


For my card today I took inspiration from two of my fellow teammates ... Kelly Booth for her card where she combined the Anita Frames Pop Up with the Iron Fence Pop Up die sets which you can see here

The second teammate I took inspiration from was Caz Counsell who used the created a fabulous summery scene using the Iron Fence Pop Up and the All Seasons Tree which you can find here

My card is larger than I would normally make being 6 inches tall by 7 1/4 inches wide  when closed. To allow for the 14 1/2 inch wide designer paper on the inside, I cut my designer paper at 6 inches x 12 inches and scored at 7 1/4 inches and then cut another piece of designer paper about 4 inches wide and joined joined the two pieces together. The tree on the right hand side of the card hides most of where the join is.


Here is a close up photo of the left side of my card. Before adding the Iron Fence Pop-Up to my card, I die cut two long pieces of green card using the grass border from the Outdoor Edges die set and added that to the bottom of my card which had already been die cut using the Anita Frames Pop Up die set.

You can see Karen Burniston's video on how to use the Iron Fence Pop Up here. I added the Iron Fence to both sides of the card before adding the trees, so I knew where I needed to position the trees on my card.


Here is a close up photo of the right side of my card. I used the All Seasons Tree which I die cut in brown cardstock and leafy designer paper. 

I also added die cut the flowers also included in the All Seasons Tree die set and added those along the bottom of the fence. I added Pink/Silver Glitter Dots Peel Off Stickers to each of the centres of the flowers. 

I die cut two of the birds also included in the Iron Fence Pop Up die set and colored them using copic markers another idea I got from Caz. 

To finish off the inside of the card I added sentiments from the Occasions Clear Stamp set and the Just a Note Clear Stamp set. 


For the front of the card I continued the scene, using the Iron Fence Pop-Up along the bottom of the card. I also added the border from the Outdoor Edges die set prior to adding the fence to the card.

This time round I used the All Seasons Tree as a branch rather than a tree. I also added more flowers along the bottom of the fence. 

Finally I added the sun from the Oval Pull Card die set to the top left hand corner of the card.

If you are looking to purchase Karen's Pop It Ups dies in Australia you can find them at Craft Giraffe (now online only).

Don't forget to check out  Karen Burniston's blog  on Tuesday when you will be able to see what all the designers created for the challenge this month, plus an amazing card/video tutorial from Karen Burniston.

Stamps: Occasions Clear Stamp Set; Just A Note Clear Stamp Set - designed by Karen Burniston for Elizabeth Craft Designs
Paper: White; Teal; Pink; Brown; Imagine DP - Authentique; Live Loud Ear Candy DP - Imaginisce; Train Ride DP - Bella Blvd
Dies: Anita Frames Pop Up; Iron Fence Pop Up; Outdoor Edges; All Seasons Tree; Oval Pull Card - designed by Karen Burniston for Elizabeth Craft Designs
Other ECD Products: Pink/Silver Glitter Dots Peel Off Stickers
Other: Black Ink; Foam Tape; Copics