Showing posts with label Stampendous. Show all posts

Friday, July 24, 2026

Gnoel


Hi Crafty Friends,

Today I am sharing another "Christmas in July Card", recently when I was looking through my Spellbinder Collections I spied the folder that held my Stampendous Hugs die sets (Stampendous is own by Spellbinders).  Anyway I could see through the file that there was a Christmas gnome already die cut and assembled, waiting patiently to be used on the card, so I pulled it out to make this card.

The die set used here is Stampendous Gnome Hugs.

To create the background behind the gnome, I pulled out an older Spellbinders Betterpress Plate called Season's Greetings Evergreens. I used my Betterpress and two different green inks to add the trees to my white panel. I moved the trees slightly up and to the right before inking the second time with my lighter ink.

I sponged the top of the white panel with blue inks to create my sky and then splattered it with white paint to resemble snow. The sentiment GNOEL, is from an older Honey Bee Stamps stamp set.

I layered this to the middle of a Slimline card, adding embossed green pieces of card to the top and bottom. This was embossed using Made To Surprise's Festive Tartan Embossing Folder and then adding white ink to the raised areas.


For the inside of the card, I added another gnome themed Christmas sentiment from the Honey Bee Stamps stamp set.

I added another green embossed panel to the bottom of my card and added the die cut stocking which I also found in my stash.


Thursday, January 4, 2024

Hooray It's Your Day


Hi Crafty Friends,

Back in October, I shared a Trellis Style Bridge Fold Card using a tutorial from Sam Calcott, which you can find here. For my card today, I basically CASED the card, just changing up the theme, colours and images.


To decorate my card, I used the Spellbinders/Stampendous Puppy Hugs die set. This die set included the puppy image as well as the all the various balls. There is also a coordinating stamp set, which I used to stamp the detail on a couple of the balls.

I added the sentiment using one of the sentiments included in The Greenery's Sentiment Suite: Birthday stamp set. I die cut the sentiment using a speech bubble die. I die cut the speech bubble from white and blue cardstock, offsetting the two together so I had a red shadow under the white speech bubble.

To finish off the front of the card I added some blue stars and then embellished each of the stars using some jewels from Pinkfresh Studio.

I mounted the panel to a top folding white 5 x 7 card.


For the inside of the card I added a sentiment using a stamp set from Made To Surprise. I also added a few more of the stars and the trophy which are included in the die set.


The card folds flat, so that it will fit inside a 5 x 7 envelope.


Friday, December 8, 2023

To You and Your Gnomies


Hi Crafty Friends,

Today I am sharing a Gnome themed Slimline Card I created recently. I used Spellbinders/Stampendous Gnome Hugs die set and coordinating stamp set to create the gnomes on this card.

I used Lawn Fawn's Stitched Hillside Borders die set to create my snowy hills. The trees in the background of this card is an older Tim Holtz/Sizzix die.

I used a sentiment from Picket Fence Studios for the sentiment at the top of my card.


For the inside of my card, I created a pop-up card using Karen Burniston's new Raising Platform Pop-up die set which is being released next week. I kept the inside fairly simple for this card, just adding the pop-up and the tiny gnome.


Thursday, November 9, 2023

Snowman Hugs


Hi Crafty Friends,

Welcome to my blog. For my card today I have created a Triple Oval Accordion card, using Made To Surprise by Sam Calcott's Triple Oval Accordion die set from her Showstoppers 2 Collection.

To decorate my card, I used Spellbinders/Stampendous' Snowman Hugs die set and coordinating stamp set. 


As I had some of the patterned paper I used on the front leftover, I added some to the two outer oval panels to add some interest to the card. One of these panels can be seen when the card is closed, so I thought this would make it look a little more attractive.

For the centre oval I added a Christmas sentiment from the Christmas Sentiments die set from Made to Surprise.

As you can see, I also added another large snowman to the panel on the right, this is the panel which will be on the top when the card is closed.


Here is a look at my card when it is closed ready to fit into an envelope. I kept this fairly simple as the focus of this card is when it is opened.


Tuesday, October 10, 2023

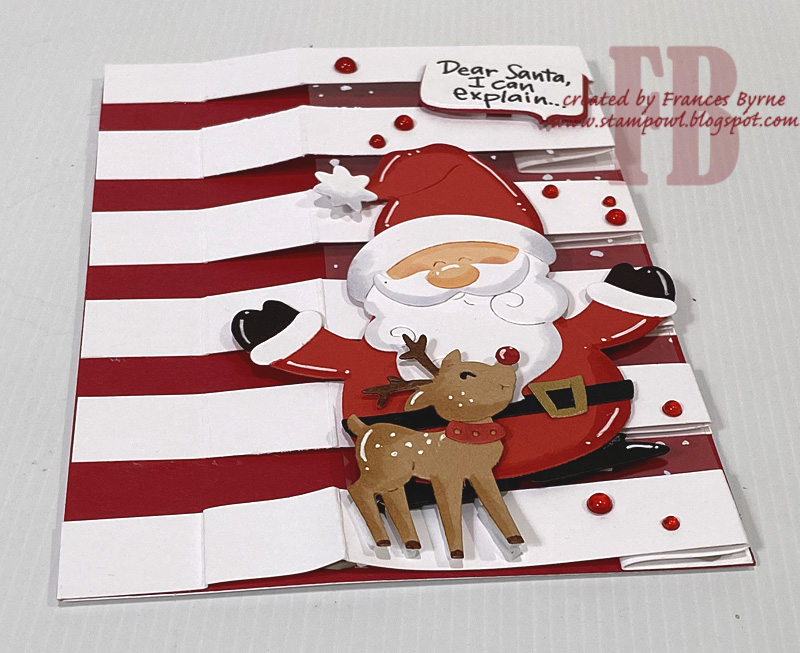
Santa I Can Explain


Hi Crafty Friends,

Today I am sharing a Christmas themed Trellis Style Bridge Fold Card I created recently.

Sam Calcott shared a tutorial for this style of card back in September, as it looked like a fun style of card, I decided to give it a go. You can see her tutorial here. 


To decorate my card, I used the new Spellbinders/Stampendous Santa Hugs die set. This die set included the Santa image as well as the cute little reindeer.

I added the sentiment which is from the Holiday Hugs Sentiments stamp set. I die cut the sentiment using a speech bubble die. I die cut the speech bubble from white and red cardstock, offsetting the two together so I had a red shadow under the white speech bubble.

To finish off the front of the card I added some red dew drops.

I mounted the panel to a top folding white 5 x 7 card.


For the inside of the card I added a sentiment and the Santa image which are both from an Apple Blossom stamp set.  


The card folds flat, so that it will fit inside a 5 x 7 envelope.

Other Supplies:
  • Festive Globes Stamp Set - Apple Blossom


Wednesday, October 4, 2023

Happy Birthday Hugs


Hi Crafty Friends,

Thanks for stopping by my blog, today I am sharing a Slimline Easel Card I created recently.

For my card, I used the Stampendous Bear Hugs stamp/die set which is part of the Hugs Collection that Spellbinders has been releasing. There were three different animals in the first collection ... bear, cat and dog. There is a Christmas collection also available now which includes Santa, Snowman & Gnome sets.


I used Lawn Fawn's Grassy Hillside Borders die set to create the grass areas of my card. Both bears and honey pot are included in the die set, and the bees are in the coordinating stamp set.

For the sentiment I used Alex Siberia's "It's Your Birthday" foil plate which I foiled using black foil.


Here is a look at my card, when it is closed ready to be placed in an envelope.


And finally a look at the bottom panel when it is opened up. I added the two bears on either side of the sentiment which acts as the stopper. The sentiment is from "Hugs Sentiments" stamp set.


Thursday, August 24, 2023

Gnomefuls of Christmas Wishes


Hi Crafty Friends,

As today is the 24th August, it is almost 4 months until Christmas ... YIKES! So today I am sharing a gnome themed Christmas card I created.


I created a 5 x 7 Flip Card, using Creative Craft Products Perfect Flips - Circle die set. For the layers I used a patterned paper from Simply Made Crafts Winter Sparkles 12 x 12 Paper Pad.

I decorated the card using Stampendous' Slim Winter Gnomes, this is a slimline style stamp which I stamped and then cut apart and positioned the gnomes where I wanted on my card. 


When you pull the left side of the card the card opens and the circle in the centre "flips" to reveal the other side. Here I stamped a Christmas sentiment and a few snowflakes. The "GNOEL" is from an older Honey Bee Stamps stamp set which may be discontinued now. The rest of the sentiment is from MFT Stamps Bitty Holiday Sentiments stamp set.


As you can see, I decided to decorate the back of my card. I used white cardstock on the left panel so that I could add another sentiment and some images and have a place to write a personal greeting. The rest I decorated using the same patterned paper I used on the front.


Other Supplies:
  • Slim Winter Gnomes - Stampendous
  • Gnome Place Like Home - Honey Bee Stamps (discontinued)


Tuesday, August 15, 2023

Purrrfectly Wonderful Day


Hi Crafty Friends, 

Today I am sharing a Cat themed 5 x 7 card. 

For the background of my card I used Creative Craft Products' Triangles 5 x 7 Cover Plate die. I die cut it from white and black cardstock and then layered the two together, offsetting slightly. I then layered the background onto a rainbow patterned paper I have had in my stash for years.

To decorate my card, I used the Stampendous Kitty Hugs die set and coordinating stamp set.


For the inside of the card I added two sentiments and three cat faces from the Kitty Hugs stamp set.


Wednesday, June 22, 2022

Just For You


Hi Crafty Friends,

Today I am sharing a floral slimline card that I created recently.

To create my card I used Stampendous' Slim Pop Blooms Cling Stamp. I stamped the image twice onto white cardstock, once using black ink and ones using a dark pink ink. I coloured the flowers on the black inked image and then cut out the flowers to mount over the flower image on the pink inked image. 

The stamp although called a slimline stamp, is an odd size. So I trimmed the image to fit a slimline sized card as best I could. The finished size of my card is 3 3/4 inches x 8 1/4 inches. 

I added a sentiment to the lower right hand corner of the card using a sentiment from a Creative Card Products stamp set I recently received.


I am always in need for get well cards, so I added a get well sentiment to the inside of the card. I also added a couple of the flowers.


Wednesday, April 27, 2022

Birthday Gnomes


Hi Crafty Friends,

I have a birthday themed Slimline card to share with your today, using Stampendous' Slim Gnome Birthday stamp.

My slimline card measures 4 inches x 8 /12 inches to allow for the gnome holding the orange "y" balloon. I cut the blue cardstock and green cardstock to size and used my MISTY to stamp the image onto each of the cardstock panels as well as another onto white cardstock. I die cut the green cardstock piece using a grass border from Honey Bee Stamps Horizon Borders die set and adhered it over the blue card panel.

I used my Scan N Cut machine to die cut all the gnomes, balloons etc from the white cardstock panel. After colouring all the images, I adhered the coloured images over the images on the blue/green cardstock panel. This was then adhered to a white top folding slimline card.


For the inside of my card, I die cut another piece of green cardstock using the grass border die.

I stamped the right side of the gnome stamp once more on white cardstock. I cut out the "B" balloon what is not held by a gnome as shown on the front and used that balloon to cover up the "Y" balloon  the gnome in the air is holding so that the word the gnomes make says "BDAY" 

To finish my card I added two sentiments to the left side of the card which are both from MFT Stamps Hanging with my Gnomies stamp set.


Monday, April 4, 2022

Pink Floral Slimline


Hi Crafty Friends,

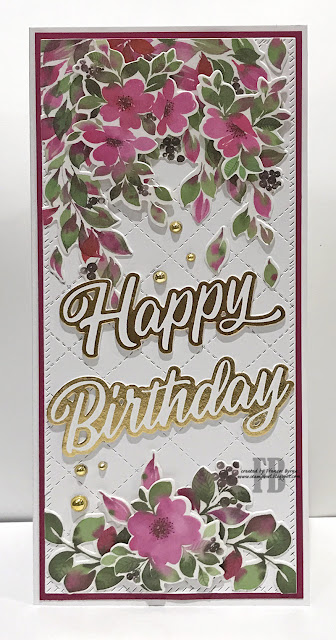
Today I am sharing a floral birthday Slimline card using products from Pinkfresh Studio and Concord and 9th.

For the background of my card, I used Concord and 9th's Quilted Card front die to create the stitched diamond design on the white rectangle panel. After running the design through my die cutting machine once, I then repositioned the background carefully and die cut a second time to create the slimline background. I then used Pinkfresh Studio's Slim Diagonal Stitched Rectangles die set.

For the flowers I used Pinkfresh Studio's In The Meadow Washi Tape. I layered the washi tape onto white cardstock and then used the coordinating die to die cut the panel. I layered the washi flowers onto the to and bottom of the white slimline panel. Some of the flowers I glued directly to the slimline panel and others I added using foam tape.

The birthday sentiment was created using Pinkfresh Studio's Brushed Sentiments Hot Foil Plate using gold foil and also the Solid Hot Foil Plate which allows us to use the left over foil to create a negative sentiment with a gold outline and white centre. 

To finish off the front of my card I added some of the Gold Metallic Pearls to the card.

The slimline panel was layered onto dark pink cardstock and then a Side Folding 4 inch x 9 inch card front.


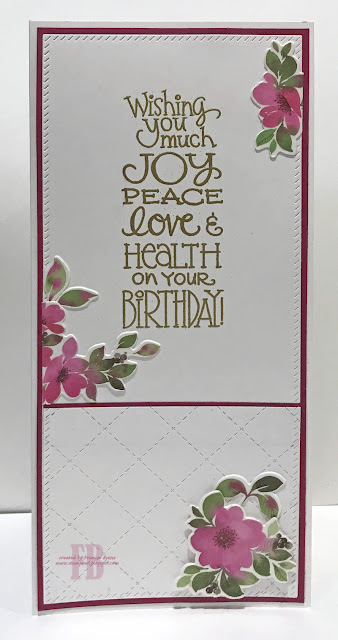
For the inside of my card I die cut a piece of white cardstock using the Slim Diagonal Stitched Rectangle die set. I also used the Concord and 9th's Quilted Card Front die to add the stitched diamond design on another piece of white cardstock. I used the Slimline die again to die cut the panel, this was cut down to about 3 inches and then added to the bottom of the slimline panel.

I stamped the birthday sentiment to the top portion of the card using Stampendous' Joy On Birthday Cling stamp using gold embossing powder.

I then used a few more of the washi flowers to decorate the panel.