Monday, April 20, 2015

For You


Hi everyone,

Today I am sharing a shaped card I created last year using the Sizzix Royal Labels Framelits set.

To create the card I folded a piece of purple card so it was slightly larger than the largest label in the set. I then positioned the card so that the fold was just under the cutting portion of the die at the top of the card.

I then die cut another purple piece of card and attached this to the folded card.


For the layers I used the next size down label and die cut my designer paper. I added flowers and banner from the Sizzix Flowers and Tags Framelits.


Here is the inside of my card. I added another sentiment which is included in the Flowers and Tags stamp set.

Dies: Sizzix Royal Labels Framelits; Sizzix Flowers & Tags Framelits w/stamps; Sizzix Borders Thinlits
Paper: White; Bright Pink; Purple; DP
Other: Black Ink; Brads; Foam Tape


Sunday, April 19, 2015

It's A Boy


Hi everyone,

Today I am sharing a baby card I created using Art Impressions Zoo Babies Wild Cute stamp set .... I just adore this adorable Giraffe and I figured it would make a cute baby card.


For this card I also pulled out my Cheery Lynn Designs Centre Step Card die which makes easy work on creating Centre Step card, as it comes with the base card and all the layers too.


Here is the inside of my card, I stamped part of the giraffe again on the left hand side and the sentiment that comes with the set on the lower right hand side.


Stamps: Zoo Babies Wildly Cute - Art Impressions
Paper: White; Blue; Bundle of Joy A New Addition Boy - Echo Park
Dies: Centre Step Card - Cheery Lynn Designs; It's A Boy/Girl - Elizabeth Craft Designs; MFT Die-namics Fishtail Flags Stax
Other: Black Ink; ECD Glitter Dots; Foam Tape; Copics


Saturday, April 18, 2015

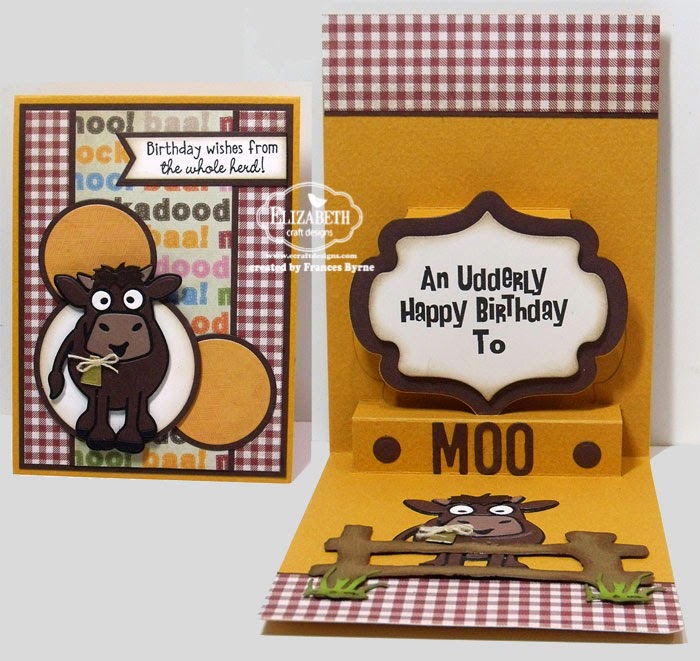
Birthday Wishes from the Whole Herd!


Hi everyone,


It’s challenge time with the “Crazies” over on the Crazy 4 Challenges blog.  Lynn Put our challenge hostess for April continues to bring us our challenges.

This week being the third Saturday of the month, it is time for a sketch challenge. 


For my card this week I have used the new Brownie the Cow die set designed by Karen Burniston for Elizabeth Craft Designs


For the inside I decided to create a Pop Up Card using the Lorna Label Pop Up Card die set. 

The sentiment on the label was computer generated.


At the bottom of my card I added another cow and also the fence and grass from the Susan's Garden line of dies also available from Elizabeth Craft Designs.

The "Moo" is created using the Alphabet 1 Caps die set.


Here is another view of my card this time at an angle so you can see the Pop Up portion a little easier.

Don't forget to check out the rest of the “Crazies” cards over on the Crazy 4 Challenges blog and also their individual blogs for more details.

Stamps: Oh Crop! - There She Goes
Paper: White; Brown; Green; Mustard; Kraft; Gold; Cock-a-doodle-doo! DP - Kaisercraft
Dies: Brownie the Cow; Lorna Label Pop Up Card - designed by Karen Burniston for Elizabeth Craft Designs; CountryScapes - Country Fence 1; Country Scapes - Country Flora 1 - designed by Susan's Garden for Elizabeth Craft Designs; Alphabet 1 Caps - Elizabeth Craft Designs; MFT Die-namics Circle Stax 1 & 2; MFT Die-namics Fishtail Flags Stax 1 & 2
Other: Black Ink; Brown Ink; Elizabeth Craft Designs Transparent Double Sided Tape 64mm; Hemp Cord; Foam Tape


Friday, April 17, 2015

I Love Mew


Hi everyone,

Today I am sharing a Pyramid Box Card that I created recently. A few weeks ago I attended one of the stamp clubs I go to every month and our project for that week was to create a Pyramid Box Card using Craft Concepts Kite Nesting Dies. I have made this type of card before, but using this method was so easy that I decided I had to purchase the dies so I could make them anytime I wanted.

Here is my first Pyramid Box Card using my new dies :)


Here is a side of view of the front of my Pyramid Box Card. 


I decorated my box card using a new stamp set from MFT Stamps.


Here is the inside of my card.


Stamps: I Knead You - MFT Stamps
Paper: White; Pink; DP - My Memories
Dies: Kites Nesting Dies - Craft Concepts; MFT Die-namics Circle Stax
Other: Black Ink; Ribbon; Foam Tape; Copics


Thursday, April 16, 2015

Happy as a Pig in Mud


Hi everyone,

It's challenge time with my friends over on the CCEE Stampers challenge blog. As I am the challenge hostess for April, I am continuing to issue the challenges.

Apparently today is National Librarian Day, so for our challenge this week we are using a book as our inspiration either Children's or Adult.

I must confess that I cheated a little for this challenge as I created my card first and then searched for a children's book that might fit the theme as I so wanted to play with Karen Burniston's fun new Virgil the Pig die. I found a couple of books that would work with this theme although now were actually in a bath... Hogwash! by Karma Wilson and Pigs in the Mud in the Middle of the Rud by Lynn Plourde. You can see the later book read by the author on Youtube here if you are interested. 

As I am sure you are aware, Pigs love mud so when I saw this cute pig die I had vision of him in a bath of mud. I had to wait a while to actually get to me as I had to wait for the dies to arrive!

This was a fun card to create and uses quite a number of Karen Burniston's dies ... I kind of went overboard LOL! To start of we have Virgil the Pig and I needed to put him in the bath from the Bath Pop Stand Card set. (for Virgil, I die cut another set of legs which I cut off and added to the bath, so it looks like Virgil has his feet out of the bath, I am not sure if a pig could actually get in the position mine is ... but it made it look more interesting so I went with it) I die cut the bubbles from brown card so they looked like mud. I added some mud splatters to Virgil, the bath and the background of the card using the small hay from the new Hay There Pop Stand Card set; the dripping honey from Honey the Bear and the lily pad from Hoppy the Frog. I added the bath to my card base which is the Lorna Label Pop Up Card.

I added the word "HAPPY" to the top of my card using the Elizabeth Craft Designs Alphabet 1 Caps set which I mounted to the fishtail banner from the Lots of Pops Pop Up Card set. I added the flag poles also from this set to each side of the card (I extended the bottom of the flag poles so they would work with the height of the banner. 

At the bottom panel of my card I added the sentiment "as a Pig in Mud" which was computer generated. Of course I had to add mud splatters to this label too ;).


Here is a side on view of the inside of my card.


For the front of my card I used the Outdoor Edges along the bottom of my card to which I stamped the sentiment "Got mud?" I thought this worked well with what was happening on the inside of my card. Unfortunately the company who made this set is no longer in business.

I added the Barn which was created using the new Barn Pop Stand Card die set. The fun thing about the Pop Stand Card dies is that Karen created these to be stand alone dies that come with the optional Pop Stand Card die ... so you can make Pop Stand cards but you can also just use them for normal cards etc too. And finally I added a much cleaner Virgil the Pig. 


Here is another photo of the front of my card, this time with the Barn doors open. I love that you can make these doors open and close. Once the doors open it reveals a birthday greeting which is from Karen's new Farm Greetings Clear Stamp set also being released soon.

Wow I think I counted at least 9 dies that I used for this card that is if I didn't forget any!

Don't forget to check out the CCEE Stampers blog (goes live 12 AM EST) to see the rest of the creations the CCEE Stampers created this week. You can also see more details of their creations on their individual blogs:


Stamps: Farm Greetings Clear Stamps - Elizabeth Craft Designs; Oh Crop - There She Goes
Paper: White; Pink; Brown; Red; Gold;  Fair Skies DP - Farmhouse Paper Company; Fiddlesticks DP - My Minds Eye
Dies: Virgil the Pig; Lorna Label Pop Up; Bath Pop StandCard ; Honey the Bear; Hoppy the Frog; Lots of Pops; Barn Pop Stand Card; Hay There Pop Stand Card; Outdoor Edges - designed by Karen Burniston for Elizabeth Craft Designs
Other: Black Ink; Hemp Cord; Elizabeth Craft Designs Transparent Double Sided Tape 64mm; Foam Tape


Wednesday, April 15, 2015

April Showers


Hi everyone,

It's challenge time again over on the Riley and Company blog. This time round our challenge is hosted by Kelly!

For our challenge this week Kelly has given us the popular rhyme  April Showers bring May Flowers! Create a card inspired by this saying it could be anything with rain, umbrella or flowers.

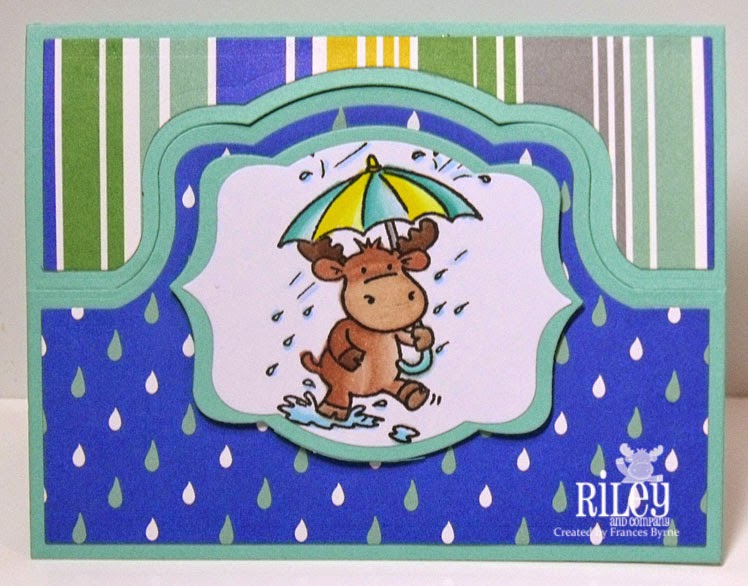
For my card this week I used Riley and Company's Rainy Day Riley to create a stand ups card. 


Here is my card at a different angle so you can see the folds in the card. I also added a sentiment that I thought would work  with this image.


Here is my card closed ready to be placed in an envelope.


Want to Play Along?

If you would like to play along with us of course we would love to have you!

To play create a card using Riley and Company images.

Once you have created your card/project, come back here and place a comment with a link to your card so we can see what you have created. If you upload your card/project to Splitcoast Stampers please use the keyword Riley0815. We can't wait to see what you create!

Don't forget to check out the Riley and Company Design Team's cards on their blogs:


Stamps: Rainy Day Riley - Riley and Company; Rainy Day Sentiments - CC Designs
Paper: White; Aqua; It's Raining It's Pouring Collection DP - Piggy Tales
Dies: Sizzix Royal Stand-Ups Card Framelits; Sizzix Royal Labels Framelits; Folded Banner - Simon Says Stamp
Other: Black Ink; Foam Tape; Copics


Tuesday, April 14, 2015

Karen Burniston April Designer Challenge Day 2


Hi everyone,

It's time for our April Karen Burniston Designer Challenge. This time round the theme for our challenge is Accordions with DT and Friends.

Now if you have seen the title of my blog post today, you are probably wondering whether you missed my Day 1 blog post???? The answer is no you didn't, so don't bother scrolling down to look for it LOL! This time round Karen has changed this up a little and each designer was able to invite a friend to play along with us for the challenge. So rather than have two cards from me, one card was created by my friend Maryann Einam who posted her Accordion card to her blog yesterday. You can find her card here.

Over the weekend at the Collins Group 2015 Spring Papercrafting Education and Tradeshow, Karen Burniston unveiled her newest designs that she will be releasing for Elizabeth Craft Designs shortly. This time round it's all about the farm, with three new fun Character dies ... Cheepers the Chicken; Virgil the Pig and Brownie the Cow; a Barn Pop Stand Card  and Hey There Pop Stand Card die sets. Plus a set of clear stamps that are themed to be used with the new dies.

Today for my Accordion card I decided to use the Rectangle Accordion die set and used the new Cheepers the Chicken set ... love these new characters. I used the grass from the Outdoor Edges set and die cut this using yellow card so it looked like hay/straw. This set also includes an egg die which  I used to add with the chicken and also decorate the frame of my Accordion Card. Around the centre page of my Accordion Card I added the Katie Stars Frame Edges to decorate.


Here is my Accordion Card when it is closed ready to be placed in an envelope. As you can see I have added the greeting "Best of Cluck" using the Elizabeth Craft Designs Alphabet 1 - Caps

I will be sharing more cards this week using Karen's new Farm themed dies, so I hope you come check them out too.

If you are looking to purchase Karen's Pop It Ups dies in Australia you can find them at Craft Giraffe (formerly Photo Continental).

Don't forget to check out the Elizabeth Craft Designs blog on Wednesday when you will be able to see what all the designers created for the challenge this month, plus an amazing card/video tutorial from Karen Burniston.


Stamps: Farm Greetings Clear Stamps - Elizabeth Craft Designs
Paper: White; Yellow; Red; Spot On DP - Graphic 45
Dies: Rectangle Accordion Card; Katie Stars Frame Edges; Cheepers the Chicken; Outdoor Edges - designed by Karen Burniston for Elizabeth Craft Designs; Alphabet 1 Caps - Elizabeth Craft Designs
Other: Black Ink; Foam Tape; Copics


Monday, April 13, 2015

Best Things in Life


Hi everyone,

It’s my turn to post a project on the Elizabeth Craft Designs blog  today. This time round I decided to use the one of the grids from Susan’s Garden Patch range of dies to create a scene you might see looking out of a window.

Here is how I created my card:

1. To create the base card -
  • Cut a piece of green card 5 7/8 inches x 11 6/8 inches. Score along the long side at 5 7/8 inches so you have a top folded card card 5 7/8 inches square.
  • Cut a piece of brown card 5 11/16 inches square.
  • Cut a piece of designer paper 5 1/2 inches square.
  • Layer the designer paper onto the brown card and then onto the top folded card. Set aside.
2. Cut a piece of cream card 3 3/8 inches x 5 inches. Apply blue ink to the inside of the Clouds Embossing Folder and place the cream card inside. Run through die cutting machine. Color the bottom part of the cream card with a green copic marker.

3. Using the CountryScapes The Woods 1 die set die cut the following:
  • 1 each of the Tree and branches from Kraft Card
  • 6 each Leaves from Green Card.
Add detail to the tree trunk and branches using a brown copic marker. Adhere the tree to the left side of the cream piece of card and then adhere the leaves all over the tree.

4. Using the CountryScapes Backyard 1 die set die cut the following:
  • 4 each Tall Grass from Green Card
  • 1 Watering Can from Orange Card.
Add shading to the grass & watering can using copic markers. 

5. Die cut the large grid from the Garden Patch – 1 1/2 inch & Mini Petals die four times from Brown Card, adhere the grids on top of each other to give height. Adhere the grid over the top of the tree scene trimming off any branches or leaves hanging over the card.

6. Attach "Window" scene to the right hand side of our base card as per photo above.

7. To finish of the front of the card adhere a green button which has been threaded with hemp cord to the top left hand corner of the card.


The Inside of the Card:

8. Cut the following card 
  •  Brown Card 5 11/16 inches square.
  • Cream Card 5 1/2 inches square.
Layer the cream card to the brown card and adhere to the inside of the card.

9. Using five of the 1 1/2 inch brown squares which are left over from die cutting the brown grids in step 5, adhere them to the inside of the card as per photo above.

10. Stamp sentiment "The Best Things in Life" in the centre of the square of cream card using black ink.

Thanks for stopping by today! I hope you enjoyed my tutorial.

Supplies: 

Elizabeth Craft Designs
1001 Garden Patch – 1 1/2 inch & Mini Petals
992 Country Scapes - The Woods 1
988 Country Scapes - Backyard 1
KB105 Clouds Embossing Folder
RS009 Best Things in Life Rubber Stamp 
 
Other
Cream Card
Brown Card
Green Card
Bo Bunny Safari Collection 6 inch Paper Pad
Green Button
Brown Hemp Cord
Glue
Copics
Black Ink

Sunday, April 12, 2015

Thank Moo!


Hi everyone,

Today I am sharing a card I created using the new Farm themed dies designed by Karen Burniston for Elizabeth Craft Designs which will be available for sale at the end of the month. 

On Friday at the Collins Group 2015 Spring Papercrafting Education and Tradeshow, Karen Burniston unveiled her newest designs that she will be releasing for Elizabeth Craft Designs. This time round it's all about the farm, with three new fun Character dies ... Cheepers the Chicken; Virgil the Pig and Brownie the Cow; a Barn Pop Stand Card  and Hey There Pop Stand Card die sets. Plus a set of clear stamps that are themed to be used with the new dies.

The first thing I did when I started playing with these new dies was to die cut each of the three new character dies (Brownie the Cow; Virgil the Pig and Cheepers the Chicken) twice and assemble them all once I had my farmyard animals to keep me company I started creating cards for them to live on :) Of course I just had to make a Barn Pop Stand Card.


For this card I used the new Barn Pop Stand Card die set to create a Pop Stand Card. I die cut the Pop Stand die to the right of the card so that I was then able to use the small pop stand die in the Hay There Pop Stand Card set to the left of the barn to add the hay stack.

I added a Cow to the bottom of each opposite corner and also added a speech bubble from the Rectangle Accordion Card die set to which I added "Thank Moo"


One of the fun things about the barn is that Karen designed this set so that you are able to open and close the barn doors ... what fun! So when you slide the barn doors open on this card it reveals the message Hay There which is from the Hay There Pop Stand Card die set.


Here is the view of my card so you can see the back of the barn. On this card I left the barn so it looked like the back, but you could also decorate it to look like the front if you wanted to.


Here is an overhead view of my card so you can see the whole card a little easier. 


And finally the front of my card, I have added one of Karen's new sentiments from her Farm Greetings Clear Stamp set.

Stamps: Farm Greetings Clear Stamps - Elizabeth Craft Designs; Cow Spots - Alota Rubber Stamps
Paper: White; Green; Red; Gold; Pink; Yellow; Black;  Cock-a-doodle-doo DP - Kaisercraft
Dies: Barn Pop Stand Card; Hey There Pop Stand Card; Brownie the Cow; Rectangle Accordion - designed by Karen Burniston for Elizabeth Craft Designs
Other: Black Ink; Yellow Ink; Red Hemp Cord; Foam Tape; Copics


Saturday, April 11, 2015

Dog or Hydrant


Hi everyone,


It’s challenge time with the “Crazies” over on the Crazy 4 Challenges blog.  Lynn Put our challenge hostess for April, brings one another fun challenge. 

Did you know that today is National Pet Day? For our challenge this week, create a card or project using some type of pet as your inspiration.


I recently purchased a Dog themed stamp set from My Favorite Things, so I decided to use those for my card this week. 


For the base of my card I have used the Katie Label Pivot Card die set designed by Karen Burniston for Elizabeth Craft Designs.

I just love the sentiment I used on this card.


Here is the rear view of my card.

Don't forget to check out the rest of the “Crazies” cards over on the Crazy 4 Challenges blog and also their individual blogs for more details.

Stamps: You Make My Tail Wag - MFT Stamps
Paper: White; Yellow; Red; Dog Stripes DP - Karen Foster Designs
Dies: Katie Label Pivot Card - designed by Karen Burniston for Elizabeth Craft Designs; MFT Die-namics Pet Accents
Other: Black Ink; Foam Tape; Chameleon Markers