Showing posts with label Boxes. Show all posts

Tuesday, December 12, 2023

Karen Burniston - KB Riley LLC December 2023 Release Blog Hop


Hi Crafty Friends, 

Welcome to our Karen Burniston Products - KB Riley LLC December Release Blog Hop. The Design Team have come together with Karen today for a fun blog hop to celebrate the release of 7 new dies. Sneak peeks of the new release started last week, and the dies are available to order NOW!


This release includes:

  • 2 new Add-ons Die Sets
  • 1 new Pop-up Die Sets
  • 1 new Tag Die Set
  • 2 new Stand Alone 3D Die Sets
  • 1 new Sentiment Shadow Die Set


Dies are available to order now on the website. 


GIVEAWAY:


To celebrate the release Karen Burniston and each of the Karen Burniston - KB Riley LLC Design Team members will be giving away a $25 Gift Certificate to some lucky person who comments on our blog posts, so make sure you join the hop and comment on everyone's blog post. Winners will be randomly chosen from ALL of the blog hop comments received on our blog posts by Monday,18th December 2023. Lots of chances to win some goodies, so just leave a comment on this post or any other blog hop posts to enter! Don't forget to leave some way for us to contact you, in case you are a lucky winner!


Today I am sharing a gift set which includes a Slimline Pop-up card, a mini gift bag and a Candy Heart Box. First up I am sharing my slimline card.

The photo above shows the inside of the card. For this I have used the new Raising Platform Pop-up die set. I can see me having a lot of fun with this die set in the future, and the great thing is that it fits into a Slimline card that is at least 3 1/2 inches wide.

I used the Small Script - Christmas die set to add the Christmas sentiment to the pop-up label. I added another of the large labels in white in the lower right hand corner of the card as a place to write a hand written greeting. I added candy canes which are from the Christmas Borders 2 die set. I used the Candy Cane Border and cut them apart.


I kept the front of my card simple. The circles on the front are from the Mini Gift Bag die set and I added more of the candy canes to the circles.


As mentioned above I also made matching Candy Box and Mini Gift Bag.


For the Gift Box, I used the new Candy Heart Gift Box, with comes with Hearts and Conversation Hearts ... perfect for Valentine's Day and anything love related. As Christmas is only a few week's away I decided to use it to make a Christmas themed gift Box. As you can see, I added another Candy Cane to the centre of the square window opening.


And finally a coordinating gift bag using the new Mini Gift Bag die set. This is perfect for tiny treats or gifts or even a gift card. I added a Christmas sentiment to the tiny gift tag which is also included in the set.

The circle in the centre of the bag, is also from the die set and I added another of the candy canes.

Well that's about it from me today, thank you for dropping by. To continue on the blog hop, click on the next person on the list, which is Jennifer Webster 


Here is the complete blog hop list in case you need it.


Blog Hop List:


Karen Burniston   

Lois Bak 

Sue Small-Kreider 

Frances Byrne  <you are here>

Jennifer Webster 

Fran Sabad 

Suzanne Smit 

Nicky Foden

Sandy Diller


Wednesday, December 1, 2021

Snowshoes Gift Set

Hi Crafty Friends,

Today I am sharing a gift set I created as a Christmas gift using some of the new stamps, dies and papers from Divinity Designs November/December release. Last month I shared a gift set that consisted of a card and Nugget box which was decorated and suitable for a female. Today I have a card and Nugget box which I decorated with a more male theme.


First up the card, this time around I decided to create a Step Panel card using Divinity Designs Pop Up Card with Layers die set.  I die cut the main die from red cardstock and used patterned paper from the Plethora of Plaids Slimline paper pack for the layers.


To decorate my card I used the snowshoes from the Snowshoe die set which I decorated using the Pine Branches from the Pinecones and Pine Branches die set. I also added the "Merry Christmas" sentiment using the Merry Christmas with Layers 2 die set.


I added a panel to the back of the card, using the layering dies included in the Pop Up Card with Layers die set. I added a strip of plaid patterned paper to the left side of the card, and then added a sentiment to the white area.

The sentiment is from the Silent Night stamp set.


The card folds flat so it can be placed in an envelope for mailing.


I used the X-Large Nugget Box die set to create the Nugget Box which I then decorated using the same patterned papers and dies that I used for the card.


One last photo of the Nugget Box I created. The die set comes with dies to die cut wrappers to decorate the nuggets.


Monday, November 1, 2021

Divinity Designs New Release


Hi Crafty Friends,

It's beginning to look like Christmas with Divinity Designs November/December release ... you guessed it, it's a Christmas theme. This month Divinity Designs is releasing 1 stamp set; 16 die sets; 1 paper/die duos set; 4 Paper Pads and 1 embossing folder. The Design Team will be sharing ideas using products from this release over November and December.

Today I am sharing a gift set of a Slimline card and Nugget Box I created using some of the products from this release.


First up the Slimline card I created. For the slimline portion of the card I used the Slimline Card Base die set which I die cut from white cardstock and the Slimline Rectangles die set. I die cut the rectangle from red cardstock and then used the Lattice Embossing Folder to add texture to the panel.

I then used the Nugget Box Snowflake Background which is designed to work with the new X-Large Nugget Box die set. The good news is it is a perfect size for a slimline card. The designer paper underneath the background was die cut using the rectangle die included in the X-Large Nugget Box die set and layered together. I centred this panel onto my slimline card.

I added the Merry Christmas & Layers 2 die set to the centre of the card.

On either side of the Christmas sentiment I added gnomes using the new Merry Gnomes Paper/Die Duos set ... this is full of fun pre-colored Christmas gnomes which are perfect for those quick Christmas cards. I layered the gnomes to my card using the Circles and Scalloped Circles die sets.


Of course I always like to decorate the inside of my card when I am creating them, it saves time later. For this card, I added another strip of the beautiful patterned papers I used on the  front of  my card.

I added another of the gnomes and two candy canes which are also included in the Merry Gnomes Paper/Die Duos set.

To finish off the inside of the card I added a sentiment which is from the Candy Cane Wishes stamp set.


My Nugget Box was created using the X-Large Nugget Box die set, this set has dies to create the lid and bottom sections of the box, and rectangle die for layering on top of the box lid and wrappers for the Nuggets.  


The completed box measures approximately 9 inches x 2 3/4 inches x 1 inch in height, and while it was designed for nuggets, I am sure there are other things that would be perfect to be added inside the box.


Thursday, November 26, 2020

Santa Boxes


Hi Crafty Friends,


t's challenge time with my friends over on the CCEE Stampers challenge blog.  Kelly Santi our challenge hostess for the month, finishes off the month with one last challenge.

Today is Tie One On Day.  Create a card using something that’s tied (apron strings, shoelaces, bow tie, ribbons in the hair, etc.   Alternate is to use ribbon/twine/etc anywhere on your card – or both combined.


It is a month until Christmas ... yikes! As you can see by my photo above, I didn't create a card for today's challenge, instead I created a couple of cute little Santa Boxes. These are both tied at the top with ribbon, so I figured this was suitable for today's challenge.  I created the boxes using a new die from i-Crafter called Santa Box. The  assembled box size is 3” x 3 ⅝” x 1 ½”

To assemble the box, it's just a matter of scoring three lines on each side. Gluing the bottom together, fold the top score lines and tying some ribbon through the holes in the top of the box to keep shut.


This die set comes with the die to create the basic box and then the pieces to decorate the box with Santa's Face. You could also use this box for other occasions, by decorating with other dies you may already have in your stash.

These are fairly quick to put together. I die cut the box base twice to create the basic box, and also once using patterned paper, which I cut to cover just the bottom portion of the front of the box. You could leave this plain red, but I like the look of the pattern paper for a little more interest and if you were making lots of these it would help personalise the box too.


I die cut the the other dies in various colors to create Santa's face and adhered them to the box.

Don't forget to check out the CCEE Stampers blog (goes live 12 AM EST) to see the rest of the creations the CCEE Stampers created this week. You can also see more details of their creations on their individual blogs:


Thursday, March 12, 2020

Baby Boy Treat Box


Hi Crafty Friends,

It's challenge time with my friends over on the CCEE Stampers challenge blog. Maryann Einam our challenge hostess for the month, continues to issue the challenges.

For our challenge this week Maryann has requested that we .... Create a bag, box or container that can be used to contain a party favour.


For today's challenge I decided to pull out my Tonic Studio's Deco-Edged Square Cracker Box die set. This die set allows you to create Christmas Crackers, but with a little trimming before assembling you can also make some fun boxes with it.

When I was looking through the die set at the decorative overlay dies, I saw the one that had moons & stars on it, so decided to use this one to make a box which could be used at a baby shower.


After decorating the treat box, I then added the ribbon and the baby boy tag. The tag was created by using a Frantic Stamper Square Vignette Baby Insert die, I then stamped the word "Boy" underneath the baby word.

Don't forget to check out the CCEE Stampers blog (goes live 12 AM EST) to see the rest of the creations the CCEE Stampers created this week. You can also see more details of their creations on their individual blogs:

Supplies:
For your shopping convenience, all products are linked below. Compensated affiliate links are used where possible with no extra cost to you. This helps me to continue to share all the projects I include on my blog. For the benefit of my Australia readers, I have started to include some links to Australian stores when available. Please note I only use and share products I love.


Monday, November 25, 2019

Christmas Milk Cartons


Hi Crafty Friends,

Today I am sharing two more boxes that I have been creating to use at a Christmas Party for a club I attend.

This time around I used the new Divinity Designs Milk Carton With Layers die set.


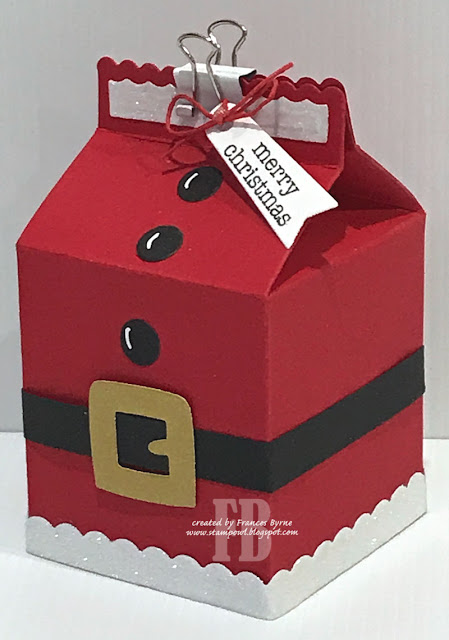
For my first Milk Carton, I created a "Santa's Suit". I die cut the milk carton from red cardstock and didn't add the layers which come with the die set.

The buttons and belt are from an older Taylored Expressions Sack It To You plus BONUS Santa die set. I added the glittered scalloped border around the base of the milk carton which is from an older MFT Stamps die.


I used the layer die from the milk carton die set for the white glittered panel at the top of the box.

I added a Christmas sentiment to the tag which I tied to the clip which is holding the box closed.


For my second Milk Carton I die cut the milk carton using green cardstock and this  time used patterned paper for all the layers.

I added one of the images from MFT Stamps Christmas sELFies stamp set.


I again added a Christmas sentiment and tag to the clip that holds the milk carton closed.

Supplies:
For your shopping convenience, all products are linked below. Compensated affiliate links are used where possible with no extra cost to you. This helps me to continue to share all the projects I include on my blog. For the benefit of my Australia readers, I have started to include some links to Australian stores when available. Please note I only use and share products I love.

Sack It To You Plus BONUS Santa - Taylored Expressions - discontinued
Blue Prints 1 Die-namics (Tags) - MFT Stamps - discontinued
Mini Scallop Border - MFT Stamps - discontinued


Wednesday, November 20, 2019

Red Christmas House Box


Hi Crafty Friends,

Today I am sharing a Christmas project I created recently. I am helping out to organise our Christmas party for a club I belong to, where we will be doing a Secret Santa present. Sometimes people forget to bring along a present but they still want to participate, so the club normally decorates a few envelopes for them to put in money to the value everyone was supposed to spend. Well that is my job this year, after thinking about it I thought envelopes were pretty boring, so decided to create a few boxes ... this way when the recipient receives their gift they are getting something a little nicer than an envelope.


For my box, I used Elizabeth Craft Designs Holiday House Box. I die cut the house from red cardstock and then splatter white paint over the box. I also die cut the roof sections from white cardstock and then used the roof from Honey Bee Stamps House Builder - Halloween Add On to add texture to the roof.


I tied a red ribbon and a gold cord to the handle, so the box can be hung from a tree. I added the Merry Christmas sentiment which uses Taylored Expressions Mini Strips - Holiday stamp and coordinating die set.


I added vellum behind the windows. I decorated the house using the fence and tree from the Village Edges die set.

Supplies:
For your shopping convenience, all products are linked below. Compensated affiliate links are used where possible with no extra cost to you. This helps me to continue to share all the projects I include on my blog. For the benefit of my Australia readers, I have started to include some links to Australian stores when available. Please note I only use and share products I love.


Sunday, November 17, 2019

Cracker Boxes


Hi Crafty Friends,

Today I have two more boxes that I have been making for my clubs Christmas party, we are doing a Secret Santa and in past years those who forget to bring a gift but still want to participate just put money in an envelope. I thought an envelope looked a little boring, so I decided to make up a few boxes instead .... after all I have enough dies to make them, so why not!

A few months ago I purchased Tonic Studios new Deco-Edged Square Christmas Cracker die set. I make my own Christmas Crackers every year and even though I have their previous cracker die sets, I liked the look of this one so decided I needed to add it to my collection :).


For my first box, I cut one end off the cracker die cut and folded that up to make a square base. I then decorated the box using gold and red cardstock.


I added gold ribbon to the top of the box. 

I used Taylored Expressions Simple Strips - Christmas stamp set with the coordinating dies to make the sentiment which I adhered to the front of the box.


For my second box, I created a cracker as the die set is intended. I die cut the cracker base from Silver cardstock and this time just used the outline dies included in the set to die cut the layers from patterned paper.


I used silver ribbon to tie bows at each end of the boxes. The sentiment is another sentiment created by the Taylored Expressions Simple Sentiments - Christmas stamp set and coordinating dies. 


Well that's 4 boxes made now ... I need to make 6 in total, so I am getting there .... yay!!!!

Supplies:
For your shopping convenience, all products are linked below. Compensated affiliate links are used where possible with no extra cost to you. This helps me to continue to share all the projects I include on my blog. For the benefit of my Australia readers, I have started to include some links to Australian stores when available. Please note I only use and share products I love.