Showing posts with label Anything but a Card. Show all posts

Wednesday, September 2, 2026

Hope This Raises Your Spirits


Hi Crafty Friends,

Today I am sharing a Halloween themed Money Card, that I created recently to give to one of my grandchildren for Halloween in October. 

This is another of the projects I created using products from Spellbinders August 2026 All Clubs Crate which had a Halloween theme to the products.

If nothing else I know the grandkids will love this, as there is money rolled up in the clear piece at the bottom of the card!

For this money card, I used the Small Die of the Month ... Boo Crew Lab and the 3D Embossing Folder ... Spooky Web.

I also used a sentiment from the Clear Stamp/Die of the Month ... Trick or Snark.


To create the Money Card itself, I used another older MFT Stamps die set called Money Card.

I decorated the back of my money card using s few more die cut images and a sentiment. 

The money can be retrieved from the card by pulling the part of the note which is peeking out of the slit on the back of the card.


Friday, August 28, 2026

Trick or Treat


Hi Crafty Friends,

As I have two grandchildren, I need two treat holders to give to them for Halloween. This is the second one I made using the Stitching Die of the Month from Spellbinders All Crates Club for August 2026. If you missed seeing the other one I made scroll down a few days and you will find it.

Although this is a stitching die set, I opted not to do the stitching, but I still used the insert dies that create the holes as I thought that added to the "aged" look a mummy would have. This die set is called Frank-N-Stitch.


I also used the 3D Embossing Folder ... Spooky Web for the black back panel. This embossing folder has two different designs on the one folder and I used the stripes for this project.

To create the treat bag itself, I again pulled out the Divinity Designs Card Caddy & Gift Bag die set, omitting the handle included in the set.


Monday, August 24, 2026

EEK!

Hi Crafty Friends,

 The Spellbinders All Clubs Crate for August 2026 was Halloween themed. Now I don't normally do a lot of Halloween stuff, as it isn't all that big a deal here in Australia where I live. However this club kit looked like lots of fun so I decided to get it anyway and so I got busy making some fun projects for my grandkids using the sets included in the kit. Sometimes it's fun to do something you don't normally get to play with.

I only ended up making a few cards as I don't need a lot of those. Instead I went with treat holders, money cards etc.

For my first project I created a treat holder, I will fill it up with some fun goodies to give to one of my grandchildren. 

To decorate the bag, I used the Scaredy Cat die set which was one of the bonus die sets from the kit.


To create the bag, I used Divinity Designs Card Caddy & Gift Bag die set die cutting it from purple cardstock. The die set does come with a handle, but I decided not to use it for these bags.

I added clouds to the front of the bag using a cloud stencil and black ink. I also added a circle for the moon.


Tuesday, December 12, 2023

Karen Burniston - KB Riley LLC December 2023 Release Blog Hop


Hi Crafty Friends, 

Welcome to our Karen Burniston Products - KB Riley LLC December Release Blog Hop. The Design Team have come together with Karen today for a fun blog hop to celebrate the release of 7 new dies. Sneak peeks of the new release started last week, and the dies are available to order NOW!


This release includes:

  • 2 new Add-ons Die Sets
  • 1 new Pop-up Die Sets
  • 1 new Tag Die Set
  • 2 new Stand Alone 3D Die Sets
  • 1 new Sentiment Shadow Die Set


Dies are available to order now on the website. 


GIVEAWAY:


To celebrate the release Karen Burniston and each of the Karen Burniston - KB Riley LLC Design Team members will be giving away a $25 Gift Certificate to some lucky person who comments on our blog posts, so make sure you join the hop and comment on everyone's blog post. Winners will be randomly chosen from ALL of the blog hop comments received on our blog posts by Monday,18th December 2023. Lots of chances to win some goodies, so just leave a comment on this post or any other blog hop posts to enter! Don't forget to leave some way for us to contact you, in case you are a lucky winner!


Today I am sharing a gift set which includes a Slimline Pop-up card, a mini gift bag and a Candy Heart Box. First up I am sharing my slimline card.

The photo above shows the inside of the card. For this I have used the new Raising Platform Pop-up die set. I can see me having a lot of fun with this die set in the future, and the great thing is that it fits into a Slimline card that is at least 3 1/2 inches wide.

I used the Small Script - Christmas die set to add the Christmas sentiment to the pop-up label. I added another of the large labels in white in the lower right hand corner of the card as a place to write a hand written greeting. I added candy canes which are from the Christmas Borders 2 die set. I used the Candy Cane Border and cut them apart.


I kept the front of my card simple. The circles on the front are from the Mini Gift Bag die set and I added more of the candy canes to the circles.


As mentioned above I also made matching Candy Box and Mini Gift Bag.


For the Gift Box, I used the new Candy Heart Gift Box, with comes with Hearts and Conversation Hearts ... perfect for Valentine's Day and anything love related. As Christmas is only a few week's away I decided to use it to make a Christmas themed gift Box. As you can see, I added another Candy Cane to the centre of the square window opening.


And finally a coordinating gift bag using the new Mini Gift Bag die set. This is perfect for tiny treats or gifts or even a gift card. I added a Christmas sentiment to the tiny gift tag which is also included in the set.

The circle in the centre of the bag, is also from the die set and I added another of the candy canes.

Well that's about it from me today, thank you for dropping by. To continue on the blog hop, click on the next person on the list, which is Jennifer Webster 


Here is the complete blog hop list in case you need it.


Blog Hop List:


Karen Burniston   

Lois Bak 

Sue Small-Kreider 

Frances Byrne  <you are here>

Jennifer Webster 

Fran Sabad 

Suzanne Smit 

Nicky Foden

Sandy Diller


Monday, November 20, 2023

Hello Gorgeous


Hi Crafty Friends,

Today I am sharing a birthday card I created for my granddaughter who celebrated her 11th birthday earlier this month. I would have been in big trouble, if I hadn't made this particular style of card for her as I knew she had been wanting one and her big brother got one earlier in the year for his birthday.


For the card I created a 3D Display Card using Made To Surprise by Sam Calcott's 3D Display Card and Stand die and Circular Frame Floral die sets.


As you can tell by the photo above, I added lights to the inner hollow portion of the card.


To decorate the card, I used the ephemera from Made To Surprise's Glitz and Glam Ephemera set. My granddaughter loves make up, so she will love this.


The "birthday love" sentiment is from Text{ures} Wildflower Collection.

I added the "11th" using Made To Surprise's Large Modern Numbers die set.


On the back of my card, I added a birthday sentiment from Made To Surprise's Showstoppers Sentiments stamp set. I also added a few more of the make up themed ephemera.

I added a blank white panel to the stand of my card, so I had a place to write a personal greeting.


After going to all that trouble making the 3D Display Card, I wanted to make something to carry it in and that would protect it. When Sam Calcott released the 3D Display and Stand Collection, she shared a tutorial on how to make an Envelope Gift Bag to fit the 3D Display Card in, so I decided to make one of those. I kept mine fairly simple, as a 13 year old boy isn't going to care too much about a gift bag. You can see Sam's video here


I used one of the toppers from the Glitz and Glam Paper Pad to add to the centre of the front of the bag. I also added the scalloped circle using the Circular Frame Floral die set.


Other Supplies:
  • Wake Up And Make Up Stamp Set - Simon Says Stamp


Monday, October 16, 2023

Bat Halloween Gift Bag


Hi Crafty Friends,

Last week I shared a Witches Cat Halloween Gift Bag that I created for my granddaughter for Halloween. Today I am sharing a Bat version which I have made for my grandson.


Here is a quick video to see my card in action.


To decorate my bag I used papers from Made To Surprise by Sam Calcott's Spooktacular Collection. The paper pad included in this collection includes six different Halloween themed puppets. 


Here is another view of my gift bag, the sentiment under the cat says "Spooky Wishes".


Monday, October 9, 2023

Witches Cat Halloween Gift Bag


Hi Crafty Friends,

Today I am sharing an Halloween themed interactive gift bag that I have made for my granddaughter for Halloween. 


Here is a quick video to see my card in action.


To decorate my bag I used papers from Made To Surprise by Sam Calcott's Spooktacular Collection. The paper pad included in this collection includes six different Halloween themed puppets. 

I don't normally make Halloween gifts for the grandkids ... but these were just too cute that I had to play. 


Here is another view of my gift bag, the sentiment under the cat says "Happy Halloween".


Monday, May 29, 2023

Time To Celebrate


 Hi Crafty Friends,

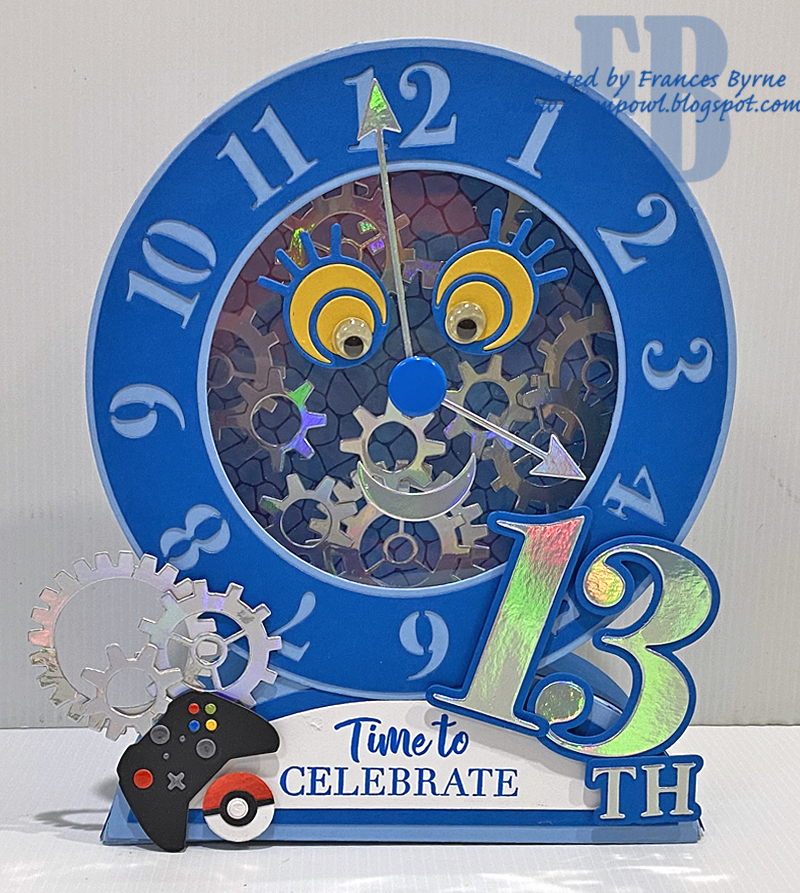
My grandson turned 13 this month! Wow where has the time gone, it seems like only a few years ago that I held my first grandchild in my arms not long after he was born! Thirteen of course means that he is now a teenager, so I wanted something special to celebrate the occasion. 

As both my grandchildren liked the 3D Display Card I made earlier in the year, I decided I would make him one of those. I also made a special Envelope Gift Bag which was designed to fit the 3D Display Card. 


For this card I used the Made to Surprise 3D Display Card & Stand die set along with the Circular Frame Clock die set to make this fun clock card. I figured a clock went well with turning 13!


As you can tell by the photo above, I added lights to the inner hollow portion of the card along with plenty of cogs which are from the Time Clock Additions Stamp/Die set. I die cut all the cogs from silver holographic cardstock and added them inside the clock, behind the face of the clock. 


As it was a card for a teenager, I wanted to add a few things that I know my grandson would like. So I added a small game controller using a die set from MFT Stamps and a Pokemon thingy that I found already made up when I went to get my game controller dies. I also added a few more silver cogs to balance off that side of the card a little.


On the right hand side of the card I added the "13th" using the Large Modern Numbers die set also from Made to Surprise.

I added the fun "face" to the Clock Face using dies included in the Time Clock Additions Stamp/Die set. I added googly eyes to the eyes, I would have like larger ones but that is all I had on hand, so they had to do. I also found a large blue brad which worked perfectly to secure the hands of the clock.

The sentiment is also from the stamp set included in the Time Clock Additions Stamp/Die set.


On the back of my card, I computer generate the blurb which tells you how many years, months, minutes, weeks etc 13 years is.

I added a blank white panel to the stand of my card, so I had a place to write a personal greeting.


After going to all that trouble making the 3D Display Card, I wanted to make something to carry it in and that would protect it. When Sam Calcott released the 3D Display and Stand Collection, she shared a tutorial on how to make an Envelope Gift Bag to fit the 3D Display Card in, so I decided to make one of those. I kept mine fairly simple, as a 13 year old boy isn't going to care too much about a gift bag. You can see Sam's video here


As you can see I added the number "13" to the front of the bag using the Large Modern Numbers die set. I also added a strip of card along the bottom with the sentiment "Woohoo!"