Showing posts with label Easel Card. Show all posts

Wednesday, August 6, 2025

Snowman Easel


Hi Crafty Friends,

Today I am sharing a Christmas themed Easel Card I created while I was making Christmas in July cards last month.  Once  I got into that Christmas card making mode, it was hard to get out of it and as I still have cards to get made for Christmas this year I will pop a few on here each month.

For this card I used the North Pole Sentiments die set which included the snowmen, and the pole and sentiments on the pole ... it's such a fun set. 

I used Spellbinders Snowfall Shimmer Betterpress Plate to white glimmer foil the snowflake background onto a panel of blue cardstock. I am loving this plate!


I used Trinty Stamps Arch- Shaped Card die set to create the Arch Shaped Easel card.

I added white glitter cardstock to the base and also the main panel of the card for snow.


Here is a look at my card, when it is folded. It will fit into a standard A2 Envelope.


Monday, June 2, 2025

Unfrogettable


Hi Crafty Friends,

For my card today I am sharing a fun frog themed cards using dies and stamps from Spellbinders Jump for Joy Collection. I had lots of fun creating all the mushrooms/toadstools and the frogs.


A few weeks ago when Sam Calcott from Made To Surprise shared her May release products, she released her Winged Pop Up Card die set from the Showstoppers 3 collection. She also shared a number of new ways to use this die ... I love when you can use a die more then one way, so of course I got mine out and die cut it a few times from white cardstock and made up some of the different styles while they were fresh in my mind. For this one I added the extra panel at the bottom to make it a stepper easel card.


Here is a look at the inside and the bottom panel. While I did get the Spellbinders sentiment set that goes with the frog die set, I ended up using the Waffle Flower Crafts stamp set. I preferred the size and wording of these for this particular card.


Monday, May 26, 2025

It's Beginning To Look A Lot Like


Hi Crafty Friends,

Yeah ok … so it’s not beginning to look like Christmas just yet! It’s still seven months away, we can all keep breathing haha. 

I finally got my hands on a few Christmas themed die sets I have been after from last year, so I decided to pull one out to play. This one is the Festive Friends die set which was Spellbinders October 2024 Small Die of the month, I recently came on sale on the Spellbinders web site, so I grabbed one.

For my card I created a Centre Step Card which I turned into a Centre Step Easel Card, I used an old Cheery Lynn Designs die set, which has long been retired. I have linked to a couple of others, the Divinity Designs one is exactly the same, but I like the insert for the inside on the one I used. 


To add the panel to turn my card into an Easel Card, I cut a piece of Cardstock that was 5 1/2 inches x 6 inches and then scored along the 6 inch side at 1/2 inch, I then used the 1/2 inch tab to attach to the back of the card.

I went a little crazy with the penguins, making seven all up, I assembled two upside down, so that they were facing the opposite way, so they weren’t all the same.

I used glitter cardstock to create the snowy hill at the bottom of the card, the base is also glitter.

The sentiment is one from Mama Elephant, which I have used for the stopper of the card. I layered the sentiment using Spellbinders Essential Stylish Ovals.


For the polar bears jumper, after die cutting the piece, I used an embossing folder to add texture, rubbing white ink over the raised areas.

The card folds flat and will fit in a 6 inch square envelope.


Here is a look at the inside of my card and the easel base, 

The Merriest Christmas is a Spellbinders Betterpress plate which I stamped using black ink. 


Friday, April 25, 2025

A Note Just For You


Hi Crafty Friends, 

Today I am sharing an Easel card I created using some of the club kits from Spellbinders April Club Kits. 

The snail, letterbox & tulips are from the Small Die of the month, Snail Mail Post. On the blue background I used the Embossing Folder of the Month, Perforated Post Edges.

I added to Betterpress sentiments to the card which is from the Post Edges Expressions the Betterpress kit of the month. 

The “hello” sentiment is from the large die of the month. 


Friday, February 7, 2025

An Adventure Was Going to Happen


Hi Crafty Friends,

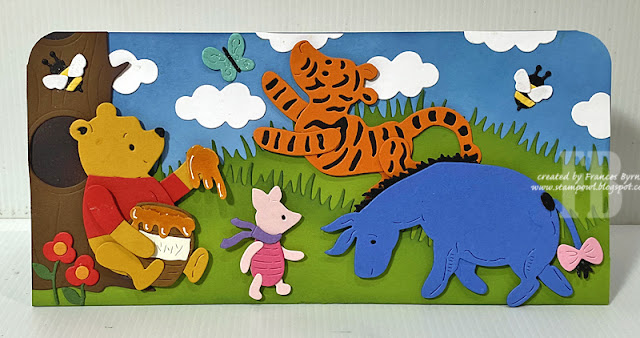
Thanks for stopping by my blog, today I am sharing a Pooh themed Slimline Easel Card I created recently.

For my card, I used the dies from the new Spellbinders Classic Pooh Collection.I saw these were going to be released in January when I was checking out the "Coming Soon" section on the Spellbinders website before Christmas  and have been impatiently waiting all year (yeah ok a month) for them to make it downunder.

My Slimline Easel Card measures 8 1/2 inches x 4 inches. I wanted the extra height so I could include all the characters from the various sets.


To create the card base, I used Lawn Fawns Lawn Fawn's Grassy Hillside Borders die set to add all the grassy areas on both the front and inside of the card.

I also wanted Pooh to be sitting against a tree, so I pulled out a tree die from Hello Bluebird to use for that. 


All the other die cut elements used to create this scene are included in the three "Pooh" themed die sets from Spellbinders. I spent a day assembling a heap of characters and so far have been able to make two cards from what I created and have enough left over for at least 2 or 3 more cards, which I will share as I make them.


And finally a look at the bottom panel when it is opened up. I added the honey pots and flowers to each side of the card and then a sentiment for a stopper, which will hold the front of the card up. The sentiment is from the Silly Old Bear Betterpress Plate set.


Friday, February 23, 2024

Easter Bunny


Hi Crafty Friends,

Today I am sharing an Easter themed Kinetic Easel Block card I created recently to give to one of my grandchildren for Easter. 

This card using the Bouncing Bunny & It's Only More Puppets 5 x 7" Mechanism die sets from Made To Surprise by Sam Calcott. I used Sam's tutorial on creating an Easel Block card which she created when this collection was released last year, but I did give my card a few tweaks to make it a little different. You can find Sam Calcott's Easel Block Card Tutorial here.

Here is a quick video to see my card in action and how it folds.


For my Easel Block card, I did use the same bunny and papers which Sam used on hers, mainly these papers suited the style of card the best in my opinion. I did how change up the theme, making mine an Easter card.

I added Easter eggs to the card using Lawn Fawn's Mini Easter Eggs die set.


For the sentiment I used Karen Burniston's new Happy Easter die set which I adhered to the centre of the block portion of the Easel Block Card.

I also added an Easter Egg Basket to one of the bunny's arm which is from Karen Burniston's new Animal Add-ons 5 die set.


Here is a side view of my card, to see the look of the card a little easier.


On the inside base of the card, I added a large Easter Egg die cut and an Easter sentiment. Both the sentiment and large egg are from Divinity Designs, links of which are in the supply list below.

You can also see on this photo how two eggs at the back of the "block" are adhered so they don't interfere with the workings of the bunny.


I added a panel at the back inner portion of the card. Here I added two more sentiments which are also included in the Divinity Designs stamp set. I also added four more of the mini Easter Eggs. 


Here is a look at my card when it is folded, ready to be placed in an envelope. You can see how the card folds to fit an envelope, by watching the video at the top of the post. Because of the pull tab at the top of the card the card measures 7 1/2 inches x 5 inches.


Wednesday, October 4, 2023

Happy Birthday Hugs


Hi Crafty Friends,

Thanks for stopping by my blog, today I am sharing a Slimline Easel Card I created recently.

For my card, I used the Stampendous Bear Hugs stamp/die set which is part of the Hugs Collection that Spellbinders has been releasing. There were three different animals in the first collection ... bear, cat and dog. There is a Christmas collection also available now which includes Santa, Snowman & Gnome sets.


I used Lawn Fawn's Grassy Hillside Borders die set to create the grass areas of my card. Both bears and honey pot are included in the die set, and the bees are in the coordinating stamp set.

For the sentiment I used Alex Siberia's "It's Your Birthday" foil plate which I foiled using black foil.


Here is a look at my card, when it is closed ready to be placed in an envelope.


And finally a look at the bottom panel when it is opened up. I added the two bears on either side of the sentiment which acts as the stopper. The sentiment is from "Hugs Sentiments" stamp set.


Thursday, September 21, 2023

All Aboard


Hi Crafty Friends,

Today I am sharing a Train Easel Card that I created for my husband's birthday. It was such fun to make!

This card uses Anna Griffin's Antique Train Slimline Easel die set. I had been looking for this die set for ages, and unfortunately Anna Griffin doesn't sell to international customers and Scrapbook dot com didn't stock it either. Finally I checked eBay and found a seller there who was selling it new, so I took the opportunity to get it while I could.

I die cut the train from blue pearlescent cardstock and also gold and paper pieced the gold into the holes in the blue train. I die cut the easel portion from a smoky blue cardstock and then covered the base with patterned paper.


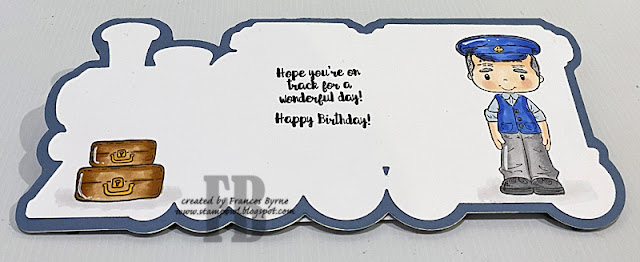
I used two stamps from Kanban's Patchwork Pals Grandpa's Trains stamp set, to create the train driver and the boy's face in the carriage.

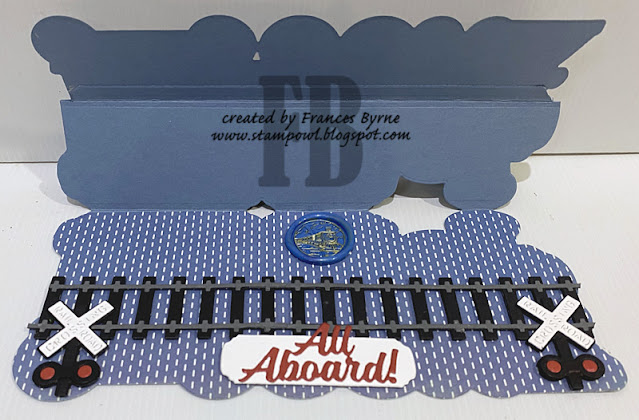
For the stopper to keep the easel portion of this card upright, I used a Train Track Border Die set from Taylored Expressions.

The train signals and "All Aboard" sentiment, are all from Karen Burniston's Train Elements die set.


I had recently purchased a train wax seal stamp, which I also wanted to use. As it didn't look right on the front of the card, I decided to add it to the base. I can't be seen unless you open the card, but that is ok.


Here is a close up of the wax seal. I'll also add a wax seal to the envelope.


I die cut the train shadow die from white cardstock, so I could add to the back of the card. This gave me a place to stamp a sentiment and also write a personal greeting. I also added two images from the Kanban stamp set that I used on the front of the card.


Other Supplies:

  • Train Track Border Die Set - Taylored Expressions (discontinued)
  • Patchwork Pals Grandpa's Train - Kanban (discontinued)