Showing posts with label Silhouette. Show all posts

Friday, February 21, 2025

Time For A Little Something


Hi Crafty friends,

Thanks for stopping by my blog! Today I am sharing a Mini Slimline card featuring more from Spellbinders Classic Pooh Collection.

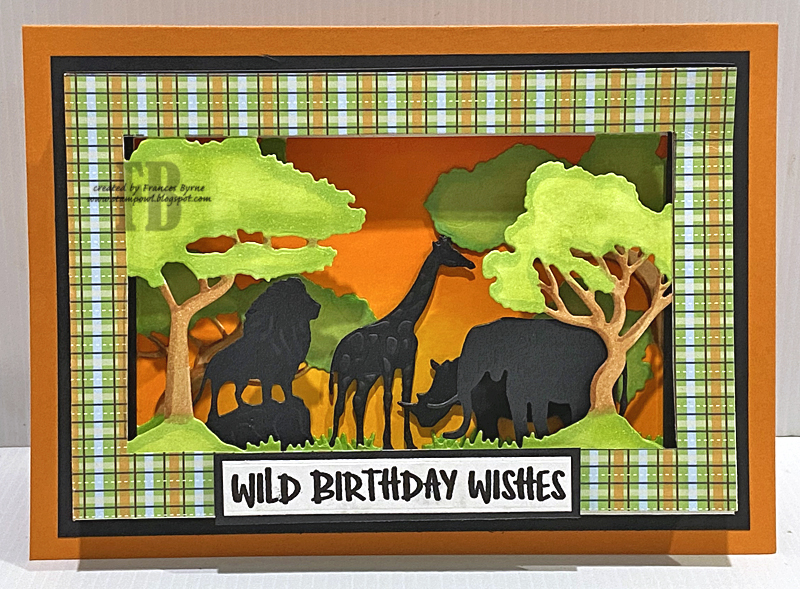
I used Spellbinders Pooh and Friends Silhouette die for the main image of my card. I die cut it twice from black cardstock layering it for strength and adhered it with foam tape to a rectangle panel of slimline pattern paper I found in my stash of Whimsy Stamps Slimline paper pads. 

To create the Mini Slimline card, I pulled out my Divinity Designs Mini Slimline Card dies ... the Mini Slimline Card Base Die; Mini Slimline Rectangle Dies and Mini Slimline Layering Rectangles Die sets. These take all the hard work of measuring and cutting the various layers and card base.

To finish off the front of the card, I added the sentiment which is from the Spellbinders Silly Old Bear Sentiments Betterpress Plate set.


For the inside of my card, I used the Mini Slimline dies to create my layers. I also die cut the Silhouette image again. from black cardstock and cut off Pooh, Piglet and Tigger and added them to the lower left hand corner of my card.

I added a sentiment to the panel which is from Made To Surprise by Sam Calcott's Feeling Happy Stamp Set.


Thursday, December 29, 2022

Silhouette Ornament


Hi Crafty Friends,

Today I am sharing my last two Christmas cards I created recently for 2022. I wanted to use   the stencils included in the Papercraft Society Box 37 designed by Made To Surprise by Sam Calcott.


For my first card, I used the large ornament stencil included in the kit to created the ornament. After blending on the ink and stamping the images I then used a circle die to die cut the ornament. The images used on this ornament are from an older Stampers Anonymous / Tim Holtz STAMPteber 2017 stamp set. I die cut the ornament topper also included in the kit and added it to the top of my circle ornament.

For the background of my card, I used Spellbinders Argyle Embossing Folder, embossing a panel of white cardstock. This was layered onto blue and then a side folding white slimline card.

I used Memory Box's Pine Needle Border to add the border along the top of the card. I then added the ornament just below centre.

At the bottom of the ornament, I added a sentiment using Waffle Flower Crafts Merry Christmas Duo set.

Finally I added a strip of gold cardstock and a bow to join the ornament to the pine needle border.


For the inside of the card, I stamped a few more of the images that I used on the front of my card.

For the sentiment, I used another older Stampers Anonymous / Tim Holtz stamp set called Handwritten Holidays 2.


For my second card, I used the light bulb stencil included in the kit. I used Catherine Pooler inks to colour the light bulbs, masking the various areas as I went so that I wouldn't get too much colour in the wrong places. 

My card is a 5 x 7 top folding card. After I had added the colour to the light bulbs, I carefully blended red ink around the edge of the card before layering onto my card base.

I added the "Merry Christmas" sentiment to the centre of the card, white embossing the sentiment onto red cardstock this time.

To finish off the card I added glossy accents to each of the light bulbs. 

Other Supplies:
Pine Needle Border Die - Memory Box (retired)
STAMPtember 2017 Stamp set - Stampers Anonymous / Tim Holtz (retired)
Handwritten Holidays 2 Stamp set -  Stampers Anonymous / Tim Holtz (retired)


Thursday, November 10, 2022

African Savannah


 Hi Crafty Friends,

It's challenge time with my friends over on the CCEE Stampers challenge blog. Maryann. Einam our challenge hostess for the month continues to issue the challenges.

For our challenge this week, Maryann requests that we create a card that features a Silhouette, it can be in a scene or a standalone image.

For my card today I pulled out my Crafter's Companion African Savannah Create a 3D Scene die set. I had been wanting to play with this die and this was the perfect opportunity to use it. 

I created a Shadow Box Card that I adhered to my 5 x 7 top folding card. I die cut the tree frame dies from white cardstock, so I could colour the images using Copic markers. I die cut the animals using black cardstock for my silhouette images.

I added a birthday sentiment to the bottom of the card using a sentiment from Avery Elle.


For the inside of my card, seeing I included a lion in my scene for the front of the card I figured the Whimsy Stamps "Roarsome! die set worked for this card. I also added stamped sentiments to complete my sentiment using a Honey Bee Stamps stamp set.

To finish off my card I added the silhouette of the tree.

Don't forget to check out the CCEE Stampers blog (goes live 12 AM EST) to see the rest of the creations the CCEE Stampers created this week. You can also see more details of their creations on their individual blogs:


Sunday, July 12, 2020

Congratulations


Hi Crafty Friends,

Today I am sharing another Slimline Card using stamps, dies and papers from Divinity Designs.

Divinity Designs July release includes nine Slimline die sets, for my card today I used five of those die sets ... Slimline Card Base; Slimline Pierced Window Frame; Slimline Rectangles; Slimline Layering Rectangles and Slimline Scalloped Rectangles die sets. 

I added papers from the Landscapes Collection Paper Pad to insert into all three of the windows on the front of the card. I then used the two silhouette couples and the park bench from the Park Silhouette die set which was one of the die sets included in the April Blessing Box. The street lamps, also from this die set were adhered to either side of the front of the window panel.

To finish off the front of the card I added a sentiment from the Lovely Day sentiment set and the Sentiment Strip with Layers die set, both these sets were also included in the April Blessings Box.


For the inside of my card I used the Slimline Rectangles; Slimline Layering Rectangles and Slimline Scalloped Rectangles die sets to add the layers for my sentiment. I then added two more sentiments from the Lovely Day stamp set.

Supplies:
For your shopping convenience, all products are linked below. Compensated affiliate links are used where possible with no extra cost to you. This helps me to continue to share all the projects I include on my blog. For the benefit of my Australia readers, I have started to include some links to Australian stores when available. Please note I only use and share products I love.


Friday, July 3, 2020

Have A Lovely Day


Hi Crafty Friends,

Today I am sharing another Slimline card using stamps and dies from Divinity Designs.

My card uses some of the new Slimline dies that were released this week .... the Slimline Card Base; Slimline Rectangles; Slimline Layering Rectangles; Slimline Grasses and Slimline Clouds. There are nine different Slimline die sets that were released and they are all amazing.


To decorate my card I used the Park Silhouettes die set which is part of the April Blessing Box which is a subscription card kit which comes out every three months. 

I was sooooo excited when I first saw this kit, however due to COVID 19, it has taken 3 months to reach me. Of course I had to make a couple of cards using this kit straight away. You are still able to purchase the kit if you are a Blessing Box member.

I used a sentiment from the Lovely Day sentiment stamp set and the Sentiment Strip with Layers die set which are also included in the April Blessing Box.

I also added a bird to the top of the card which is a die included in the Cowboys & Cactus Silhouettes die set.


For the inside of the card, I used two of the smaller dies included in the Slimline Rectangles and Slimline Layering Rectangles die set. I also added the lamps to either side of the sentiment which are also included in the Park Silhouettes die set.

Supplies:
For your shopping convenience, all products are linked below. Compensated affiliate links are used where possible with no extra cost to you. This helps me to continue to share all the projects I include on my blog. For the benefit of my Australia readers, I have started to include some links to Australian stores when available. Please note I only use and share products I love.