Thursday, June 30, 2016

Steampunk Greetings


Hi everyone,

It's challenge time with my friends over on the CCEE Stampers challenge blog.This week our challenge hostess for the month Vicky Gould finishes of the month with one last challenge.

Vicky has challenge us to a Mixed Media challenge ... 

Quoting Splitcoaststamers: A "medium" can be any of the following: 
  
Pencils - wax, oil, watercolour, graphite/charcoal. chalk/pastel
Pastels - Chalk, oil
Markers - watercolor, pigment, water-based acrylic
Pens - ink, glitter
Pigments - Gelatos, watercolor crayons, metallic rubons
Paints - watercolor, acrylic, oil, poster, tempera
Inks - dye, chalk, distress, reinkers, pigment, hybrid
Powders - mica, pigment, chalk
Sprays & airbrushing
Dimensionals - embossing paste, gesso, fabric, found items, papers (collage, piecing) & ephemera, foils
Heated elements - encaustic wax, embossing 


As you can see I have created another Cascading Tag Card using the chair die from the Adirondack Pop Up  Card and one of the tags from the Tag Pivot Card. You can find Karen Burniston's video tutorial here on how to create this style of card.

To decorate my card I used Poppy the Owl along with the Steampunk Charm die set and Steampunk Clear Stamp set.

I used the Gears Stage It Stencil  and Viva Walnut Brown Metallic 3D Stamp Paint to add gears to the designer paper I used which is one of the papers from the Through the Lens Cardstock. I also  sponged gears onto each of the Owl's hats.


These are the various mixed media materials I used to create my card : Stencil; Embossing Paste; Shimmer Sheetz; Distress Ink; Fibers; Glitter; Glitter Dot Peel Off Stickers; Glitter Border Peel Off Stickers; Designer Paper; Die Cuts.


For the front of my card I used the Clock and Gears die set along with the wings from the Steampunk Charms die set which were cut from Shimmer Sheetz. The clock face was die cut with Clear Double Sided Adhesive Tape on the front and then covered with Copper Silk Microfine Glitter. 


Don't forget to check out the CCEE Stampers blog (goes live 12 AM EST) to see the rest of the creations the CCEE Stampers created this week. You can also see more details of their creations on their individual blogs:


Stamps: Steampunk Clear Stamp Set - Elizabeth Craft Designs
Paper: Brown; Through the Lens Metal DP; Through the Lens Wood DP - Elizabeth Craft Designs
Dies: Poppy the Owl; Adirondack Pop Up Card; Tag Pivot Card; Steampunk Charms; Clock & Gears- designed by Karen Burniston for Elizabeth Craft Designs
Other ECD Products: Gears Stencil; Clear Double Sided Adhesive Tape; Bronze Metallic Shimmer Sheetz; Fire Opal Shimmer Sheetz; Silver Shimmer Sheetz Copper Silk Microfine Glitter;
Other: Black Ink; Tea Dye Distress Ink; Picket Fence Distress Ink; Viva Walnut Brown Metallic 3D Stamp Paint; Fibres; Foam Tape


Wednesday, June 29, 2016

Rebus - Things Found in Medicine Cupboard


Hi everyone,


It is time for another Rebus swap to share with you all. This time round our theme is 
"Things for in a Medicine Cupboard ". 


If you would like to solve my rebus puzzle, why not post a comment on my blog post with your answers. I will let you know what the correct answers are next time I post a rebus card here.


How did you go working out my March Rebus which was Names starting with the letter "H" .... here are the correct answers for you to check how you did.


  1. Heather
  2. Harvey
  3. Heidi
  4. Hunter
  5. Henrietta
  6. Henderson
  7. Helen
  8. Hayley
  9. Homer


You can find all my past rebus cards here.


Tuesday, June 28, 2016

Happy Birthday


Hi everyone,

Today have a tutorial on how to create the card above using products from Elizabeth Craft Designs.  For my project today I have used two of the dies from the Bead Strings 1 die set to create a tone on tone background. I also used the Stitched Ovals and Dotted Scallop Ovals to layer the A Way with Words Happy Birthday sentiment. To finish off my card I added the Susan's Garden Coreopsis.

Here's how I created my card: 

1. Cut a piece of Perfect Pink Soft Finish Cardstock so that it measures 5 1/4 inches x 5 1/4 inches.


  • Adhere a piece of Clear Double Sided Adhesive Sheet to a piece of Perfect Pink Soft Finish Cardstock that measures approx 7 inches x 6 1/2 inches. Die cut 7 each of the two straight dies included in the Bead Strings 1 die set. 


  • Attach the die cut borders onto the  5 1/4 inch square Perfect Pink Soft Finish cardstock, so that the borders were attached diagonally as per photo above.
  • Layer this card onto a piece of Rich Black Soft Finish Cardstock that is 5 1/2 inches square.
  • Cut a piece of Rosebud Soft Finish Cardstock that measures 5 3/4 inches x 11 1/2 inches. Score along the 11 1/2 inch side at 5 3/4 inches and fold. Attach the layers created previously onto the Top Folded Card.
2. Counting from the small centre die, die cut the third die from the Stitched Ovals die set and die cut from White Soft  Finish Cardstock.
  • Counting from the small centre die, die cut the fourth die from the Dotted Scallop Ovals die set and die cut from Rich Black Soft Finish Cardstock.
  • Layer white oval to black scallop oval and attach to the centre of the card using foam tape.

3. Attach a piece of Clear Double Sided Adhesive Tape to a piece of Rich Black Soft Finish Cardstock and Rosebud Soft Finish Cardstock which are big enough to fit the A Way with Words - Happy Birthday sentiment die. 
  • Die cut the sentiment from both colors of cardstock and layer the pink sentiment to the black sentiment so that the sentiment is slightly offset.
  • Attach sentiment to Oval on the front of the card.
4. Using the Susan's Garden - Coreopsis flower die, die cut all the pieces from White Soft Finish Cardstock. Using distress inks, color the petals pink, the leaves green and the stamen yellow. You can find a video on how to create the flower here
  • Adhere completed flower to the lower left hand side of card underneath the oval panel.


5. The inside of the Card:
  • Die cut two additional borders from the Bead Strings 1 die set from Perfect Pink Soft Finish Cardstock that has Clear Double Sided Adhesive Tape on the back. Adhere borders to the left side of the inside of the card as per photo above.
  • Using the sentiments "You're the Best" and "Happy Birthday" from the General Sentiment Clear Stamp set and stamp onto the centre of the inside of card using black ink.
Thanks for stopping by today, I hope you enjoyed my tutorial.


Supplies:

Elizabeth Craft Designs:

Other:
Inks - Black; Spun Sugar Distress Ink; Squeezed Lemonade Distress Ink; Peeled Paint Distress Ink
Blending Tool
Die Cutting Machine


Monday, June 27, 2016

Flying by to Say


Hi everyone,

On Wednesday for the June Karen Burniston Designer Challenge, Karen shared an amazing video tutorial on how to create a Cascading Tag Card using the chair die from the Adirondack Pop Up  Card and one of the tags from the Tag Pivot Card. You can find her tutorial here.

Of course as soon as I viewed her tutorial, I knew it was a must do card and although I had other things I should have been doing, I sat down and started to create this card and could not stop until it was done :).


To decorate my card I used the Bee and Bee Hive die sets from the Joset Designs range of dies, the flower border is from the Susan's Garden range all available from Elizabeth Craft Designs.


Here is another view of my card taken from above so you can see the folds in this style of card.


For the front of my card I used one of the sentiments from Karen Burniston's What's Up? Clear Stamp set which is layered onto the fancy labels from the Fancy Label Accordion Card die set. I also added two more bees.


Here is one more photo of the front of my card.


Stamps: What's Up Clear Stamp Set; Bee Sentiments Clear Stamp Set - Elizabeth Craft Designs
Paper: White Soft Finish Cardstock - Elizabeth Craft Designs; Black; Yellow; Type T DP - FabScraps
Dies: Adirondack Pop Up Card; Tag Pivot Card; Fancy Label Accordion Card - designed by Karen Burniston for Elizabeth Craft Designs; Bee; Bee Hive; CountryScapes Garden Edges Tulips - Elizabeth Craft Designs
Other ECD Products: Clear Double Sided Adhesive Tape
Other: Black Ink; Tumbled Glass Distress Ink; Mustard Seed Distress Ink; Carved Pumpkin Distress Ink; Peeled Paint Distress Ink; Foam Tape


Sunday, June 26, 2016

Have a Blast!


Hi everyone,

Today I am sharing a card I created using a new stamp set that I purchased at our recent Papercrafts Show.

As you can see I have created an Accordion Card using the Rectangle Accordion Card die set designed by Karen Burniston for Elizabeth Craft Designs.

For the white panels on either side of the card I used the Cloud die from the Clouds/Grass die set to sponge the clouds over the card and then used the Grass from the Outdoor Edges die set to die cut some grass from green cardstock.


Here is my card when it is closed ready to be popped in an envelope.


Stamps: Wet & Wild - Penny Black
Paper: White; Red; Yellow; Blue; Sunkissed DP - Doodlebug Design Inc.; Sunshine Beach DP - Echo Park
Dies: Rectangle Accordion Card; Outdoor Edges - designed by Karen Burniston for Elizabeth Craft Designs; CountryScapes Clouds & Grass - Elizabeth Craft Designs
Other: Black Ink; Tumbled Glass Distress Ink; Twisted Citron Distress Ink; Scan N Cut; Foam Tape; Copics


Saturday, June 25, 2016

Flying By To Say


Hi everyone,

It’s challenge time with the “Crazies” over on the Crazy 4 Challenges blog. Karen Aicken our challenge hostess for the month finishes of the month with one last challenge.


Add a BUTTERFLY! I love butterflies, so have a butterfly be the main focus of your card this week. If that doesn’t work of you - just add a butterfly. :-) 


For my card today, I created a Pull Card using the Oval Pull Card die set designed by Karen Burniston for Elizabeth Craft Designs.

The butterfly uses some of the new Silk Microfine Glitters which will be released by Elizabeth Craft Designs shortly. I have used glitter technique that Els from ECD shared on one of her recent Technique Friday video which you can see here.

The butterfly border on the edge of the card is one I HAD to have and purchased last year and finally I have gotten around to using it LOL!


When you 'pull' the card open it reveals the sentiment.


Don't forget to check out the rest of the “Crazies” cards over on the Crazy 4 Challenges blog and also their individual blogs for more details.

Stamps: What's Up? Clear Stamp Set; General Sentiments Clear Stamp Set - Elizabeth Craft Designs
Paper: White; Purple; Lavender; Secret Garden Arbor DP - Bo Bunny
Dies: Oval Pull Card - designed by Karen Burniston for Elizabeth Craft Designs; Butterfly 1 - Elizabeth Craft Designs; Kensington Border - Memory Box
Other ECD Products: Clear Double Sided Adhesive Sheet; Black Silk Microfine Glitter; Violet Silk Microfine Glitter; Lavender Silk Microfine Glitter; Lavender Ice Silk Microfine Glitter; Diva Silk Microfine Glitter; Clear/Silver Glitter Dots Peel Off Stickers
Other: Black Ink; Foam Tape


Friday, June 24, 2016

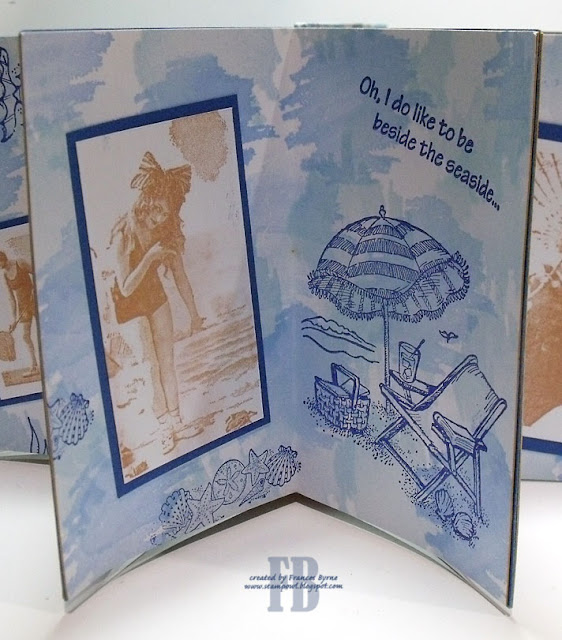
Near the Sea


Hi everyone,

Today I am sharing another project I created some years ago, but have never shared on my blog.

Here you can see my book when it is closed.


This is called a Star Book, when you open the book up and tie the ribbon so that the two covers are back to back you can see the star shape from overhead.


Here is another view of the star book when it is opened taken from overhead.


This Star Book was decorated using various photo stamp type images with a Beach theme.


I hope you enjoyed see another of my older projects I created.


Thursday, June 23, 2016

#1 Teacher


Hi everyone,

It's challenge time with my friends over on the CCEE Stampers challenge blog.This week our challenge hostess for the month Vicky Gould continues to issue the challenges.

Vicky tells us that she loves birds.  Let’s use birds on our cards this week….Crazy Birds, Real Birds, Cartoon Birds…whatever trips your trigger!  One,  two, a flock…it’s your choice.  Show me those birds!


At our recent Papercrafts Show that I attended earlier in the month I found this fun owl stamp which I had been looking for for a while and of course had to purchase. So of course I decided to use that for my card today. 

As there were books also on this card I thought it would be a great image to use for another teacher thank you card that I need to make for my Grandsons teachers at the end of the year.


As you can see I have created a pop up card using the pop up die included in the Hot Air Balloon die set designed by Karen Burniston for Elizabeth Craft Designs.


For the front of my card I added an oval using the Stitched Ovals and Dotted Scallop Ovals and added the #1 Teacher die cut.


Don't forget to check out the CCEE Stampers blog (goes live 12 AM EST) to see the rest of the creations the CCEE Stampers created this week. You can also see more details of their creations on their individual blogs:


Stamps: Owl Clock - Stampendous
Paper: White; Blue; Pink; Toy Box ABC DP - Bo Bunny
Dies: Hot Air Balloon - designed by Karen Burniston for Elizabeth Craft Designs; Stitched Ovals; Dotted Scallop Ovals; Beaded Strings 2; A Way with Words Thanks - Elizabeth Craft Designs; #1 Teacher - PTI
Other: Black Ink; Scan N Cut; Foam Tape; Copics


Wednesday, June 22, 2016

You, Me and Coffee


Hi everyone,

Today I am playing along with the Summer Coffee Lovers Blog Hop which is being held from Saturday 17th June to Friday 24th June.


I decided to create another 'flat' card using the Cup Pop Stand Card die set designed by Karen Burniston for Elizabeth Craft Designs.

For the background of my card I used the Glitter and Lace Technique using a couple of the new Silk Microfine Glitters which are being released by Elizabeth Craft Designs soon. I also used a piece of lace which Els from ECD purchased while she was out our local Papercrafts Show a fortnight ago when she was done here in Australia.

For the spoon I used Silver Shimmer Sheetz and I also added one of the borders from the Bead Strings 1 die set to embellish the coffee cup.


For the inside of my card I added a couple more of the borders from the Bead String 1 die set on the left side of my card. I added a coffee sentiment I found in my stash and a few coffee beans which are also included in the Cup Pop Stand die set.


Stamps: Coffee & Tea - designed by Karen Burniston for Elizabeth Craft Designs; Coffee Break - Whimsy Stamps
Paper: White; Black; Pink
Dies: Cup Pop Stand Card - designed by Karen Burniston for Elizabeth Craft Designs; Stitched Circles; Dotted Scallop Circles; Bead Strings 1 - Elizabeth Craft Designs
Other ECD Products: Clear Double Sided Tape 64mm; Black Silk Microfine Glitter; Copper Rose Silk Microfine Glitter; Light Brown Silk Microfine Glitter; Paisley Stage It Stencil; Black/Silver Glitter Dots;  Silver Shimmer Sheetz
Other: Black Ink; Blending Tool; Foam Tape


Tuesday, June 21, 2016

Karen Burniston June Designer Challenge Day 2


Hi everyone,

As promised yesterday I have another card for our June Karen Burniston Designer Challenge. This time round Karen has given us the theme ....  Summer Lovin'! Make a project to celebrate Summer - this could be nature, or beach or 4th of July or anything that means "summer" to you.

This time round I went with an ice cream theme .... who doesn't love having an ice cream during summer!


As you can see by the photo above I have created a pop up card. For this I used the pop up die that comes in Karen's Hot Air Balloon die set. I also used Jinks the Monkey  and the Ice Cream Cone die set.

To decorate the top and bottom edges of the inside of my card I used the oval die from the Pull Card Edges die set.  Each panel was embossing using the Lots of Dots Embossing Folder.

The sentiment has been layered using the Stitched Ovals and Dotted Scallop Ovals die sets.


Here is another photo of the inside of my card taken at a different angle so you can see the pop up a little better.

All cardstock used on this card is from Elizabeth Craft Designs Soft Finish Cardstock.


I kept the front of my card fairly simple see the focus is on the pop up on the inside. I again used the Oval die from the Pull Card Edges die set to create the designer paper panel. I then added the sentiment panel using the Stitched Ovals and Dotted Scallop Ovals die sets.

The sentiment is from the Just a Note Clear Stamp set.

Along the top of the card I die cut a border from the Bead Strings 2 die set which I cut out from pink and brown. I layered the border so just a small amount of brown shows through under the pink border. I then added Clear/Silver Glitter Dots Peel Off Stickers to the beaded areas of the diet.


If you are looking to purchase Karen's Pop It Ups dies in Australia you can find them at Craft Giraffe (formerly Photo Continental).


Don't forget to check out  Karen Burniston's blog  on Wednesday when you will be able to see what all the designers created for the challenge this month, plus an amazing card/video tutorial from Karen Burniston.

Stamps: Just a Note Clear Stamps - designed by Karen Burniston for Elizabeth Craft Designs; What's the Scoop - Hero Arts
Paper: White; Pink Peach; Rust; Mustard; Sunflower and Dark Chocolate Soft Finish Cardstock - ECD; Soak Up The Sun Ice Cream DP - Carta Bella
Dies: Jinks the Monkey; Hot Air Balloon; Pull Card Edges - designed by Karen Burniston for Elizabeth Craft Designs; Ice Cream; Stitched Ovals; Dotted Scallop Ovals; Beaded Strings 2 - Elizabeth Craft Designs
Other ECD Products: Lots of Dots Embossing Folder; Clear Double Sided Adhesive Tape; Clear/Silver Glitter Dots
Other: Black Ink; Foam Tape