Showing posts with label 3D scenes. Show all posts

Wednesday, May 17, 2023

Record Shop


Hi Crafty Friends,

Today I am sharing a fun 3D card I created recently using dies from Concord & 9th.

I have been loving the cute little shops I have been seeing online using the cute Window Shoppe Card Base die from Concord & 9th, so I decided to purchase the die along with a few other things from a recent release. As one of the other things I purchased was record themed, I decided to use the Window Shoppe Card Base die set to create a record shop. Apparently the day I made this card was actually "Record Shop Day", yes it is a thing I remember my husband and I going to a few some years back. I have had so many things to post on my blog, that it has taken almost a month to get it posted on here.


I love the "record" sentiment and the tiny record that comes in Concord & 9th's For the Record die set, it was perfect to use for the sign of my shop ... the shop word came from the Window Shoppe Base die set.


The die set also included a die to make a 3D crate and a record cover, so I die cut them three dies to add to the inside of my store, I added a brown panel under the crates to look like a table/bench. I added a couple more records to the wall.


For the inside of the card, I added the ovals using dies also included in the For the Record die set. I added a stamped sentiment from Honey Bee Stamps For the Record stamp set, which is no longer available. Concord & 9th did release a record themed stamp set, but as I have so many other stamp sets of this theme I decided not to get it.

I then die cut a larger record using dies and stamps from Sugar Pea Designs, this is probably also no longer available as it's pretty old.

I used hands from MFT Stamps In Good Hands die set to make it look like someone holding the record.

Other Supplies:

For the Record Stamp Set - Honey Bee Stamps (discontinued)


Friday, May 5, 2023

3D Castle Card


Hi Crafty Friends,

Tomorrow, 6th May is the coronation of King Charles III and his wife Queen Camilla. As this is such an historical occasion I decided to make a card to celebrate the event.


For the castle I used Paper. Discovery's Perfect Castle die set which I purchased from Craft Stash last year when it was on special. This is a 3D die. Normally the towers would be square, but as I didn't want my card to have that much depth, I made a few adjusts to the die cut pieces before assembly. I also cut the tower die cuts in half and this die is rather long as it can be used for a number of different projects.

If you look at the walls you will see the brick detail which is another die included in the set.


I originally wanted to add this to an easel card, but doing that would mean the castle would be at an angle which I didn't like. So instead I added a green panel to the back of the front panel of my card which can be folded into the card when mailing and then folded underneath the castle for display.


I used La La Land Crafts Prince Luka and Princess Marcie for the King and Queen, these are older stamps I have had in my stash for years and are no longer available.


The castle towers fold flat in towards the centre of the card so that it can be placed in an envelope. This is a fairly large card measuring 7 inches wide x 6 1/2 inches tall, I don't I will end up giving this to anyone but keep it on display in my room.


For the inside of my card, I added La La Land Crafts Heart Chair stamp another I have had for years. I thought it could be a throne.

I added a birthday sentiment using a Honey Bee Stamp set and the "Royal Treatment" sentiment which is from an older MFT Stamps stamp set, that set is no longer available but I did find another one on the MFT Stamps web site which I have linked below.


Other Supplies:

  • Prince Luka Stamp - La La Land Crafts (discontinued)
  • Princess Marci Stamp - La La Land Crafts (discontinued)
  • Heart Chair Stamp - La La Land Crafts (discontinued)
  • Royal Friend Stamp Set - MFT Stamps (discontinued)


Tuesday, May 5, 2020

May 2020 Karen Burniston Designer Challenge


Welcome to our May Karen Burniston Designer Challenge.

Check out Karen Burniston's blog on Wednesday (US Time) when you will be able to see what all the designers created for the challenge this month, plus Karen will have an amazing video tutorial to share with us all.

Our challenge theme this month is ....  "TREASURE" - make a card that uses the Treasure Chest and/or Treasure Charms.


Karen Burniston (KB Riley LLC)  released 8 new dies last month. One of the dies that was released is the Treasure Chest die set which can be used as a stand alone die or used in conjunction with the Parcel Pop-up die set to create a fun pop-up card.  For my card today I have used it both ways. You can see a quick video of my card in action above.


Who wouldn't love to find a treasure chest with all those goodies inside! I used Kraft cardstock for the base of my card and added a patterned paper from Echo Park's Pirate Tales 6 x 6 paper pad for the back panel to create my sky.

To create the treasure chest pop-up, I used the Treasure Chest and Parcel Pop-up die sets and adhered it to the centre of my card.

I used the Palm Tree Pop-up die set to create the palm trees on either side of the treasure chest. the trunk of the palm tree was traced using a die cut of the stand alone palm tree trunk and extended so I had the correct height I needed. 

Along the front portion of the card I added waves using the waves dies from the Tropical Scene die set.

The sentiment "You Are Treasured"  is from the new Word Set 11 - Treasure die set. This was layered onto an oval using the Crosshatch - Ovals die set.


Here is a close up of the treasure chest and all it's treasures. The Treasure Chest die set also comes with a sand bank to use in the front of the treasure chest. I also used it on the bottom of the back panel to add sand to this panel.

 I used the coins, pearls and jewels dies from the Treasure Chest die set to add most of the contents of the chest. The coins were die cut using gold mirror foil cardstock. 

The silver cup (buried partially in the sand at the front) and the large coin in the treasure chest are both from the Treasure Charms die set.

I also added the anchor and chain too the front of the treasure chest which is from the Cruise Charms die set.


To give my card a bit of a pirate feel, I added the skull and crossbones from MFT Stamps Party Like a Pirate stamp set and the map in the bottle from Craftin Desert Diva's Pirate Pals stamp set. Unfortunately the later company went out of business last year.


For the front of the card I used the sand border from the Nature Edges die set to use along the bottom of the patterned paper panel.

I added the treasure chest to the left side of the card, keeping it closed. The pirate on the right side of the chest is a stamp I have had in my stash for a few years now from Magnolia Rubber Stamps.

I added the cute pirate parrot to the top of the chest, this is also from the Craftin Desert Diva's Pirate Pals stamp set.

The sentiment is from MFT Stamps Party Like a Pirate stamp set.


Don't forget to visit Karen Burniston's blog on Wednesday when you will be able to see what all the designers created for the challenge this month.

Supplies:
For your shopping convenience, all products are linked below. Compensated affiliate links are used where possible with no extra cost to you. This helps me to continue to share all the projects I include on my blog. For the benefit of my Australia readers, I have started to include some links to Australian stores when available. Please note I only use and share products I love.


Pirate Pals Stamp Set (Parrot) - Craftin Desert Divas (retired)
Captain Edwin Stamp - Magnolia


Thursday, August 29, 2019

Hello, You Nailed It!


Hi Crafty Friends,

It's challenge time with my friends over on the CCEE Stampers challenge blog. Anne Harmon our challenge hostess for the month finishes off the month with one last challenge.

This week Anne has challenged us to create a Card of Encouragement.


For my card today I created a pop-up card using the floating floor die from Karen Burniston's House & Fence Pop-up die set.

To decorate my card I used MFT Stamps Builder Bears stamp set. I have been wanting to use this set for sometime now and finally found a reason to make something with it.

On the top panel (sky area), I added some birch trees on the left hand side and a sun to the top right hand side of my card.


I added a sentiment to the lower portion of the card using a "Hello" die from Crafter's Companion and one of the sentiments from the Builder Bear stamp set.

The photo above is taken at a different angle, where you can see the floating floor part of the card. I also added a fence to the front of the floating floor.


For the front of the card I used some of the same stamps/dies I used on the inside of the card. For the grass I used the new Tucked-In Turf - Vertical Die-namics from MFT Stamps.

Don't forget to check out the CCEE Stampers blog (goes live 12 AM EST) to see the rest of the creations the CCEE Stampers created this week. You can also see more details of their creations on their individual blogs:

Kelly McKown-Santi


Supplies:
For your shopping convenience, all products are linked below. Compensated affiliate links are used where possible with no extra cost to you. This helps me to continue to share all the projects I include on my blog. For the benefit of my Australia readers, I have started to include some links to Australian stores when available. Please note I only use and share products I love.

Sun, Moon & Stars Die-namics - MFT Stamps (retired)
Birch Tree Border - Taylored Expressions (retired)
Fence - Couture Creations (retired)


Thursday, August 15, 2019

Jump In!


Hi Crafty Friends,

It's challenge time with my friends over on the CCEE Stampers challenge blog. Anne Harmon our challenge hostess for the month continues to issue the challenges.

For our challenge this week, Anne has asked us to .... Create a card using a vacation destination…..one you love or would like to go to, and make sure to add a 3D element for fun!!

My husband and I recently took a bus trip with our club to a beautiful lake where we had a wonderful meal to celebrate Christmas in July. As I had ordered the Hero Arts My Monthly Hero kit for July which had a summertime fun at the lake theme, I decided to pull that out to create my card for the challenge. The stamp set in the kit contains three layering stamps ... the mountains, trees and jetty. There are also dies to coordinate with the stamps which I didn't use except for the forest stand alone die as I thought my trees were too far down the water line when I had finished my card.


I seem to keep forgetting about the extra parts of the challenges this month ... in this case the 3D element. But I figure my 3D element is the card itself. I have created a Step Panel Card which I have been wanting to make for sometime now, when I started thinking about what I could make with the MMH kit which would be different to what I had seen others make I thought of this card.

I used the inks which came with the kit for the lake, jetty and trees, but for the other elements I used other inks especially for the ripples in the water and cattails as the ink from the kit was just blending in together so you couldn't see the detail.


I added a panel onto the back of the card so I could add a birthday sentiment (also from the kit) and stamped another jetty along the bottom. This time around I added the girl which is from an add on stamp set I purchased when I ordered the kit ... Lake Time Fun.


My card folds flat so it can be placed in a standard sized envelope for no extra postage.

Don't forget to check out the CCEE Stampers blog (goes live 12 AM EST) to see the rest of the creations the CCEE Stampers created this week. You can also see more details of their creations on their individual blogs:

Kelly McKown-Santi


Supplies:
For your shopping convenience, all products are linked below. Compensated affiliate links are used where possible with no extra cost to you. This helps me to continue to share all the projects I include on my blog. For the benefit of my Australia readers, I have started to include some links to Australian stores when available. Please note I only use and share products I love.


Monday, March 26, 2018

Best Daddy


Hi Crafty Friends,

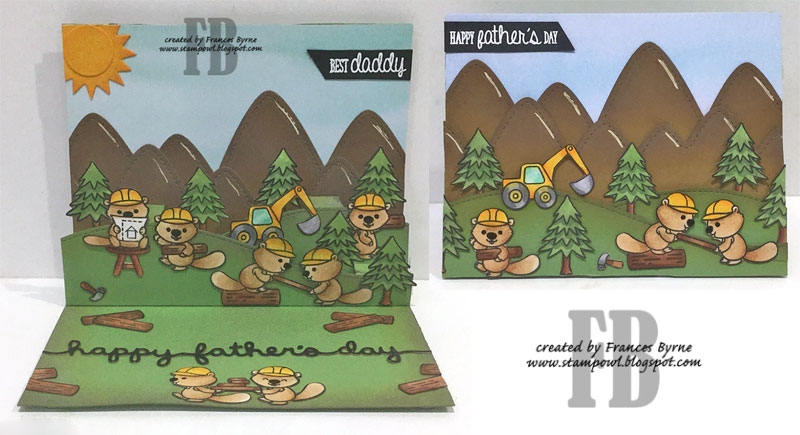
Father's Day is about 6 months away down here in Australia, but as I have had this card in my head for months and months, I figured now was as good a time as any to finally make it. I have a number of cards to make for Father's Day so getting an early start is always a good thing.


Before my husband retired a few years ago, he was in the building industry for over 40 years so when I saw this cute Build It Beaver Stamp set from Clearly Besotted I knew I had to add it to my collect to make a card for him.

As you can see I have created a pop-up card this time using Lawn Fawn's Stitched Hillside Pop-up die set. It has been a while since I played with this die set. To create my pop up I also used the Stitched Mountain Borders also from Lawn Fawn.


I stamped the images a couple of times using my MISTI (some like the trees and logs, multiple times) and then used my Scan N Cut to cut them out. When you have so many to cut out that machine sure is a time saver!!

To the base of the card I added the Father's Day Border also from Lawn Fawn.


I used the same elements for the front of my card that I used for the inside ... the mountains; the grassy pop-up hills and a few of the beavers. The stamped sentiments on this card are also included in this stamp set.

Stamps:  Build It Beavers - Clearly Besotted
Paper: White; Green; Brown; Black; Watercolor Paper Pad - Lawn Fawn
Dies: Stitched Hillside Pop-Ups; Stitched Mountain Borders;   Father's Day Border - Lawn Fawn
Other: Black Ink; VersaMark Ink; Forest Moss Distress Oxide; Gathered Twigs Distress Oxide; White Embossing Powder; Black Glaze Pen; White Gel Pen; Foam Tape; Copics


Wednesday, June 12, 2013

Picnic Basket …. MFT New Product Tour

MFT-PicnicBasketScene-wm

Hi everyone,

It’s release day over on MFT Stamps, which means it is time to join the MFT Stamps Design Team for our New Product Tour! All the new products are available NOW at My Favorite Things.  You will be able to find them all  together in the Brand Spankin' New category of the MFT Stamps store.

NewProductTour

Be sure to head on over to the MFT Stamps Blog so you can find all the release details, prize information, and inspiration about this release.

MFT-PicnicBasketScene2-wm

Today I am showcasing the new Die-namics Picnic Basket.

The Die-namics Picnic Basket is another of the Die-namics that can be used in conjunction with the Die-namics Trapezoid Treat Box which is what I used to create my picnic basket you can see above in the scene I created.

To create my 3D scene I started with a square of designer paper which I edged using the Die-namics Grassy Edges & Factory Green card stock. I then attached this to another piece of Factory Green card stock.

MFT-PicnicBasketScene4-wm

Next I created my picnic basket … I used Kraft card stock and the Die-namics Picnic Basket and Die-namics Trapezoid Treat Box …. cutting 2 pieces of each. Before assembling I decided I wanted my picnic basket a little darker so brayered over the card using Kraft ink.

MFTPicnic-Basket-Flap-wm

For my picnic basket on this scene I decided I wanted to add a lid to my picnic basket which is easy to do. I cut another piece of card 1 1/8 inches x 3 3/4 inches. I placed this piece on my Scorpal and found the centre by using the 6 inch on the Scorpal as the centre mark and then scored down a 1/4 inch on either side of the centre. (I have added black dashes on my score lines so you can see the scores.

MFTPicnic-Basket-Flap2-wm

I then die cut an extra handle from the Die-namics Picnic Basket and attached that to the centre on the back so it won’t be seen. You will also need to trim the handle (tabs) a little so it will fit into the basket.

For the handles on my picnic basket above I have them both using the same hole … so find the centre of the picnic basket and punch a hole on each side. and then thread a brad through both handles and also the side of the tab for the lid and you are done.

BTW there are score lines on the handles which help give you a good shape to your handles.

MFT-PicnicBasketScene3-wm

Next I stamped out the girl and her teddy from the Pure Innocence On a Picnic stamp set … leaving a small tab at the bottom of both. I cut a small slit into the base of the scene where I wanted these pieces to go and attached them both to the base.

I added the sentiment also from the Pure Innocence On a Picnic stamp set which I have stamped onto Smooth White card using Black Licorice ink. I used the Die-namics Designer Labels 4 STAX to die cut the sentiment and also added a frame around the top and bottom of the sentiment using Black Licorice card stock.

MFT-PicnicBasketScene5-wm

Behind the picnic basket I added the Palm Tree using the new Die-namics Palm Tree. For the tree I used Kraft card stock; Gumdrop Green card stock and Hot Fudge card stock Sponging the edges of each piece using Kraft ink and Gumdrop Green ink.

To finish off my scene I added plastic ants and some food themed erasers I have had in my stash for years.

Stamps: Pure Innocence On A Picnic – MFT Stamps
Paper: Smooth White; Kraft; Gumdrop Green; Factory Green; Hot Fudge – MFT Stamps; DP
Die-namics: Picnic Basket; Trapezoid Treat Box; Palm Tree; Grassy Edges – MFT Stamps
Other: Black Licorice Ink (MFT); Gumdrop Green Ink (MFT); Kraft Ink (MFT); Factory Green Ink (MFT); Brad; Plastic Ants; Food Erasers; Copics

MFT-PicnicButterfly-wm

For my second project today I created a Picnic Basket Gift box with a coordinating card.

MFT-PicnicButterfly3-wm

To create the Picnic Basket I used the Die-namics Picnic Basket and the Die-namics Trapezoid Treat Box with Red Hot card stock. This time around you can see I added the handles to my picnic basket separately on each side rather than in the centre.

MFT-PicnicButterfly2-wm

I added some tissue paper to the inside of the Picnic basket which I had stamped using the checkerboard background from MPD Distressed Background Blocks stamp set and Red Hot ink.

On the front of the basket I added a butterfly from the LJD Blissful Butterflies stamp set and the Die-namics LJD Blissful Butterflies using Smooth White cardstock and Bubblegum Ink.

MFT-PicnicButterflyCard-wm

For my card I used the Die-namics Blueprints 4 set. The base of my card is Smooth White cardstock , the background panel uses Bubblegum card stock and is decorated using the MPD Distressed Background Blocks stamp set and Bubblegum Ink.

On the panels on the front of the card I added the same butterfly used on the Picnic Basket which is from LJD Blissful Butterflies stamp set and the Die-namics LJD Blissful Butterflies using Smooth White cardstock and Bubblegum Ink.

MFT-PicnicButterflyCardclos

Here is a close up of the butterfly … you can see how I have stamped and die cut two butterflies and attached the centre of the top butterfly to the bottom one to get a 3D image.

MFT-PicnicButterflyCard2-wm

And finally the inside of my card. I added another of the butterfly images from the LJD Blissful Butterflies stamp set which has been stamped using Bubblegum Ink. The sentiment also from this stamp set was stamped using Black Licorice ink.

Stamps: LJD Blissful Butterflies – MFT Stamps
Paper: Smooth White; Red Hot; Bubblegum – MFT Stamps
Die-namics: Picnic Basket; Trapezoid Treat Box; Blissful Butterflies; Blueprints 4 – MFT Stamps
Other: Black Licorice Ink (MFT); Bubblegum Ink (MFT); Brad; Foam Tape

Here are the MFT products used on my cards today.


Don’t forget to head on over to the MFT Stamps Blog so you can find all the release details, prize information, and inspiration about this release.

#aa-owl-signature