

Hi Crafty Friends,
My grandson turned 13 this month! Wow where has the time gone, it seems like only a few years ago that I held my first grandchild in my arms not long after he was born! Thirteen of course means that he is now a teenager, so I wanted something special to celebrate the occasion.
As both my grandchildren liked the 3D Display Card I made earlier in the year, I decided I would make him one of those. I also made a special Envelope Gift Bag which was designed to fit the 3D Display Card.
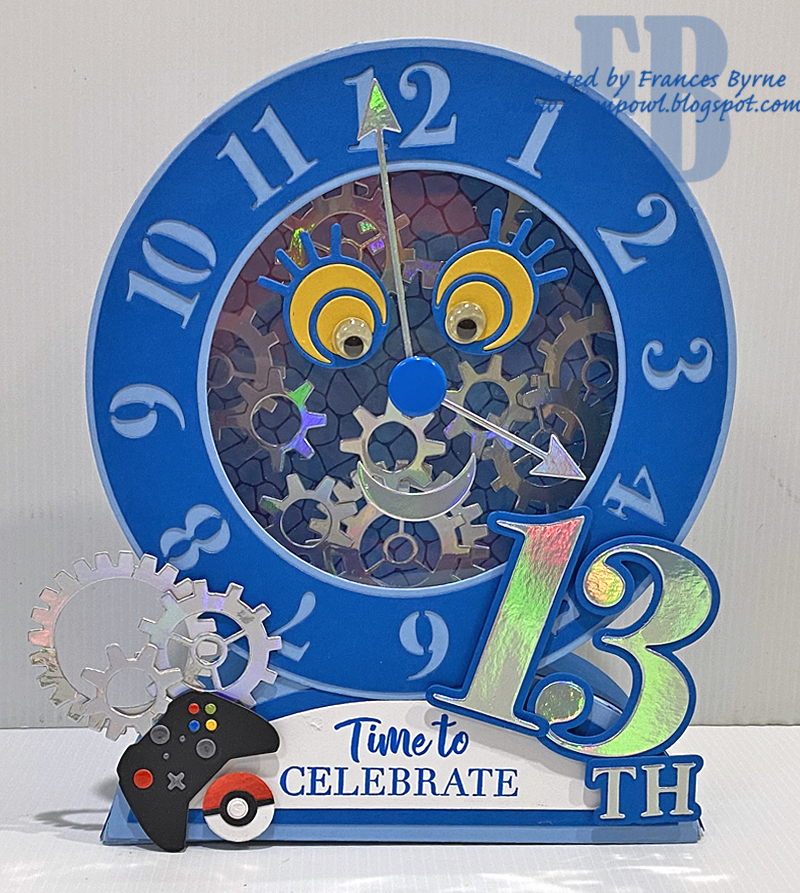
For this card I used the Made to Surprise 3D Display Card & Stand die set along with the Circular Frame Clock die set to make this fun clock card. I figured a clock went well with turning 13!

As you can tell by the photo above, I added lights to the inner hollow portion of the card along with plenty of cogs which are from the Time Clock Additions Stamp/Die set. I die cut all the cogs from silver holographic cardstock and added them inside the clock, behind the face of the clock.

As it was a card for a teenager, I wanted to add a few things that I know my grandson would like. So I added a small game controller using a die set from MFT Stamps and a Pokemon thingy that I found already made up when I went to get my game controller dies. I also added a few more silver cogs to balance off that side of the card a little.

On the right hand side of the card I added the "13th" using the Large Modern Numbers die set also from Made to Surprise.
I added the fun "face" to the Clock Face using dies included in the Time Clock Additions Stamp/Die set. I added googly eyes to the eyes, I would have like larger ones but that is all I had on hand, so they had to do. I also found a large blue brad which worked perfectly to secure the hands of the clock.
The sentiment is also from the stamp set included in the Time Clock Additions Stamp/Die set.

On the back of my card, I computer generate the blurb which tells you how many years, months, minutes, weeks etc 13 years is.
I added a blank white panel to the stand of my card, so I had a place to write a personal greeting.

After going to all that trouble making the 3D Display Card, I wanted to make something to carry it in and that would protect it. When Sam Calcott released the 3D Display and Stand Collection, she shared a tutorial on how to make an Envelope Gift Bag to fit the 3D Display Card in, so I decided to make one of those. I kept mine fairly simple, as a 13 year old boy isn't going to care too much about a gift bag. You can see Sam's video here.

As you can see I added the number "13" to the front of the bag using the Large Modern Numbers die set. I also added a strip of card along the bottom with the sentiment "Woohoo!"
1 comment:
Such a labour of love - outstanding, Frances!
Post a Comment