Showing posts with label Ombre. Show all posts

Wednesday, March 20, 2019

Oz Waterfall Card


Hi Crafty Friends,

Today I am sharing another Waterfall Card I created using Karen Burniston's Frame Pull Pop-up die set. It is really easy to adapt the Frame Pull Pop-up to make it suitable for a Waterfall Card, Karen Burniston showed us how a few months ago in her video here.


Here is a quick video to see my card in action.


To decorate my card I used Craftin' Desert Divas' Trolls of Oz stamp set which was released earlier this year. 
For the background of each panel I used the rectangle die included in the Frame Pull Pop-up die set to die cut patterned paper. To create the flower and grass background I used dies from Lawn Fawn's Shadow Box Card Spring Add On & Shadow Box Card Park Add On die sets 


For the background on the base of my card, I created a "Yellow Brick Road", by stamping Simon Says Stamp Deco Diamonds Background Stamp onto white cardstock and embossed using white embossing powder and then sponging on three colors of yellow/orange Distress Oxide inks.


Here is a look at the final waterfall panel as you pull the tab further out. As each waterfall panel flips over it reveals a new image and sentiment.


I decided to keep this card as a flat card rather than adhered to a folded card. On the back of the waterfall panel I have added another white rectangle panel which is die cut using the largest rectangle from Heffy Doodles Imperial Stitched Rectangles die set.

I also added a couple more images and the last sentiment included in the stamp set.


Supplies:
For your shopping convenience, all products are linked below. Compensated affiliate links are used where possible with no extra cost to you. This helps me to continue to share all the projects I include on my blog. Please note I only use and share products I love.


Monday, February 18, 2019

Hey Gal Pal


Hi Crafty Friends,

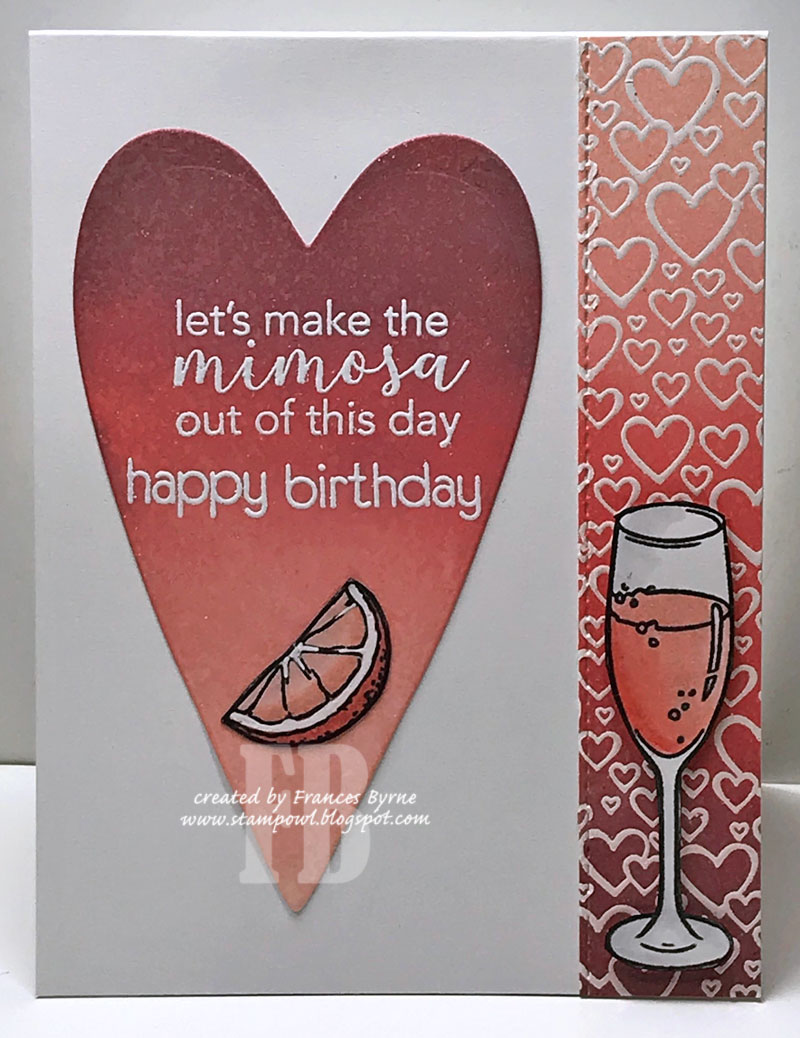
Today I am sharing a birthday card using some of the add on stamps from Hero Arts January Card Kit.

For the background I used the Bursting with Love Bold Prints background stamp which I white embossed on white cardstock. I then used Distress Oxide inks in Aged Mahogany, Abandoned Coral and Tattered Rose for an Ombre look.

For the heart I used a heart from a Tonic Studios magazine I purchased early last year, for the top heart I also added Distress Oxide inks reversing the order from light to dark to dark to light.

The glasses, bottle, fruit and sentiment are all from the Gal Pal Brunch Clear Stamp set.


For the inside of the card, I added the left strip of patterned cardstock that I had created on the right hand side of the card. I added a glass on top of the strip.

I added a large heart which is centred to the remaining white space which was also colored using the same inks. I added two sentiments to the centre of the heart.

Supplies:
For your shopping convenience, all products are linked below. Compensated affiliate links are used where possible with no extra cost to you. This helps me to continue to share all the projects I include on my blog. Please note I only use and share products I love.


Hello Beautiful Layering Hearts Die Set - Tonic Studios


Wednesday, August 8, 2018

Monkey and Balloon Birthday Card


Hi Crafty Friends,

Today I have been "monkeying around" with a few stamps and dies from Elizabeth Craft Designs to make this fun birthday card.

I used Broken China Distress Oxide Ink to create my background panel and spritz it with water using a Distress Sprayer.

The balloon is one of the newest release dies from the A Way With Words die collection, which I die cut using designer papers and then adhered to the upper part of my card using foam tape. I cut the balloon down slightly as I needed to make space for the monkey.

The monkey is an older stamp from the Jungle Cuties Clear stamp set. 

I die cut the "Happy Birthday" twice .... once from White Soft Finish Cardstock and one from White Soft Finish Cardstock that had Clear Double Sided Adhesive on the top.
For the adhesive covered sentiment, I added True Red Silk Microfine Glitter to the adhesive and adhered to my card as above.

For the white sentiment I colored the sentiments in ombre fashion using Copic markers and adhered this over the top of the glittered sentiment slightly offsetting the sentiment.

To finish off the card I added some clear crystals randomly around the blue background.


For the inside of the card I added the A Way With Words - Make A Wish sentiment which I again colored using the ombre technique.

Supplies:
For your shopping convenience, all products are linked below. Compensated affiliate links are used where possible with no extra cost to you. This helps me to continue to share all the projects I include on my blog. Please note I only use and share products I love.



Saturday, June 23, 2018

Wishing You a Fairy ....


Hi Crafty Friends,

It’s challenge time with the “Crazies” over on the Crazy 4 Challenges blog. As challenge hostess for the month, I continue to issue the challenges.

Our challenge this week is .....
Ombre 
Definition - a french word meaning "shaded". Ombre is the gradual blending of one color hue to another, usually moving tints and shades from light to dark.

The ombre technique has become very popular in stamping over the past few years. Use this technique in some way when creating your card this week.

Here are a few links to YouTube videos for inspiration:
Ombre Stamping- Jennifer McGuire 
Easy Ombre Backgrounds– Jennifer McGuire
Ombre Background Stamping– Yana Smakula


Original I started making this card for tomorrow, as apparently it is "Fairy Day", however half way through I discovered this would fit for today's challenge so decided to use it for today instead.

I used Karen Burniston's Circle Charm Pop-up die set. To create the ombre background, I sponged on Tattered Lace; Warm Lipstick and Abandoned Coral Distress Oxide ink in ombre fashion. And spritz with water from a Distress Sprayer. On the top half of the background I added hearts using Honey Bee Stamps Fall Showers Stencil set.

After creating the backgrounds, I die cut the panels using the Rectangles Crosshatch die set.


The circle frames around the opening and the back panel of the card are die cut using the Circles Crosshatch die set.

The fairy is an old one from my stash from The Greeting Farm.

I used Simon Says Stamp Center Cut Flowers stamp for the flowers, cutting out the flowers and adding to the bottom of each panel.

The "fairy" birthday sentiment is from on older Paper Pretties stamp set, which is no longer available.


Here is one more photo of my card taken from over head.

Don't forget to check out the rest of the “Crazies” cards over on the Crazy 4 Challenges blog and also their individual blogs for more details.


Supplies:

Stamps: Center Cut Flowers - Simon Says Stamp; Chloe - The Greeting Farm; Fairy Special - Paper Pretties


Wednesday, June 6, 2018

ECD Design Team Focus on New Release - A Way With Words


Hi Crafty Friends,

Today the Elizabeth Craft Designs Design Team are doing another Focus on New Release blog post on the Elizabeth Craft Designs blog. This time around we are focusing on Suzanne Cannon's A Way With Words dies and stamps. This is a huge release with 21 new dies and 3 stamp sets, there is something for everyone! You can find the new release products on the Elizabeth Craft Designs website here.

I am focusing on three of Suzanne's new die sets being released for my card today. I just love the new "Big Balloon" which almost fits the whole front of the card that you don't need much else. The new Happy Birthday 3 die set introduces a couple of different fonts to the mix which I just love and the Make a Wish sentiment. All three can be used individually, but they also work very well together which is what I decided to do for my card today.


For the front of the card, I used the new Big Balloon, which I die cut from White Soft Finish Cardstock that had Clear Double Sided Adhesive on the front. I covered the adhesive on the balloon using Lavender Silk Microfine Glitter.

I covered a top folding white card with some lavender designer paper and then adhered the balloon to the top of the card using foam tape. The bow that is attached where the balloon would be tied is also part of the die set.

I die cut the "Happy" and "Birthday" from the new Happy Birthday 3 die set again from White Soft Finish Cardstock. The "Happy" is adhered over the glittered balloon, while the "birthday" I stacked three together to make a thicker sentiment and colored the sentiment using various shades of purple for an ombre effect.

To finish off the front of the card I added some purple crystals randomly around the card.


For the inside of the card I created a pop-up card using the General Pop-ups die set. I die cut and glittered another of the "Big Balloons" adhering to the back of the pop-up, this time placing it higher on the card so it can be seen over the pop-up sentiment.

The Make A Wish Sentiment was die cut from White Soft Finish Cardstock and colored using Copic Markers giving it an ombre look. This was layered onto a rectangle die cut using the Dashing Rectangles. As the rectangle was larger than I needed, I placed the rectangle back into the die after die cutting so that I could shorten it slightly.

I used the stars that come with the Make A Wish die set, to die cut an additional star with I covered with Cool Diamond Silk Microfine Glitter and adhered over the star in the Make A Wish sentiment.


Along the edge of the base of the card I used the Valentines Edges to create a purple border. I also used the Fitted Frames - Curvy Ovals to die cut an oval to attach to the middle where a personal sentiment can be written.

Don't forget to visit the Elizabeth Craft Designs blog to see what the other Design Team have created using Suzanne Cannon's A Way With Words new release dies.

Supplies:


Friday, March 2, 2018

Romantic Bouquet Celebrate


Hi Crafty Friends,

My card today is for a challenge I do with a couple of friends of mine. As we all own Distress Oxides our challenge this month was to include Distress Oxides on our card in some way.

As I had ordered the new Distress Oxide Collection which was released in January, I decided to wait until my order arrived before I started on this challenge. As it turned out I only ended up using one of the new colors (Tattered Rose) ... but that is ok!

I used the new ModaScrap Romantic Bouquet die from Elizabeth Craft Designs to die cut the front of my card from Soft Finish Cardstock. I then used Tattered Rose; Worn Lipstick and Abandoned Coral Distress Inks to create an ombre effect on the die cut panel and also the inside of the card. I adhered a piece of White Soft Finish Cardstock behind the die cut Romantic Bouquet and then also used the three inks on that panel as well so the card had the same look inside and out.

I adhered pearls to the centres of each of the flowers on the front of the card.


The sentiment "Celebrate" from A Way With Words - Happy Birthday Collection Clear Stamp set was stamped onto the lower right hand corner of the card so it could be seen when the card was closed.


I added two birthday sentiments also from the A Way With Words - Happy Birthday Collection Clear Stamp set to a pink piece of cardstock which was die cut using a rectangle from the Dashing Rectangles die set. I trimmed the left edge off to match the straight lines of the centre.


Supplies:

Elizabeth Craft Designs:


Other:
Cardstock - Pink
Black VersaFine Ink
Distress Oxide Ink - Tattered Rose; Worn Lipstick; Abandoned Coral
Pearls