Sunday, July 7, 2019

All Aboard It's Circus Time!


Hi Crafty Friends,

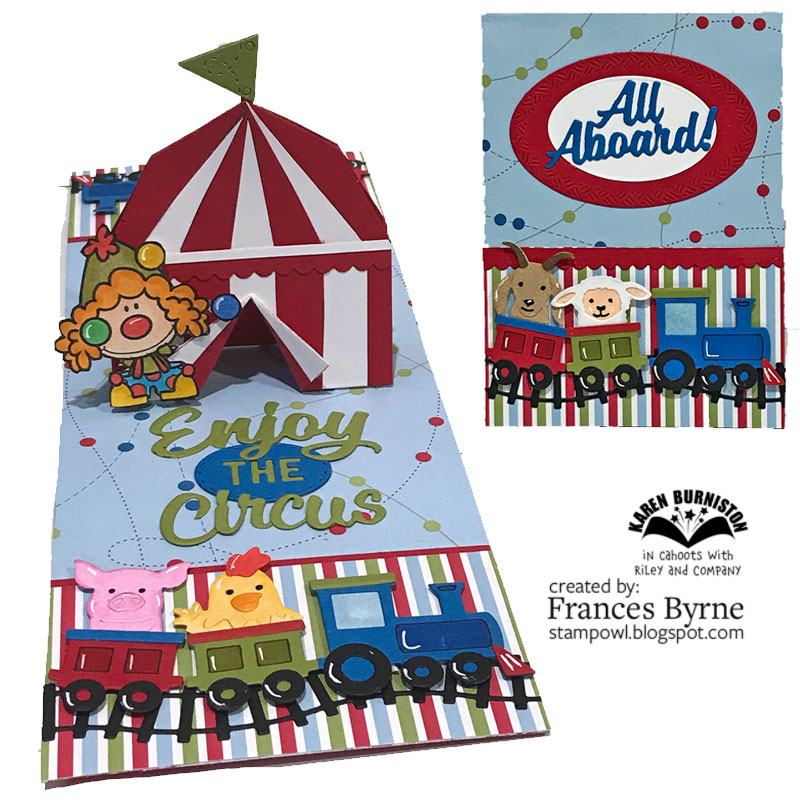
Today I am excited to share a card I created using some of the new Karen Burniston dies which are being released this month. As well as many new dies making an appearance this release, there is one die making a comeback which is the Barn Pop Stand die set.

About 4 years ago, I created a card where I changed the Barn into a Circus Tent, so I decided to do that for my card today. I always love being able to do more than one thing with a die set.


I used 13 die sets to create this card because I have all of Karen Burniston's die sets. But this design is easy to adapt so you can use what you do have. 


Here is how to convert the Barn into a Circus Tent
  • Die cut  the barn from cardstock and then drew a line at the point where the roof starts to form a triangle (of sorts). This will be your pattern.
  • Measure in from the left side 1/4 inch and make a mark on the line you created above, then at every 1/2 inch until you are left with 1/4 inch on the right hand side of the barn. Do the same at the bottom of the barn and join up these marks as per my photo above. 
  • Next take a ruler and line up each mark with the centre point of the top of the roof and draw a line.
  • Die cut 3 barns - one in white; 1 in red and another in red which has double sided adhesive tape added to the top of it.
  • Use the pattern above to cut the red and white barns and adhere them to the barn with the adhesive.
  • Die cut the scallop edge from the Border Blends - Argyle die set. (Tip: I positioned the die a little from the edge of the cardstock and used the negative part of the scallop, this way I could make it the depth I wanted to suit my tent. Adhere across the room line. 
  • Cut a strip of white card approx 1/8 inch wide and adhere there to the top of the scallop border we attached in the above step.
  • Cut up the middle of the 'tent' to approx 1/4 inch from the roof line and fold back the card to create the tent flap. 
  • Use left over white pieces to add white to the inside of the tent flaps.
  • If you are creating a Pop Stand Card you will need to repeat these steps to create a second tent, but for this one you don't need to create a tent flap.


Because Karen is also releasing a train die set too, I decided to incorporate that into my card too adding various animals to the carriages. I used the train from the Train Pivot Panels die set and the train tracks are from the Train Elements die set.  The animals are from the Chicken, Pig and Lamb; Cow and Goat & Dog and Cat die sets.

I also added a few clowns to my card to give it a circus feel using an older stamp set in my stash .... CC Designs Clownin' Around.

The flag on the circus tent is from the Tag Book Pop Up die set, however there are a number of die sets that contain flags of various types which could be used.


Here is an overhead shot of my card, so you can see the whole inside of my card at once.

I used the "Enjoy The Ride" die set, substituting the word "ride" with the word "Circus" which was made up using letters from the following die sets: Celebrate (C); Happy Birthday (ir); Congrats (c, u and s). 


For the front of the card, I added another train filled with animals ... I guess my circus has farm animals instead of the normal circus animals haha! 

 I also added the "All Aboard!" sentiment which is another of the dies from the Train Elements die set. This was layered using the Crosshatch Ovals die set.

Supplies:
For your shopping convenience, all products are linked below. Compensated affiliate links are used where possible with no extra cost to you. This helps me to continue to share all the projects I include on my blog. Please note I only use and share products I love.


Saturday, July 6, 2019

Howdy Just Chicken In


Hi Crafty Friends,

It’s challenge time with the “Crazies” over on the Crazy 4 Challenges blog. Being a brand new month it is time to introduce our new challenge hostess which is Karen Ostergard.

Apparently today is National Fried Chicken Day in the U.S.  For today's challenge, create a card with a bird on it.


Seeing it is National Fried Chicken Day, I decided the bird I would use on my card would be Karen Burniston's new chicken die from the Chicken, Pig and Lamb die set. 

I have created a pop stand card using the Barn Pop Stand Card die set, which is being re-released. For something different I decided to create a pink barn. Karen Burniston recently shared with the Design Team an idea of using the fence from the Farm Edges die set on either side of the barn. As I was adding chickens to my card I decided to add the chicken wire instead of the fence.


The barn doors open up to reveal another chicken inside the barn which is behind some chicken wire.

I added the fence from the Farm Edges die set. I added another chicken on the left hand side of my card and a sentiment on the right which is layered onto the rectangle from the Rectangles - Crosshatch die set.


This is a view of the back of my card. I used the tractor border which is also from the Farm Edges die set and a sun which is from the Tropical Scene die set.


One last photo of the inside of the card showing an overhead shot of my card, so you can see the whole card at one time.


For the front of the card I added two of the papers I used on the inside. I also added the fence to separate the two papers.

On the lower left hand corner I added another chicken to which I added a hat and pitchfork which are from the Accessories 3 die set.

On the top right hand side of the card I added the "Howdy" sentiment from the Howdy die set. I then added the "Chicken In" sentiment which is from an old stamp set in my stash which unfortunately is no longer available. After stamping the sentiment onto my cardstock, I then used one of the arms from the Photo Collage Pop-up to die cut the sentiment. I love when you find another use for a die.

Don't forget to check out the rest of the “Crazies” cards over on the Crazy 4 Challenges blog and also their individual blogs for more details.


Supplies:
For your shopping convenience, all products are linked below. Compensated affiliate links are used where possible with no extra cost to you. This helps me to continue to share all the projects I include on my blog. Please note I only use and share products I love.


Friday, July 5, 2019

Have Your Cake And Eat It Too


Hi Crafty Friends,

I have been seeing a few Triangle Corner Pop-up Cards online recently, and as I love making different construction style cards I just had to give this a go.

I used Lawn Fawn's Birthday Before 'N After Clear Stamp set to decorate my card.


Most of the tutorials for this card, seems to be fairly long, but they are fairly simple to create. Start by cutting a piece of cardstock that measures 8 inches square and then score at 4 inches horizontally and vertically. Cut along the bottom vertical fold to create a cut line. Next score diagonal lines from the top centre point to the side score lines. Cut squares of patterned paper and decorate.


The panel on the left with the sentiment will be hidden under the square on the right hand side, so it is optional whether you place anything on that panel. As you can see I decided to add a sentiment.

I used Crafter's Companion Birthday and Happy Edge'able dies to add the "Happy Birthday" sentiment along the diagonal folds at the top.


The circle in the centre folds down so it can be folded. Basically this is just a mini circular easel card.


Here is my card when it is folded ready to be placed in an envelope. It folds pretty flat. I decided to add some left over images and sentiment to this back panel for some interest when the recipient pulls it out of the envelope.


And finally, one last photo which is the back view of the card when opened.

Supplies:
For your shopping convenience, all products are linked below. Compensated affiliate links are used where possible with no extra cost to you. This helps me to continue to share all the projects I include on my blog. Please note I only use and share products I love.


Thursday, July 4, 2019

Red, White and Blue Cheers


Hi Crafty Friends,

t's challenge time with my friends over on the CCEE Stampers challenge blog. Being a brand new month it is time to introduce our new challenge hostess, which is Vicky Gould.

Since both Australia and the USA have red, white and blue for their colors, let’s use those colors to make a card…..does not have to be for a holiday, just red, white and blue….but, of course, if you send out Patriotic cards, go for it!

First up, happy 4th July to all my readers from the USA! As you can see I decided to visit a country other than USA or Australia, that also uses the colors red, white and blue in their flag .... Great Britain. I recently purchased this fun London themed stamped from Waffle Flower Crafts called Oyez, so have been wanting to use it on a card. 


For my card today, I am using a couple of Karen Burniston's new die sets being released this month. For the main part of the card I have used the new Triple Flip die set, you can see a quick video showing my card in action above. This die set is lots of fun!


I added the new "Cheers" sentiment die to the bottom of the card using the fishtail banner which is included in the Triple Flip die set for the layering of the sentiment.


For the inside of the card I used the Celebrate die set layering this onto ovals from the Crosshatch Ovals die set.

Don't forget to check out the CCEE Stampers blog (goes live 12 AM EST) to see the rest of the creations the CCEE Stampers created this week. You can also see more details of their creations on their individual blogs:


Supplies:
For your shopping convenience, all products are linked below. Compensated affiliate links are used where possible with no extra cost to you. This helps me to continue to share all the projects I include on my blog. Please note I only use and share products I love.


Wednesday, July 3, 2019

Tribute to Joanne Grzelak


Hi Crafty Friends,

Today I am participating in a special blog hop tribute for my friend Joanne Grzelak. Sadly we were recently told by Joanne's sister Sue, that she had passed away suddenly on the 25th May 2019.

I "met" Joanne online way back in 2007 over on Splitcoast Stampers when I was invited to join the original CCEE Stampers challenge team. Back then we didn't have a blog, and we used to all meet in one of the SCS forums to chat each night. At that stage Joanne wasn't a member of CCEE Stampers, but she often popped in to chat with us and later joined the Design Team in 2010. 

Joanne was also one of the foundation members of the other challenge blog I look after called Crazy 4 Challenge which was started by Vicki Garrett, Cindy Haffner and myself back in 2009.

Joanne was a wonderful person, very supportive and will be missed very much.

Today the CCEE Stampers, Crazy 4 Challenges Design Teams and a few special stamping friends have come together in this special tribute blog hop to honour our stamping friend by either:

1. Create a card depicting one of the things she love which included:
  • The Ocean
  • Lighthouses
  • Black and White Cards
  • Her Dogs
  • Paper Piercing

2. CASEing a card Joanne created on either of her blogs  The Inky Ocean Gazer and The Inky Ocean Gazer 2 or SCS Gallery


As you can see by my card above, I decided to create a black and white card for my tribute to Joanne today. Joanne used to create the most wonderful black and white cards and I was always in awe of these cards she created. To me she was the Queen of black & white cards.


To create my card I used Paper Rose Studio's Blooming Flower Background die which I have been wanting to use for a while now. I die cut the images from black cardstock and then adhered this onto a piece of white cardstock that had Clear Double Sided Adhesive Tape on the front and then added some Cool Diamond Silk Microfine Glitter over the top of the adhesive.

I framed this image using the largest frame from Hero Arts Wood Frame Infinity dies. I added this to the top of an Easel Card created from black cardstock.

I die cut another frame and added that to the base of the card and then stamped the striped background from Concord & 9ths Stripes & Sayings stamp set and die cut this using the same wood frame die so I could adhere the inner rectangle to the centre of the frame on the base.

I added a stripe of white cardstock across my striped background panel which is the stop for the easel card. I then added the Hello sentiment which is from The Stamp Market.

To finish off the main part of the card I added some black rhinestones.


Here is a look at my card when it is folded ready to be placed in an envelope.


I added a panel to the back of my card and added another sentiment, this time from Clearly Besotted's Sitting Here Thinking stamp set.

Thanks for visiting me today for our Tribute to Joanne Grzelak. Your next stop on the hop is Lois Bak. 

Here is the complete blog hop list if you need it.


Supplies:
For your shopping convenience, all products are linked below. Compensated affiliate links are used where possible with no extra cost to you. This helps me to continue to share all the projects I include on my blog. For the benefit of my Australia readers, I have started to include some links to Australian stores when available. Please note I only use and share products I love.


Tuesday, July 2, 2019

July 2019 Karen Burniston Designer Challenge


Hi Crafty Friends!!!

Welcome to our July Karen Burniston Designer Challenge.

Check out Karen Burniston's blog on Wednesday (US Time) when you will be able to see what all the designers created for the challenge this month, plus Karen will have an amazing video tutorial to share with us all.

Our challenge theme this month is ....  "PICTURE THIS!" - incorporate a photo (or photos) into your card of any theme. 


As I have mentioned before on this blog, earlier on in the year my youngest daughter finally got the pug puppy she has been wanting for so many years. It is very much loved, by her and by us. So when this challenge came up I decided to use some of the photos my daughter has taken of "Frankie" for my card. 


To create my card I have used the new Karen Burniston Photo Collage Pop-up die set .... wow is this an amazing die and lots of fun. Besides the mechanism for the photo collage arm, this set also includes the photo frame, the paper clip which look so real and pin.

I did go a little overboard with the photos, as I had printed out so many. But I do like the end result. Karen Burniston recommends 8 photos on the pop up arm, but I managed to get 10 on mine and that is all within a standard 4 1/4 inch x 5 1/2 inch card when closed.

To decorate my card I used Simon Says Stamp's Paw Background stamp for the background on my blue panels. The bark, Woof etc sentiments are from Lawn Fawn's Critter Chatter. The stamped pugs, and pug sentiments are all from There She Goes Stamps Pugalicious Stamp set which unfortunately is no longer available. When searching for pug stamps recently, I did find a cute set from Newton's Nook which I have now also order LOL!


Here is a quick video to see my card in action.


I kept the front of the card fairly simple as the focus is the inside of the card. I added another stamped pug using the Crosshatch Circles and a circle from the Snowman Twist Circle for the layers.


Here is one last photo of my card when it is partially closed. It does fold pretty flat and will fit inside a standard envelope.

The sweet is from another new Karen Burniston die set called Home Sweet Home. I also added a couple more paper clips to the layers.


Don't forget to visit Karen Burniston's blog on Wednesday when you will be able to see what all the designers created for the challenge this month.


Supplies:
For your shopping convenience, all products are linked below. Compensated affiliate links are used where possible with no extra cost to you. This helps me to continue to share all the projects I include on my blog. Please note I only use and share products I love.


Monday, July 1, 2019

Divinity Designs - July Release


Hi Crafty Friends,

Today I am sharing three projects I created using new stamps, dies and patterned papers from  Divinity Designs July Release.  For more inspiration using the April Release and to see the other designers projects, be sure to visit the Divinity Designs Blog.

My projects today features six of the new stamp, stamp/die duo & dies being released today .... Sweet Baby Stamp set, Bless This Baby Stamp/Die Duo set, Baby Blessings die set, Letter Board Die set, Candy Carrier die set and Sentiment Stripes die set. 


For my first project today I created a note card /gift card, this measures 4 1/4 inches square. I used Divinity Designs new Letter Board die set, to die cut the letter board, frame and alphabet to create the quote. This letter board die could be used for any occasion and using whatever colors you like for the inner portion of the die, although the most popular color for this would be black.

I added the cute little rabbit which is from the Baby Blessings die set.

The sentiment on the lower left hand corner is from the Sweet Baby stamp set and layered using the Circles and Scalloped Circles die sets.

For the papers on all  my baby projects today I used new Baby Boy Paper Pad.


For the inside of my gift card I added another strip of patterned paper to the bottom of the card. I added another sentiment from the Sweet Baby stamp set.

I also added a baby bib with rabbit, which is from the Baby Blessings die set.


Next we have a baby card using the Half Shutter Card with Layers die set to create the base of my card.

To decorate my card I used the Onesie, baby bib, rabbit, bottle, dummy, rattle and Welcome Baby sentiment from the Baby Blessings die set. 

I layered the onesie and Welcome Baby sentiments using the Ovals and Scalloped Ovals die sets.


I also used the new Bless This Baby Stamp/Die Duo set. This set contains the Baby die which I used to add the baby sentiment on the back panel of the card, and all the stamped sentiments.

For the one line sentiments I used the dies from the new Sentiment Strips die set and for the two line sentiment above the "Baby" sentiment, I used one of the rectangle dies from the Tri-fold Card with Layers die set.


Here is a look at my card when it is closed ready to be placed in an envelope.


For my final project today I created a cute little Candy Carrier using the new Candy Carrier die set. This was designed to hold Nuggets, but it would be fun to add all sorts of fun items into this box.


To decorate the front of the Candy Carrier, I added the Welcome Baby and Baby Bottle which are both from the Baby Blessing die set.

Supplies:
For your shopping convenience, all products are linked below. Compensated affiliate links are used where possible with no extra cost to you. This helps me to continue to share all the projects I include on my blog. Please note I only use and share products I love.