Showing posts with label Interactive Card. Show all posts

Wednesday, July 30, 2025

Big Mouth Nutcracker


Hi Crafty Friends,

Today I am sharing three Big Mouth Nutcracker cards I created recently using dies from Hero Arts.

As I couldn't decide which colour I wanted my nutcracker, I decided to make three one of each colour.


When I was researching Nutcrackers to make my cards, most I saw had white beards and hair and their moustache and eyebrows were black. I ended up using a very light grey cardstock for the hair and beard to take the starkness off the cards.


These are an interactive card, so when you pull the beard the mouth opens to reveal a Christmas sentiment.


This one is basically the opposite colours to the first, substituting the green for the red etc.


I used the same sentiment for this one as I did for my first nutcracker card.


For my last card, I used the colors dark blue & red. 


For this one I used a different sentiment to be revealed when the mouth is opened.


For the insides of all the cards I added two sentiments.


Wednesday, June 11, 2025

Flying By To Say


Hi Crafty Friends,

Today I am excited to start sharing some of the new dies which are being released by Karen Burniston next Monday 16th June, 

As tomorrow (12th June) is the 5th anniversary of when I started the Slimline Card Addicts Facebook Group which now has over 9000 members, I decided to create a Slimline card. 

Here is a quick video to see my card in action.


I created a Whirly Wheel Slimline Card using the new Whirly Wheel die set & Whirly Wheel Words stamp set. I was excited when I discovered that the Whirly wheel would inside a slimline card, This card measures 4 inches x 9 inches. 

To decorate my card I created a space scene using the Rocket Pop up & Space Charms die sets. The background paper is from Whimsy Stamps.


For the inside of the card I used the new Curved Edges die set to create the planet ground, I added the spaceman & alien from the Space Charms die set. I also added the big rocket flame from the Rocket Pop up die set.

The sentiment is from the new Birthday Magic stamp set, which I layered using the frame included in the Whirly Wheel die set.


Wednesday, March 26, 2025

Happy 'Bear’thday


Hi Crafty Friends,

Today I am sharing a Winged Panel Card using the Made To Surprise by Sam Calcott’s 5 x 7 Never Ending Card die set. One of the things I love about Sam’s dies is how she always comes up with different styles of cards using her die sets, giving them extra life.

For this card I decorated it using one of the Care Bear stamp/die sets from Craft Stash. I had stamped & coloured these images late last year and them forgot to use them. 


I added layers to the centre panel so I could add another bear & a sentiment. 


Monday, March 24, 2025

70th Birthday Wishes


Hi Crafty Friends,

As you can see, I have yet another 70th Birthday card to share with you. This will be my last one for a while LOL! 

Happy Birthday - to me!!! Yes today is my birthday and I am 70!!!!

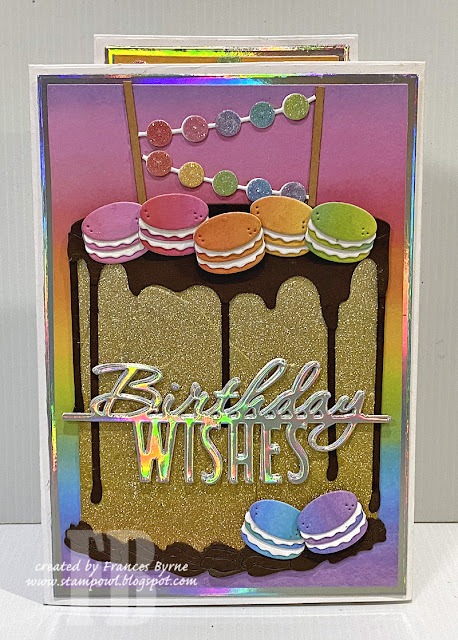
For my card today I created a Triple Tier Slider Card using the Made To Surprise by Sam Calcott's Triple Tier Slider Card die set. This card fits in a 5 x 7 envelope, when the card is completely closed.


To decorate my card, I used Spellbinders Bougie Birthday die set. I love this die set which contains the large cake, various icings and macroons as well as a few other things to help decorate the cake. I die cut the cake from ombre glitter cardstock in a tan color and then decorated it using chocolate ganache, macaroons etc.

I die cut the macaroons in rainbow colours to add to the top of the cake and the lower right hand side.

I added the Birthday Wishes sentiment in silver cardstock, which is from Papertrey Ink.

When you pull the tab at the top of the card, it reveals a second layer, which extends the bunting seen on the lower tier.


Pulling the tab one more time,  reveals the third layer which has the number "70th" on it.


I created a stand to add to the back of the card, this helps the card stand upright so it can be displayed and also gives a place to add a sentiment. 

To create the stand I cut a piece of white cardstock that measured 4 inches by 11 3/4 inches. I then scored along the long side at 4 1/2; 9; 10 & 11. To fold start with the 4 1/2 inch score and mountain fold, mountain fold, valley fold; mountain fold. Adhere the two ends together and attach to the back of the card.


Friday, February 23, 2024

Easter Bunny


Hi Crafty Friends,

Today I am sharing an Easter themed Kinetic Easel Block card I created recently to give to one of my grandchildren for Easter. 

This card using the Bouncing Bunny & It's Only More Puppets 5 x 7" Mechanism die sets from Made To Surprise by Sam Calcott. I used Sam's tutorial on creating an Easel Block card which she created when this collection was released last year, but I did give my card a few tweaks to make it a little different. You can find Sam Calcott's Easel Block Card Tutorial here.

Here is a quick video to see my card in action and how it folds.


For my Easel Block card, I did use the same bunny and papers which Sam used on hers, mainly these papers suited the style of card the best in my opinion. I did how change up the theme, making mine an Easter card.

I added Easter eggs to the card using Lawn Fawn's Mini Easter Eggs die set.


For the sentiment I used Karen Burniston's new Happy Easter die set which I adhered to the centre of the block portion of the Easel Block Card.

I also added an Easter Egg Basket to one of the bunny's arm which is from Karen Burniston's new Animal Add-ons 5 die set.


Here is a side view of my card, to see the look of the card a little easier.


On the inside base of the card, I added a large Easter Egg die cut and an Easter sentiment. Both the sentiment and large egg are from Divinity Designs, links of which are in the supply list below.

You can also see on this photo how two eggs at the back of the "block" are adhered so they don't interfere with the workings of the bunny.


I added a panel at the back inner portion of the card. Here I added two more sentiments which are also included in the Divinity Designs stamp set. I also added four more of the mini Easter Eggs. 


Here is a look at my card when it is folded, ready to be placed in an envelope. You can see how the card folds to fit an envelope, by watching the video at the top of the post. Because of the pull tab at the top of the card the card measures 7 1/2 inches x 5 inches.


Friday, January 12, 2024

Bean a Good Friend


Hi Crafty Friends,

Thanks for dropping by my blog. Today I am sharing a coffee themed interactive card I created recently.

Back in November, I got the Papercraft Society Box #50 which was one designed by Made To Surprise by Sam Calcott. It was a coffee theme, this time around which is a little different for these kits. As I was busy at the time making Christmas cards, I didn't have time to play with the contents of the kit until now.


Here is a quick video to see my card in action.

I have created a 5 x 7 Flip and See Card using Made To Surprise by Sam Calcott's 5 x 7 Flip and See Card die set.


When you pull the tab at the right hand side of the card, the top panel flips to the left to reveal another panel which I have decorated with donuts and a sentiment. I used the  stamp set included in the Papercraft Society Box to decorate the card. 


This card is then layered onto a side folding 5 x 7 card. I added an another image and sentiment from the Papercraft Society Kit.


Tuesday, November 14, 2023

Swinging By


Hi Crafty Friends,

Today I am sharing a fun kinetic birthday card I created recently.

This card uses Made to Surprise by Sam Calcott's Swing Card die set, I have been after this die set for a while and it finally came back in stock so of course I grabbed it. 

I used Daisy Mae Designs Let's Get This Party Started stamp set for the image, I love how she swings from the ceiling and so perfect to use with this die set.


Here is a quick video to see my card in action.


Here is a side view of my card, so you can see the base of the card a little better.

I also added balloons to the left side of the card which are from My Creative Life.


On the back of the card, I added a panel for a place to add a sentiment and personal greeting.

The sentiment used on here is from Creative Craft Products "Funny Sentiments" stamp set. I have been wanting to use this sentiment for a while, and I finally found the perfect image to use it with.


Wednesday, August 23, 2023

Hands Up If You've Been Good


Hi Crafty Friends,

Over the past few months, I have been enjoying making "puppet" themed cards using the It's Only More Puppets Collection from Made To Surprise by Sam Calcott. Last year I was able to get some of the puppet dies from the original It's Only A Puppet Collection, however the embossing folder and Santa/Rudolph die set weren't available to purchase.

A few weeks ago, I received an email notification from Craft Stash to say that the whole collection of It's Only A Puppet was back in stock and available to purchase .., yay! So of course I ordered what I didn't have :)

My dies arrived last week, so I wasted no time pulling out the Santa from the Santa & Rudolph die set to make a Christmas card. 


Here is a quick video to see my card in action.


For my card today, I decided to combine the It's Only a Puppet 6 x 6 mechanism die set with a Wiper Card. So it has two kinetic actions going on. For the Wiper card, I used Made To Surprise's 6 x 6 Square Pop-up Wiper Card die set.

As you can see, I also used the Snow Angel Embossing Folder for my background, I love how this looks, I used pearlescent white cardstock for this panel to add some shimmer to the card.


When you pull the sides of the card, it reveals the speech bubble with the "Ho Ho Ho" sentiment coming out  of the top of the card. The speech bubble is attached to a clear acetate wiper mechanism using one of the dies included in the Wiper Card die set. The "Ho Ho Ho" sentiment is from the Christmas Words die set also from Made To Surprise.

Along the bottom of the square panel, I added another sentiment which is from the Christmas Fun Sentiments stamp set. I white embossed the sentiment on red cardstock and then added a silver holographic border.

The wax seal on the top right hand corner of the card was created using a Spellbinder's Wax Seal Stamp ... Do Not Open. I also added a few extra red beaded embellishments which were also created using the red wax seal beads I used for the wax seal.


I added a white panel to the back of the wiper card, so I could have a place for more sentiment and a personal greeting.

I used another sentiment from the Christmas Fun Sentiments stamp set and also added the Merry Christmas from the Creative Craft Products Inside Out Sentiments Christmas Card die set.