Showing posts with label Space. Show all posts

Wednesday, September 24, 2025

Space Penny Slider Card


Hi Crafty Friends,

Today I am sharing a Penny Slider Card using new products from Made To Surprise by Sam Calcott. Sam's latest release was called Worth Every Penny and included dies to make various different Penny Slider Cards. There are also a number of different stamp/die sets of different themes,  the one I used for my card is a space themed set called Up Above.

I also pulled out an older Made To Surprise die set, the 6 x 6 Terrific Towers die set to use as the base of my card. 

I didn't take a video of this card in action, sorry. But you call tell by the two photos above how the images move and turn etc.

I used a Trinity Stamps Stencil called Crater Layers to create the planet surface for the alien to be standing on.

Here is another view of the front of the card. I added a sentiment included in the stamp set to the lower left hand side of the card.


Here is a look at the card when it is sitting on the desk, it does fold flat for mailing and would fit in a 6 x 6 envelope.


And finally the back of the card. I added a white panel and added a few more of the images, along with a sentiment. There is plenty of room to add a personal message.


Wednesday, June 11, 2025

Flying By To Say


Hi Crafty Friends,

Today I am excited to start sharing some of the new dies which are being released by Karen Burniston next Monday 16th June, 

As tomorrow (12th June) is the 5th anniversary of when I started the Slimline Card Addicts Facebook Group which now has over 9000 members, I decided to create a Slimline card. 

Here is a quick video to see my card in action.


I created a Whirly Wheel Slimline Card using the new Whirly Wheel die set & Whirly Wheel Words stamp set. I was excited when I discovered that the Whirly wheel would inside a slimline card, This card measures 4 inches x 9 inches. 

To decorate my card I created a space scene using the Rocket Pop up & Space Charms die sets. The background paper is from Whimsy Stamps.


For the inside of the card I used the new Curved Edges die set to create the planet ground, I added the spaceman & alien from the Space Charms die set. I also added the big rocket flame from the Rocket Pop up die set.

The sentiment is from the new Birthday Magic stamp set, which I layered using the frame included in the Whirly Wheel die set.


Monday, March 10, 2025

Space Puzzle Slider Card


Hi Crafty Friends,

Today I am sharing another Puzzle Slider card. I enjoyed making the one I shared last week, so I decided to make another one. For this card I pulled out my Spellbinders Space themed dies/embossing folder, focusing this time with the UFO Friends die set.

I used patterned papers for the background, sponging around each panel with black ink. The sentiment is from an old Craftin' Desert Divas stamp set called Far Out.

Directions - 5 inch x 7 inch version:

1.    Cut a piece of cardstock to measure 5 inches x 11 inches, this will be the card base. Score along the long side at 1 inch; 2 inches; 9 inches and 10 inches. Fold on all score lines so you have a mountain, valley, valley & mountain folds.

2.    From the same colour cardstock as the card base above, cut two rectangles that are 4 inches x 2.5inches and two rectangles that are 3 inches x 2.5inches.

3.    Apply glue along the 1 inch panel on the left. Starting from the bottom adhere one of the 4 inch rectangles to this panel, making sure to line up with the left and bottom edges. Next adhere one of the 3 inch rectangles to the same left panel, making sure that it lines up with all edges including the bottom rectangle.

4. Using the remaining rectangles, adhere these in the opposite way as step 3 onto the right hand panel. So the 4 inch rectangle is on top and 3 inch on bottom.

5. Cut your layering pattern papers so they are 3 3/4 inches x 2 1/4 inches and 2 3/4 inches x 2 1/4 inches and adhere to relevant rectangles on card base.

6. Decorate card as desired. If you wish to add a panel to the inside of card, this will be 6 3/4 inches x 4 3/4 inches.


For the inside of the card I added the planet surface using grey cardstock and the die from the Starry Night Embossing Folder. I added the planet and UFO Friends to the panel.

For the sentiment I added a birthday sentiment from Honey Bee Stamps Stellar Sentiments.


Monday, February 24, 2025

Happy Birthday Earthling


Hi Crafty Friends,

Today I am sharing a Space themed Inside Out Stepper Card I created using Spellbinders Space Collection designed by Stephen Hurley. 

THe Inside Out Stepper Card  was created using  Creative Craft Products High Centre Stepper Card from the Step on Up 2 Collection. Sam Calcott, shared a tutorial on this style of card a few years ago, you can see her tutorial here.

I used black cardstock for the base of my card, and then decorated all the panels using a patterned paper from Whimsy Stamps Lost In Space Slimline Paper Pack. This was layered using Silver Holographic cardstock.

I used Spellbinders To The Moon & UFO Friends die seetd for all the various images that decorate my card.

I added three sentiments from an older Made To Surprise Out In Space stamo/die set.

I don't normally decorate the sides on the front of the csrd, but I was having so much fun that I kept going!


Here is a look at my card when it is folded ready to be placed in an envelope. When closed the card measures approximately 5 3/4 inches x 7 1/4 inches.


For the inside I added a stamped sentiment to the middle panel using stamps from Honey Bee Stamps. I also decorated the side panels with a few aliens etc.

To create the ground of the planet the aliens are standing on, I die cut a side panel from grey cardstock and then used the die included in the Starry Night Embossing Folder to die cut the top of the panel.


Friday, July 21, 2023

You Are So Space'ial


Hi Crafty Friends,

According to the Days of the Year website, yesterday (20th July) was National Moon Day and Space Exploration Day. 

I remember back in 1969, it was the 21st for us down here in Australia. We had just arrived at school to be told we could go home as the first man was walking on the moon and we could watch this event on our TV's at home.

As you can see I decided to create a space themed card to celebrate these events.

Here is a quick video to see my card in action.


For my card today, I created a 5 x 7 Flip and See Card using Made to Surprise by Sam Calcott's 5 x 7 Flip and See Card die set.

I used stamps from Clearly Besotted's Balloon Bunch Space stamp set to decorate my card.

The sentiment at the top left side of my card, I used a sentiment from Made To Surprise's Out in Space stamp set.


When you pull the tab at the right hand side of the card, the top panel flips to the left to reveal another space scene. I used the same stamp sets on this panel as I did on the front of my card. The sentiment used on this panel is from the Clearly Besotted stamp set.


This card is then layered onto a side folding 5 x 7 card. I added a few more images from the Clearly Besotted stamp set.

I also added two more of the sentiments from the Made To Surprise Out In Space stamp set.


Other Supplies:

Out In Space Stamp Set - Made To Surprise by Sam Calcott (discontinued)


Thursday, May 4, 2023

May the 4th Be With You


Hi Crafty Friends,

Today is May the 4th ... which means it is Star Wars Day .... May the 4th Be With You! To celebrate the day I decided to create a space themed card using stamps and dies from Made To Surprise by Sam Calcott.


Here is a quick video to show my card in action.


As you can see I have created a Reveal Wheel card using the Made To Surprise Reveal Wheel Mechanism Die set and the Out In Space Overlay die set. The Overlay die set die cuts the various shapes into the card, I used the layered circle overlay to create the circle panel which I die cut from patterned paper and the corners on the square panel underneath. There are actually four corners, but I only used the two for this card.


As this reveal wheel card is 6 inches square, it allows for more images or sentiments on the wheel. For this card I ended up adding 5 sentiments and three images (the same image) to the wheel.


As I didn't have enough sentiments that fitted the triangle area, I added the shooting star.


I added the space themed images to my card, using Made To Surprise Out In Space Stamp/Die set. This set is no longer available to my knowledge, but I was lucky enough to be able to get it from eBay UK recently.


The spaceship in the centre of the card, disguises the large brad in the centre of the card.


Here is a look at each of the 6 scenes showing the different sentiments that are revealed when you turn the wheel at the side of the card. As mentioned above, there are actually 8 different turns of the wheel but as three of those were the same star I didn't add all three to this photo.


For the inside of the card, I used the other two corner overlay dies included in the Out In Space Overlay die set to add to the corners of my white panel. I added another of the space themed sentiments and two more of the images I used on the front.

Other Supplies:
Out In Space Stamp/Die Set - Made To Surprise (discontinued)


Tuesday, August 30, 2022

Out of this World


Hi Crafty Friends,

Today I am excited to be able to share I card I created using one of Karen Burniston's new die sets which will be released next Monday 5th September. There will be 13 new die sets that will be released on this day.


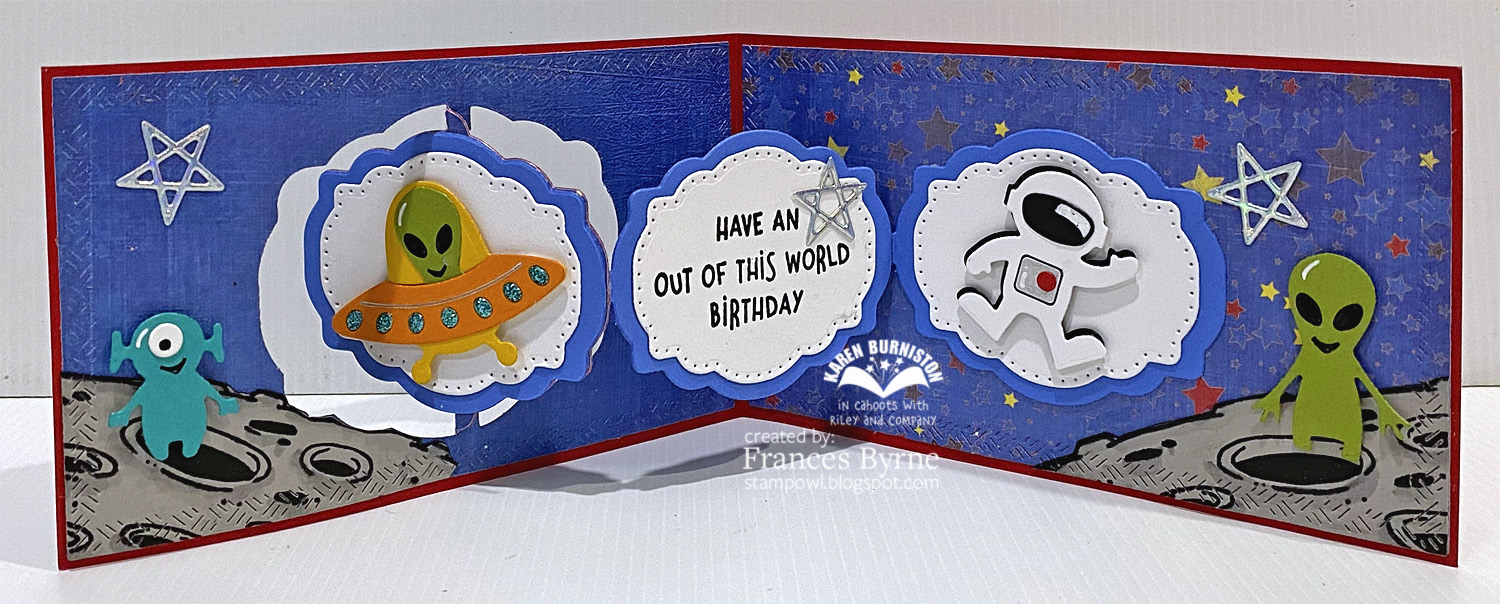
For my card today I have used the new Label Charm Pop-up, this die was designed to fit into a side fold card that measures 5 to 6 inches wide and works perfectly with Mini Slimline cards, which is what I created today.


As you can see, I created a space themed card using the Space charms die set. The layers on each of the panels were die cut using the Short Rectangles - Crosshatch die set.


When you open the card the image that appears when the card is closed, pivots so it can be seen on the inside too.

To finish decorating my card I added Whimsy Stamps'  Moon Background which I added to the bottom corners of the card. 

The Label Charm Pop-up die set also comes with a few accessory dies which included the star. I die cut the star from holographic cardstock and added it randomly over the card.

I added a birthday sentiment using Lawn Fawn's Beam Me Up stamp set.


Thursday, August 25, 2022

Happy Birthday Earthling


Hi Crafty Friends,

It's challenge time with my friends over on the CCEE Stampers challenge blog. As challenge hostess of the month, I finish off the month with one last challenge.

According to the Days of the Year web site, yesterday 24th August was Pluto Demoted Day, this day marks the occasion in 2006 when Pluto was demoted from being a planet to a dwarf planet. For our challenge today, create a card that has a space theme.


Over the years, I have created many space themed cards so I wanted to make something different to the ones I have made in the past. It has also been about a year since I have made a Magic Iris card, that that is what I decided to use for our challenge this week. I used Lawn Fawn's Magic Iris and Magic Iris Add-On die sets to create the magic iris portion of this card.

Here is a quick video to see my card in action. 


To create the background of my card I grabbed some papers from the Craft Consortium's Ink Drops Vivid Paper Pad. This has to be one of the most versatile papers as I have used it for so many different themes, all I needed to do for this card is splatter over some white paint and Liquid Stardust to give it the outer space feel.


Here you can see my card with the "Magic Iris" full open. I had made this card and was ready to video the opening and closing of my magic iris and it started playing up, so I carefully removed the front from the card base (I didn't want to ruin the inside of my card) and. added an extra layer of foam tape around the edge of the card and a layer to the three bridge pieces on the magic iris. Once I had re-assembled my card, the magic iris worked perfectly as you can tell by the video above.


Here is a quick look at my card showing the Magic Iris closed, partially open and fully open.

To decorate the front of the card I added the moon surface using Whimsy Stamps Moon Background stamp. The sentiment shown when the magic iris is fully open is from Honey Bee Stamps Stellar Sentiments stamp set.


I had intended to keep this card to just the Magic Iris on the front, but when I had finished the front and was about to work out what to do in the inside I ended up deciding to fully decorate the inside too. So I added more splattered papers and the moon.

Most of the images used on both the front and back of my card are from MFT Stamps Space Explorer stamp set, but as I have many space themed stamp sets I did pull out a few extra planets and the alien from a couple of other sets, including Honey Bee Stamps Far Out Friends and a discontinued There She Goes stamp set called Out of this World.

I created a pop-up card for the inside using the mechanism from Karen Burniston's Katherine Label Pop-up to pop up the cute astronaut holding the balloons. You can see how the pop up mechanism moves the astronaut up and down in the video above.

Finally I added another sentiment using the Honey Bee Stamps Stellar Sentiments stamp set. I used the smallest rectangle die included in the Karen Burnsiton's Long Rectangles - Crosshatch die set to layer the sentiment. 

Don't forget to check out the CCEE Stampers blog (goes live 12 AM EST) to see the rest of the creations the CCEE Stampers created this week. You can also see more details of their creations on their individual blogs:

Other Supplies:

Out of this World Stamp set - There She Goes (discontinued)