Showing posts with label Wax Seal. Show all posts

Monday, February 3, 2025

Pond Postage


Hi Crafty Friends,

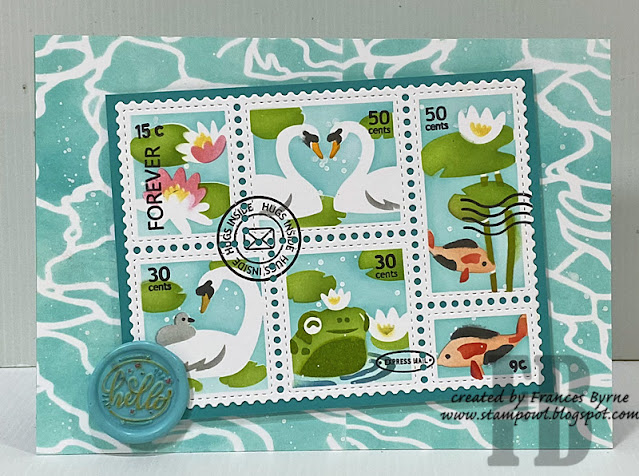
Thanks for stopping by my blog. Today I am sharing a 5 x 7 Faux Post Birthday card I created recently.

For the postage part of the card, I used Waffle Flower Crafts Postage Collage die set along with The Pond Postage Collage Stencil set. I layered this to a top folding landscape 5 x 7 card. I used the Shimmering Water stencil to create the water pattern on this panel. I also added a wax seal to the lower left hand corner of the card.


For the inside of the card I added a sentiment from the Pond of You stamp set. 


Friday, October 27, 2023

Big Thanks


Hi Crafty Friends,

Today I am sharing another Thank you card I created recently. This one uses the Spellbinders Thank You Very Much Glimmer Plate which I foiled using Navy Blue foil and the Solid Plate, so I could use the reverse image of the foiled panel.


For my card, I used Made To Surprise by Sam Calcott's Side Panel 5 x 7 inch Card die set from the Showstoppers Collection.

I also used the Sympathy Additions die set which is also from Made To Surprise. The pink leaves use a die included in My Creative Life's The Gift of Giving die set.

The wax seal on the foliage was created using the Made To Surprise's Happy Mail All Occasions Wax Seal set.


On the back of the card, I added another "thanks" sentiment using Pink Fresh Studio's Fancy Script Words Hot Foil Plates and coordinating die set.


Other Supplies:
  • Thank You Very Much Glimmer Plate - Spellbinders
  • Navy Blue Foil - Go Press & Foil


Tuesday, October 17, 2023

You're A Big Deal


Hi Crafty Friends,

Apparently today (17th October), is National Playing Card Collection Day so of course I had to pull out my Karen Burniston House of Cards Pop-up die set to create a card.


This time round, I have created a Slimline card which measures 4 inches x 8 1/2 inches when folded.  My house of cards is 3 rows high.


To decorate my card, I used the Word Set 17 Congratulations die set to add the sentiment. I also added the poker chips which are from the Game Charms die set.


On the right side of my card, I added two more poker chips and also four ace cards which are from the same card pack that I used for the house of cards.


I used the same papers that I used on the inside of my card, on the front. I was limited with the amount of paper I had left over, so I had to get a little creative with it.

I added the "Happy Birthday" and "Happy Birthday Shadow" die set to add the birthday sentiment on the front of the card.

I also added two wax seals which are of playing cards & dice.


Here is a close up of the wax seal.


Thursday, September 28, 2023

Snowman Christmas


Hi Crafty Friends,

Today I am playing with another of the dies from the Creative Craft Products Sweet Christmas Collection. These dies are designed to create a fun chocolate holder. I have been using them to make Christmas gift tags with a chocolate inside, but I am also trying to use them all as a stand alone die on a card. For my card today I am using the Frosty the Snowman die set.

To create the background of my card, I used the Flash 5 x 7 Background die which I die cut from teal cardstock, I then adhered the panel onto a panel of cardstock that had double sided adhesive on the front. I then covered the exposed adhesive with Warm Diamond Silk Microfine Glitter. This panel was adhered to a top folding 5 x 7 white card.

I used Lawn Fawn's Stitched Hillside Border dies to create the snow for the bottom of the card. 

I used pink and light green cardstock to add the hat and scarf to the snowman. As this set doesn't include arms, I used the antlers from the Rudolph the Reindeer die set to add the arms.

To cover the hole in the tummy where the chocolate would go it made as intend, I added a snowflake wax seal, using green wax beads and a snowflake wax seal I purchased from Amazon.

To finish off the front of the card, I added the "Merry Christmas" from the Made To Surprise Christmas Fun Sentiments stamp set.


For the inside of the card, I added layers using the Creative Craft Products Notched Rectangles die set. I then added a stamped sentiment using one of the sentiments from Made To Surprise's Christmas Sentiments stamp sets included in the Moving Scenes Collection.


Monday, September 25, 2023

Gingerbread Christmas


Hi Crafty Friends,

Well today is the 25th September, which means it is only 3 months until Christmas ... yikes!

For my card today, I am sharing a Gingerbread Man (or Woman) Double Bridge Fold Card. Sam Calcott shared a tutorial on this style of card a little while ago, you can see her video here

This card measures 6 inches x 6 inches and the centre portion of the card is 1 inch deep when displayed. However it does fold flat for mailing.


To decorate my card, I pulled out the Gerry the Gingerbread die set from Creative Craft Products Sweet Christmas Collection. I am planning on using all these dies to make Christmas Gift Tags this year, but I am also trying to use them all on a Christmas card if I get the chance.

There is a hole in the Gingerbread Man's belly for a chocolate to be displayed, but as I wasn't using chocolates for this card I covered the hole using a wax seal. For the wax seal I used a Spellbinders Wax Seal Stamp ... Do Not Open! I poured the melted wax in the centre of a shaped mould before stamping the wax seal stamp into the wax to give it a fancy shape. I highlighted the raised portions of the wax seal using a gold metallic pen.

I added the bow that came with the die set to the gingerbread man's head, so I guess this makes this a gingerbread woman.

Finally I added a sentiment, which is a foiled sentiment using Glimmer Foil stamps/dies from Spellbinders.


For the back of the card, I added a white panel so that I could add a sentiment and also have a place to write a personal greeting. I also found that the top bridge on the front, sagged a little until I adhered this panel to the back for added strength. The sentiments used here are from Made To Surprise by Sam Calcott's Christmas Sentiments from the Moving Scenes Collection.


Thursday, September 21, 2023

All Aboard


Hi Crafty Friends,

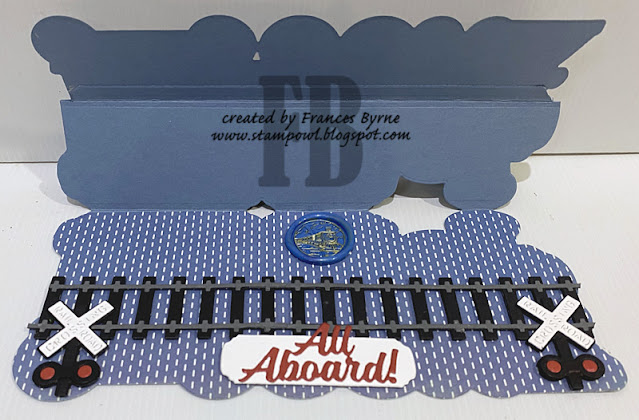
Today I am sharing a Train Easel Card that I created for my husband's birthday. It was such fun to make!

This card uses Anna Griffin's Antique Train Slimline Easel die set. I had been looking for this die set for ages, and unfortunately Anna Griffin doesn't sell to international customers and Scrapbook dot com didn't stock it either. Finally I checked eBay and found a seller there who was selling it new, so I took the opportunity to get it while I could.

I die cut the train from blue pearlescent cardstock and also gold and paper pieced the gold into the holes in the blue train. I die cut the easel portion from a smoky blue cardstock and then covered the base with patterned paper.


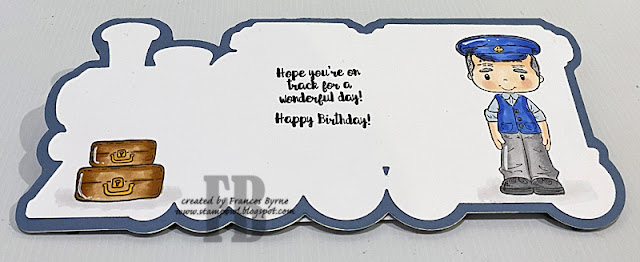
I used two stamps from Kanban's Patchwork Pals Grandpa's Trains stamp set, to create the train driver and the boy's face in the carriage.

For the stopper to keep the easel portion of this card upright, I used a Train Track Border Die set from Taylored Expressions.

The train signals and "All Aboard" sentiment, are all from Karen Burniston's Train Elements die set.


I had recently purchased a train wax seal stamp, which I also wanted to use. As it didn't look right on the front of the card, I decided to add it to the base. I can't be seen unless you open the card, but that is ok.


Here is a close up of the wax seal. I'll also add a wax seal to the envelope.


I die cut the train shadow die from white cardstock, so I could add to the back of the card. This gave me a place to stamp a sentiment and also write a personal greeting. I also added two images from the Kanban stamp set that I used on the front of the card.


Other Supplies:

  • Train Track Border Die Set - Taylored Expressions (discontinued)
  • Patchwork Pals Grandpa's Train - Kanban (discontinued)


Friday, September 1, 2023

A Crackin' Christmas


Hi Crafty Friends,

According to the Days of the Year website, tomorrow (2nd September} is World Beard Day!

I figured gnomes have beards, so I pulled out a gnome Christmas stamp set to make a Christmas card. This fun gnome is from the Nutcracker Gnome stamp set from Woodware Stamps.


For my card today I created a trifold card, using Made To Surprise by Sam Calcott's 6 x 6 Trifold Card from the Showstopper Collection.

I added a snowflake wax seal to the lower right side of the oval sentiment panel using a snowflake wax seal I purchased from Amazon. I also created some wax embellishments to use around the nutcracker gnome.


I added a panel to the back of the card, so that I could use another of the sentiments included in the Nutcracker Gnome stamp set and also have a place to write a personal greeting. I added a few green snowflakes which match the colour of the snowflakes on the pattern paper I used on the front of the card.


Wednesday, August 30, 2023

Celebrate You


Hi Crafty Friends,

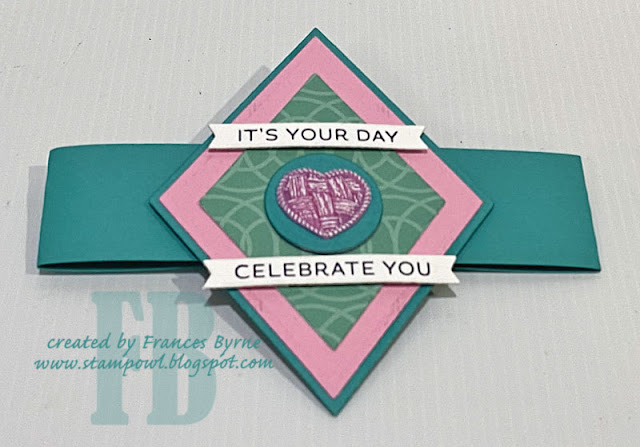
About a year ago, I shared a 6 x 6 version of a Gatefold Pop-out card, today I have a 5 x 7 version. 


For this card I pulled out another Betterpress Plate I got when I purchased my Spellbinders Betterpress recently ... this one is the Diamond Aviary Press Plate. After creating the image, I coloured it using my Black Widow Pencils. 


When the card is closed it becomes a Gatefold Fold Card, and is held closed using a Belly Band.

The sentiments used on the front and on the bird are also Letterpresses using the Betterpress System. 


In the centre of the diamond panel, I added a woven heart wax seal using a wax seal that I found on eBay. After pouring the wax and stamping the wax seal stamp into the wax, I used scissors to cut around the outline of the heart. I then used white ink to highlight the weaving.


Here is a look at the back of my card. The two side panels form the front of the gatefold card when the card is closed. 

I added two white panels to the next two panels, for a place to stamp a sentiment and also to be able to write a personal greeting when this card is given to someone. Both sentiments are from Stampendous' Cheap Tweets stamp set.


Other Supplies:
  • It's Your Day Betterpress Press Plate - Spellbinders
  • Tweet Chirps Stamp Set - Stampendous (discontinued)
  • Woven Heart Wax Seal 


Monday, August 28, 2023

Joyful Stocking


Hi Crafty Friends,

Today I am sharing another Christmas card I created recently. This time around I have used Spellbinders July 2023 Large Die of the Month which is called Stocking Full Of Joy. I thought this was great value as it includes dies for the Christmas Stocking; Gingerbread Man, Gnome, Candy Cane, Sentiment and various foliage.

For the background of my card I used Creative Craft Products Crosses Background 5 x 7 Cover Plate, but rather than die cutting the background I embossed it. 

My wax seal is part of a collection of Christmas Wax Seals I found on Amazon. I also used a metal Wax Seal Mould to use when pouring my wax, to give a fun shape to the seal. I also found the moulds from Amazon. My burner and wax are from Made To Surprise.


For the inside of my card I used an older Retro Merry Christmas sentiment die set from Sizzix/Tim Holtz.

I also added another gnome above the sentiment to finish off the card.

Other Supplies:
  • Retro Merry Christmas - Tim Holtz/Sizzix
  • Stocking Full of Joy - Spellbinders July 2023 Large Die of the month
  • Merry Christmas Wax Seal 
  • Red Wax Seal Beads
  • Floral Wax Seal Mould


Friday, August 25, 2023

Doggone Great Day


Hi Crafty Friends,

According to the Days of the Year website, tomorrow (26th August) is National Dogs Day. As you can see, I decided to create a dog themed card in honour of the occasion.


As you can see, I created a Slimline card.  I used the Be A Dog die set from Waffle Flower Crafts to create the two dogs I added to my card. I also used the bone die from the Stampendous Puppy Hugs die set which I used to add the "Happy Birthday" sentiment to my card. The sentiment is from a Creative Craft Products Birthday Sentiments stamp set.

To finish off the front of my card, I added the paw print wax seal to the middle area of my card.


For the inside of the card, I created a double pop-up card using Karen Burniston's Katherine Label Pop-up.

I added the dog faces to each of the labels using the Stampendous Puppy Hugs stamp set.

Both sentiments are from La-La Land Crafts' Pawsome Friend stamp set.


Other Supplies:

  • Paw Print Wax Seal
  • Green Wax Beads