Friday, August 21, 2015

Riley and Company New Release Day 5


Hi everyone,

The Riley and Company Design Team are celebrating the new stamp release by bringing you .....

Inspiration Week with the Design Team

all week the Design Team will be sharing creations they have made using the new stamps.

There are 42 Funny Bones stamps; 11 Inspiration stamps and 4 brand new images for a new character called Burt (he's a cat!) ... which is just so much fun! These stamps are available to purchase on the Riley and Company website now!

Here are this month's release specials:

FREE SHIPPING (on any order over $20) until August 24th on ALL Riley & co stamps, including Riley, Funnybones, Inspirations and Burt stamps! Just put the word FREESHIP in the coupon code section when you check out.

Get the Entire 42 piece Funnybones release for only $150 - you save $60!

Get the entire 12 piece Inspirations release for only $55 and save $23!


Today I am sharing two cards using the brand new stamps.

For my  first card today I have used Riley and Company's Burt Smiling with the Sizzix Circle Flip-its Bigz die to create a birthday card. I just love that cheeky grin!


Here is the "flip" side of my card. I used the new Happy Birthday Old Friend Funny Bones sentiment

I will be back tomorrow with two more cards using the new Riley and Company stamps.


Stamps: Burt Smiling; Happy Birthday Old Friend - Riley and Company
Paper: White; Black; Pink; DP
Dies: Sizzix Circle Flip-its Bigz Die; Circle Stax - MFT Stamps
Other: Black Ink; Black Ribbon; Black Rhinestones; Foam Tape; Copics


For my second card today I have again used Burt Smiling .... have I told you how much I love this fun cat! This time around I have paired it with a couple of the new Inspirations Sentiments, this one used here is Actually, I can.

As you can see I have created a Centre Step Card. 


Here is another view of my card this time at a different angle.


For the inside of my card I have used another of the Inspiration Sentiments, this one is If it were easy.

Stamps: Burt Smiling; Actually I Can; If It Were Easy - Riley and Company
Paper: White; Brown; Here & There DP - Studio Calico
Dies: Centre Step Card - Cheery Lynn Designs; Oval Stax; Fishtail Flag Stax - MFT Stamps
Other: Black Ink; Foam Tape; Copics


Blue Christmas


Hi everyone,
It's my turn to post a project on the Elizabeth Craft Designs blog today. Today I am bringing you a project using some of the new Elizabeth Craft Designs dies which will be released next week to create a Christmas decoration that can be displayed. For this project I have used the new Tags and More 9 Sparkle die set; Alphabet 2 Lower Case; Ornament Set 5 and Card Stand/Easel, along with a couple of older sets.


Here is how I created my Christmas Tag Decoration:
1.   Cut a piece of blue card and a piece of white card that measures approx 4 1/2 inches x 8 inches (we will be cutting this down so it doesn’t need to be exact).
  • Line up the main tag die from the Tags & More 9 – Sparkle at the top of the blue card stock and die cut. Snip off the excess cardstock around the top of the die and then use your trimmer to trim off both sides to make them even with the top part of the die. Trim tag shape so it is 7 1/4″ long.
  • Place the snowflake decorative overlay die from the same die set at the top of the tag so that the rounded shape of the overlay lines up with the rounded shape of the tag and die cut.
  • Adhere a piece of Transparent Double Sided Adhesive Tape to the front of the white card stock and place the main tag die from the Tags & More 9 – Sparkle and die cut. Trim of sides of tag as we did for the blue tag above.
  • Remove the protective backing from the white tag and adhere this behind the blue tag being careful not to touch the adhesive close to the top of the white card.
  • Cover the adhesive which shows through the top of the blue tag with Warm Diamond Silk Microfine Glitter, polish glitter with your finger and brush excess off.
2.  Adhere a piece of Transparent Double Sided Adhesive Tape to the front of a piece of white card stock. Trim so the card measures 3/4 inches x 4 1/2 inches.
  • Remove the protective backing from the adhesive.
  • Cover the adhesive with Warm Diamond Silk Microfine Glitter, polish glitter with your finger and brush excess off.
  • Adhere strip approximately 1/4 inches from the bottom of the tag. Trim of any overhanging edges level with tag.
3. Adhere a piece of Transparent Double Sided Adhesive Tape to the front of piece of thin white card approx 2 1/5 inches x 8 1/2 inches.
  • Remove protective backing from adhesive.
  • Cover the adhesive with Silver Silk Microfine Glitter, polish glitter with your finger and brush off excess.
  • Use the Alphabet 1 Caps die to cut cut the letters “M” and “C”
  • Use the Alphabet 2 Lower Case die to cut the following letters: ‘e'; ‘r'; ‘r'; ‘y'; ‘h'; ‘r'; ‘i'; ‘s'; ‘t'; ‘m'; ‘a'; ‘s’
  • Starting with the letter ‘s’, adhere the letters of the word “Christmas” onto the white glittered strip at the bottom of the tag so the letter ‘s’ is close to the right hand edge of the tag.
  • Starting with the letter ‘M’ adhere the letters of the word “Merry” so that the bottom of the letters touch the top of the white glittered strip at the bottom of the tag so the letter ‘M’ is close to the left hand edge of the tag.
4.  Cut a piece of white card large enough to die cut two solid hearts from the Ornament Set 5 die set. Cover the front of the card with Transparent Double Sided Adhesive Tape. Die Cut two solid hearts.
  • Cut a piece of Silver Shimmer Sheetz large enough to die cut two lattice decorative overlay hearts from the Ornament Set 5 die set. Die Cut two lattice decorative overlay hearts. Make sure to use the metal adaptor plate when die cutting Shimmer Sheetz.
  • Remove protective backing from adhesive on the solid hearts.
  • Attach the Shimmer Sheetz decorative overlay to the solid heart being careful not to touch the adhesive on the solid heart with your fingers.
  • Cover the adhesive with Warm Diamond Silk Microfine Glitter, polish with your finger and brush off excess.
  • Die cut two of the large hangers from the Ornament Set 5 die set from Silver Shimmer Sheetz (adhere a piece of Transparent Double Sided Tape to the back of the Shimmer Sheetz before die cutting). Attach the hangers to the top of the heart so heart looks like a decoration.
  • Adhere the two hearts to tag referring to photo above using foam tape.
  • Using blue ribbon, create two bows and attach to the top of each heart ornament as per photo above.
5. Cut a piece of white card stock approximately 1 3/4 inches x 5 inches. Adhere Transparent Double Sided Adhesive Tape to the front of the white card.
  • Remove protective backing from adhesive.
  • Cover the adhesive with Warm Diamond Silk Microfine Glitter, polish with your finger and brush off excess.
  • Die cut 3 of the smallest snowflakes from the Snowflakes  die set.
  • Attach snowflakes to tag using photo above for placement.
6. Decorate the Lattice Heart Ornaments; Snowflakes and the snowflake overlay at the top of the tag using Blue/Gold Glitter Dot Peel Off Stickers. (Note: I have used the glitter dots on the swirls as well as the lattice portion of the heart ornament.)


7. From a piece of blue card stock die cut the Card Stand/Easel. Emboss Card Stand/Easel using the Snowflakes Embossing Folder.
8. Place the tag ornament onto the Card Stand/Easel.
Thanks for stopping by today. I hope you have enjoyed my tutorial.
Supplies:
Elizabeth Craft Designs:
1077 Tags & More 9 – Sparkle 
1066 Ornaments Set 5
1071 Card Stand/Easel
757 Snowflakes
967 Alphabet 1 – Caps
1075 Alphabet 2 – Lower Case
E126 Snowflakes Embossing Folder
7018 Blue/Gold Glitter Dots Peel Off Stickers
508 Transparent Double Sided Tape 64mm
639 Warm Diamond Silk Microfine Glitter 
603 Silver Silk Microfine Glitter
802 Fine Pointed Scissors
  
Other:
Cardstock: white; blue
Ribbon
Foam Tape


Thursday, August 20, 2015

When Life Gives You Lemons


Hi everyone,

It's challenge time with my friends over on the CCEE Stampers challenge blog. As the challenge hostess for the month, I continue to issue the challenges.

According to the Days of the Year web site today is Lemonade Day …. Let's celebrate by creating cards that features lemonade in some way. If you don't have anything Lemon or lemon related feature some other kind of beverage.


For my card today I have created a Pop Up Card using the Lots of Pops Pop Up Card die set designed by Karen Burniston for Elizabeth Craft Designs. I have decorated the top and bottom of my designer paper using the Agatha Edges die set.

I used Penny Black's ... make lemonade image on the inside of my card.


Here is another view of my card showing the pop up portion of my card a little easier.


Here is the front of my card. I used Penny Black's Life Gives You Lemons images and added a sentiment.

Don't forget to check out the CCEE Stampers blog (goes live 12 AM EST) to see the rest of the creations the CCEE Stampers created this week. You can also see more details of their creations on their individual blogs:


Stamps: Life Gives You Lemons; ….Make Lemonade - Penny Black; Lemonade2drink; MoreLemonade2stamp - The Stamps of Life
Paper: White; Lemon; Green; Slice of Summer DP - Doodlebug Design Inc.
Dies: Lots of Pops Pop Up Card; Agatha Edges; Katie Label Pivot Card; Katie Label Accordion Card - designed by Karen Burniston for Elizabeth Craft Designs; Say What - MFT Stamps
Other: Black Ink; Foam Tape; Copics


Riley and Company New Release Day 4


Hi everyone,

The Riley and Company Design Team are celebrating the new stamp release by bringing you .....

Inspiration Week with the Design Team

all week the Design Team will be sharing creations they have made using the new stamps.

There are 42 Funny Bones stamps; 11 Inspiration stamps and 4 brand new images for a new character called Burt (he's a cat!) ... which is just so much fun! These stamps are available to purchase on the Riley and Company website now!

Here are this month's release specials:

FREE SHIPPING (on any order over $20) until August 24th on ALL Riley & co stamps, including Riley, Funnybones, Inspirations and Burt stamps! Just put the word FREESHIP in the coupon code section when you check out.

Get the Entire 42 piece Funnybones release for only $150 - you save $60!

Get the entire 12 piece Inspirations release for only $55 and save $23!


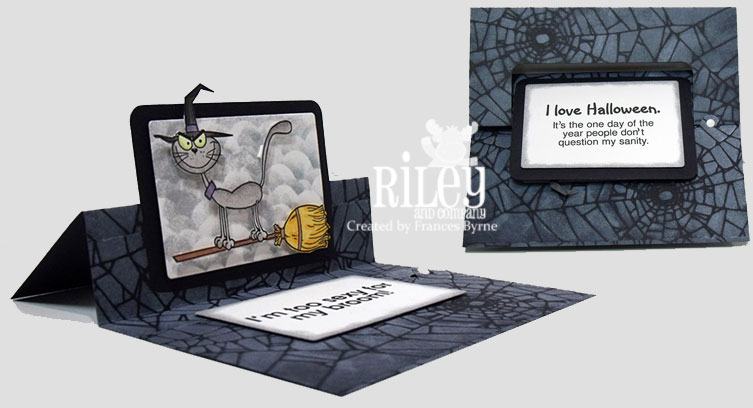
For my first card I have used Burt on Broomstick and converted the Rectangle Pull card designed by Karen Burniston for Elizabeth Craft Design to create an Easel type card.

I used black card for my card base and then sponged Picket Fence Distress Stain through a cobweb stencil to create the background on my card. I added grey clouds to the white panel and attached Burt to the panel. On the lower panel I added the new Funny Bones sentiment "I'm too sexy for my broom!"


Here is another look at my card at a different angle, so you can see how I folded the Rectangle Pull Card to create this card.


Here is the front of my card when it is closed. I added another of the new sentiments "Don't question my sanity."

  • Don’t forget to check out all the Riley and Company Design Team’s blogs for more inspiration all week!

Stamps: Burt on Broomstick; I'm too Sexy; Don't Question my Sanity - Riley and Company
Paper: White; Black
Dies: Rectangle Pull Card - designed by Karen Burniston for Elizabeth Craft Designs
Other: Black Ink; Hickory Smoke Distress Ink; White Distress Paint; Cobweb Stencil - Stampers Anonymous; White Candy Dot; Foam Tape; Copics


Wednesday, August 19, 2015

Riley and Company New Release Day 3


Hi everyone,

The Riley and Company Design Team are celebrating the new stamp release by bringing you .....

Inspiration Week with the Design Team

all week the Design Team will be sharing creations they have made using the new stamps.

There are 42 Funny Bones stamps; 11 Inspiration stamps and 4 brand new images for a new character called Burt (he's a cat!) ... which is just so much fun! These stamps are available to purchase on the Riley and Company website now!

Here are this month's release specials:

FREE SHIPPING (on any order over $20) until August 24th on ALL Riley & co stamps, including Riley, Funnybones, Inspirations and Burt stamps! Just put the word FREESHIP in the coupon code section when you check out.

Get the Entire 42 piece Funnybones release for only $150 - you save $60!

Get the entire 12 piece Inspirations release for only $55 and save $23!


For my first card today I have made an Easel Card using the new Burt and Jack and the Pumpkin Spice Lattes Funny Bones sentiment.

The sentiment normally is just one sentiment and there is couple of pumpkins between the first part of the sentiment and the second. For this card I decided to stamp the different parts of the sentiment separately and masked off the pumpkins as I didn't need them. As you can see I used part of the sentiment on the card front and the other part on the base which also helps to keep the Easel standing when open.


It is also challenge time with a couple of friends of mine. Each month we get together and go to our favorite stamp/scrapbook store and come home with one or two new goodies. So we decided to also challenge ourselves each month using a product we all have.

Last month when we went shopping, we all had to have the Tattered Lace Half Circle dies. I had actually purchased mine a few days earlier and my friends had seen what I had already done with mine that they needed them too hehe! 

I have used the Half Circle die to create my Easel card. By placing the half circle on above the score line it cuts out the circle from the card.


Here is my card closed ready to be placed in an envelope.


Here is a look at the back of my Easel card so you can see where and how I used the half circle die to create my easel card.

Stamps: Burt and Jack; Pumpkin Spice Lattes - Riley and Company
Paper: White; Black; Pumpkin Power DP - Graphic 45
Dies: Half Circles - Tattered Lace; Circle Stax; Label Stax; Fishtail Flags Stax 1 & 2 - MFT Stamps
Other: Black Ink; Foam Tape; Copics


For my second project today I created a treat topper using the new Grinch Pills Funny Bones sentiment and Riley as the Grinch which is an existing stamp.


I have again used my Tattered Lace half circle die to create the pop up topper.


Here is a look at the back of the treat topper so you can see how I created the pop up portion of the treat topper.

Stamps: Riley as the Grinch; Grinch Topper - Riley and Company
Paper: White; Red; DP - Graphic 45
Dies: Half Circles - Tattered Lace; Circle Stax - MFT Stamps
Other: Black Ink; Green Candy Dots; Foam Tape; Copics


Tuesday, August 18, 2015

Riley and Company New Release Day 2


Hi everyone,

The Riley and Company Design Team are celebrating the new stamp release by bringing you .....

Inspiration Week with the Design Team

all week the Design Team will be sharing creations they have made using the new stamps.

There are 42 Funny Bones stamps; 11 Inspiration stamps and 4 brand new images for a new character called Burt (he's a cat!) ... which is just so much fun! These stamps are available to purchase on the Riley and Company website now!


It's also Design Team challenge time and this week it is my turn to host the challenge.
National Tell a Joke Day was on the 16th August, so for our challenge this week we have to include one the of the Funny Bones Sayings on your card.


For my card today I have used the new Riley and Company Burt and Bats .... I just love these new Burt images. I stamped the first part of the new Zombie Riddle Funny Bones sentiment onto a speech bubble and placed this at the bottom of my card. It looks like the Jack o lantern is asking the riddle.


For the inside of  my card, I created a pop up card using the Lorna Label Pop Up Card die set. I added the remainder of the riddle onto the label of my card. I decorated my card with a few Halloween themed dies.


One more look at the inside of my card, this time at a different angle so you can see the pop up part of the card a little better.


Don't forget to check out the Riley and Company Design Team's cards on their blogs:


I will be back again tomorrow with two more cards using the new Riley and Company stamps.

Stamps: Burt and Bats; Zombie Riddle - Riley and Company
Paper: White; Black; DP - Doodlebug Design Inc
Dies:  Lorna Label Pop Up Card - designed by Karen Burniston for Elizabeth Craft Designs; Quotables - Paper Smooches; Spider Web Border - There She Goes; Halloween Charms - MFT Stamps
Other: Black Ink; Black Rhinestones; Foam Tape; Copics


Monday, August 17, 2015

Riley and Company New Release Day 1


Hi everyone,

The Riley and Company Design Team are celebrating the new stamp release by bringing you .....

Inspiration Week with the Design Team

all week the Design Team will be sharing creations they have made using the new stamps.

There are 42 Funny Bones stamps; 11 Inspiration stamps and 4 brand new images for a new character called Burt (he's a cat!) ... which is just so much fun! These stamps are available to purchase on the Riley and Company website now!

Today I am sharing two cards using the brand new stamps.


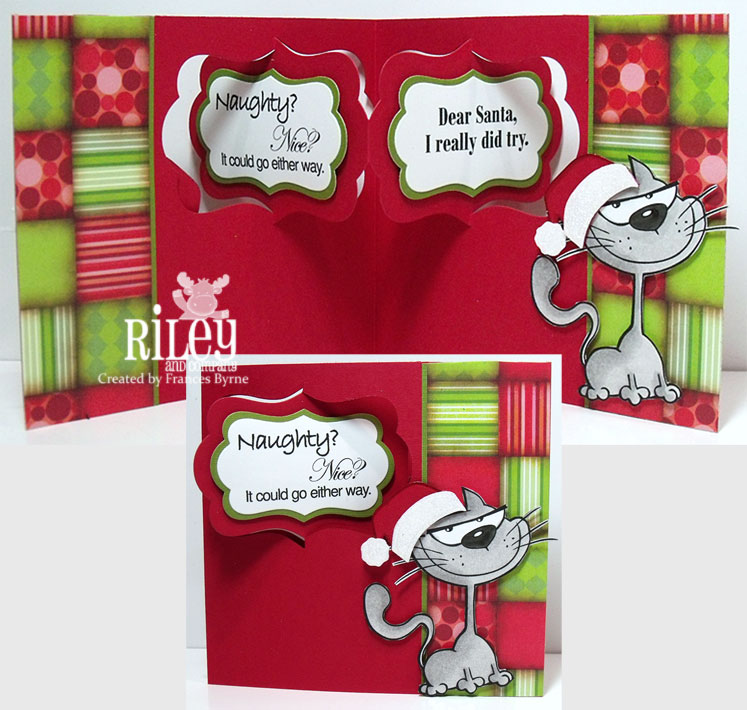
I am loving the new Burt designs that Riley and Company has just released ... so much so that I can't stop using him hehe! The one I have used for my card today is Burt Smiling, as this was a Christmas card I added a Santa hat to him using the Props 5 Christmas Costumes die set from Elizabeth Craft Designs.


I created a Pivot Card using the Katie Label Pivot Card die set designed by designed by Karen Burniston for Elizabeth Craft Designs.

The sentiments are two of the new Funny Bones sentiments, I used "Naughty or Nice" and "Dear Santa". Burt looks like he could get up to some mischief don't you think! ;)


Here is the view of the back of my card. 


Stamps: Burt Smiling; Dear Santa; Naughty or Nice - Riley and Company
Paper: White; Red; Green; DP
Dies: Katie Label Pivot Card; Props 5 Christmas Costumes - designed by Karen Burniston for Elizabeth Craft Designs
Other: Black Ink; Transparent Double Sided Adhesive Tape 64mm - ECD; Warm Diamond Silk Microfine Glitter - ECD; Foam Tape; Copics


For my second card today I have used Burt and Jack (Jack is a Pumpkin). As I didn't want to make a fall or Halloween card today I decided to just use Burt .... I think Burt along could be used with a number of things.

I wanted to  make my card a birthday card (I always need those), so I used a Cupcake Peel Off Sticker to put beside Burt. I have a feeling Burt likes cupcakes ... look at him licking his lips haha!

I created an Accordion Card using the Fancy Label Accordion die set designed by Karen Burniston for Elizabeth Craft Designs.

The sentiments on the right hand page are from two Riley Clear sets ... Popping Out of Cake Riley Clear Stamp set and Walking Dogs Riley Clear Stamp set.


Here is my card when it is closed ready to be placed in an envelope.

I will be back tomorrow with another card using the new release stamps.

Stamps: Burt & Jack; Popping Out of Cake Riley Clear Set; Walking the Dogs Riley Clear Set - Riley and Company
Paper: White; Teal; DP - Kaisercraft
Dies: Fancy Label Accordion Card - designed by Karen Burniston for Elizabeth Craft Designs
Other: Black Ink; Kitchen Time Peel Off Stickers - ECD; Foam Tape; Copics