Showing posts with label 4th July. Show all posts

Friday, February 5, 2021

Red, White and Blue Triple Step Card


Hi Crafty Friends,

Today I am sharing a Triple Step Card using stamps, dies and papers from Divinity Designs January 2021 Blessings Box.

To create the base of my card I used the Triple Step Card with Layers die set. I used papers from the Star Shaker Kit - Patriotic Paper Pad for the layers of the card.


To decorate my card I used the Star Shaker Kit and the Star Shaker Kit Inset Add-Ons die sets.

I die cut the stars from red, white and blue papers from the paper pad from largest to smallest stars to create three shaker stars. I added the Red, White and Blue Star Sprinkles to fill each of the stars.

Along the bottom of the card, I added the "U S A" using the dies included in the Freedom Stamp/Die Duo sets.


For the inside of the card I added paper along the bottom edge of the card using the paper pad I used on the front of the card.

I added the sentiment from the Freedom Stamp/Die Duo set which I layered using the Sentiment Strips 2 die set.


Monday, July 2, 2018

Happy 4th July


Hi Crafty Friends,

There is only a couple of days until the 4th of July and I have another card to share with you using products from Elizabeth Craft Designs and Altenew.

The background for this card was created using the Weave Builder Stencil from Altenew. I had something else in mind when I created this background, but I didn't end up needing it for that particular card and seeing it was red, white and blue I figured I needed to make a 4th of July card using it.

The stamps and dies used on this card are from Elizabeth Craft Designs.


For the inside of my card, I added a left over strip of the stencil background I created on the left side of my card.

The sentiment and American Flag are from two Elizabeth Craft Designs stamp sets ... Summer Sentiments and A Way With Words - Happy Birthday Collection.

Supplies:


Friday, June 22, 2018

Happy 4th of July Shaker Card


Hi Crafty Friends,

It's my turn to post a tutorial on the Elizabeth Craft Designs blog. With the 4th of July being less then 2 weeks away, I thought I would create a shaker card to celebrate the occasion. 

Now of course living in Australia I don't actually celebrate the day, but I had fun playing with a number of the new die sets which included the 4th of July & Frame It/Stitched Rectangle die sets.

Here is how I created my card:


Step 1 - 
  • Cut a piece of blue cardstock that measures 5 1/2 inches x 8 1/2 inches, score and fold along the 8 1/2 inch side at 4 1/4 inches to create a 4 1/4 inch x 5 1/2 inch top folding card.
  • Using the second largest rectangle from the Fitted Rectangles die set, die cut a rectangle from White Soft Finish Cardstock. 
  • Adhere to the centre of the folded blue card.

Step 2 - 
  • Starting with blue cardstock, centre the third largest rectangle from the Garden Notes - Frame it Stitched Rectangles die set into the largest rectangle from the Fitted Rectangles die set. Die cut frame.
  • Remove the inner rectangle die from the two dies and replace with the next smaller rectangle from the die set and die cut a piece of white cardstock.
  • Repeat this process each time using a smaller rectangle and die cut a piece of red cardstock and then another piece of blue cardstock.

  • Layer all rectangles together, so you have the larger blue frame at the top and finishing with the smallest blue frame at the bottom.
  • Using the solid star from the Summer Fun Sentiment set, stamp around the large blue frame only using VersaMark Ink.
Step 3 -
  • Place the frame over the folded card and mark around the opening in the centre of the frame onto the white cardstock on the front of the folded card.
  • Remove the frame and stamp the sentiment "Happy 4th of July" to the centre of the white cardstock using black ink.
Step 4 - 
  • Add foam tape all around the front of the base card so that the foam tape is slightly in from the mark placed on the white card in step 3. 
  • Using the two star decorative pieces from the 4th of July die set, die cut stars from red, white and blue cardstock. (I die cut each color 4 times to get enough stars).
  • Place all the stars in the centre of the base card. Carefully remove protective backing from foam tape.
  • Add acetate to the back of the opening of the red, white and blue frame created in step 2 and adhere to the foam tape on the front of the card.
Step 5 - 
  • Die cut two large star bursts from the 4th of July die set from white cardstock that has Clear Double Sided Adhesive Tape on the front.
  • Remove protective backing and cover the adhesive with Silver Silk Microfine Glitter. Polish glitter with your finger to bring out the maximum shine of the glitter.
  • Die cut the hat and two fireworks from the 4th of July die set from red, white and blue cardstock. Assemble images.
  • Adhere silver starbursts, hat and fireworks to opposite corners of the card.

Step 6 - Inside of Card:
  • Using the second largest rectangle from the Fitted Rectangles die set, die cut a rectangle from red cardstock.
  • Using the third largest rectangle from the Stitched Rectangles die set, die cut a rectangle from white cardstock.
  • Die cut the word "Celebrate" from the Words 1 - Celebration die set from red cardstock and adhere to the top centre of card as per photo above.
  • Using the Blackboard Alphabet die set, die cut the letters U S A from blue cardstock and adhere to the bottom left hand corner of card.
  • Die cut the American flag from the 4th of July die set, assemble and adhere to the bottom right hand corner of card.
  • Adhere panel to inside of card.


Thank you for stopping by, I hope you enjoyed my tutorial.


Supplies:
Elizabeth Craft Designs:


Friday, June 8, 2018

4th of July Favor Boxes


Hi Crafty Friends,

Today I have a couple of 4th of July favor boxes I created.

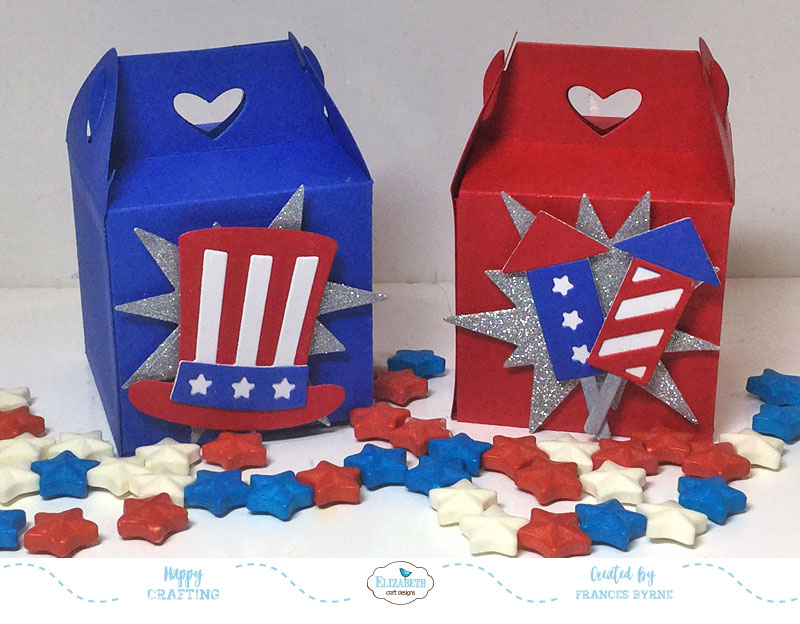
These fun boxes were made using products from Elizabeth Craft Designs. The Gable Box die is one of Suzanne Cannon/A Way With Words die sets that were released earlier this week. The 4th of July die set designed by Joset Designs was released a month ago.

With the 4th of July just under a month away now, I thought these would be fun to make as favor boxes or to use as place cards, by adding a name to each box and having something fun inside.


To keep with the red, white and blue theme of the 4th of July ... I die cut one of the gable boxes in blue. It is hard to tell in the photos, but I added a decoration to both opposite sides of the box.

Both boxes are decorated with a silver glittered starburst, using the largest starburst included in the 4th of July die set which I die cut from cardstock that had Clear Double Sided Adhesive Tape on the front and then covering with Silver Silk Microfine Glitter.

For the blue box I then added the hat which I die cut and decorated using red, white and blue cardstock.


The second box I die cut from red cardstock, and again added the silver starburst.

I then added two fire crackers using red, white and blue cardstock.


Of course I don't actually celebrate the 4th of July, seeing I live in Australia. However I thought it might be fun to fill these with a treat for my two grandchildren. That way they can learn a little bit about the USA and 4th of July.

Supplies:


Tuesday, June 5, 2012

Die-namic Feature

MFT TagBox wm

Now that we've teased and tempted you all week long, it's almost time for you to shop for your favorite Brand Spankin' New products from MFT.

But first... it's time for our Die-namics Feature and Pre-Release Pep Rally!

PreReleaseRally_FullSize

Our Design Team has been busy creating jaw-dropping and inspiring projects for you, and we've saved the best for last.

We've taken an in-depth look at this month's Die-namics, while re-visiting the amazing sets being released tonight at 10 PM EST RIGHT HERE in the MFT Boutique.

And while we are at it, how about we make your life even easier with a "cheat sheet" of all that's new?  Head over to the MFT Blog to print out a shopping list.

Here are the details about the upcoming release on June 5 at 10 PM EST:

  • You can attend the New Release Party on June 5 from 8-10 PM EST HERE in the MFT forum, where you can enjoy fun, games, and PRIZES!
  • The MFT release, including all new stamp sets and Die-namics, is on June 5 at 10 PM EST.  You'll find all the newest products HERE at release time.
  • You have just a few more hours to submit your entry for this month's guest designer contest.  Check out the forum for details on how YOU can win $200 in stamp sets and Die-namics, and play along with the MFT Design Team for a month.
  • If you'd like to see all the designers' posts for today, please click on over to the MFT Blog NOW.  Be sure to leave comments as you go for the chance to win one of 2, $10 gift certificates given away daily.  The winners will be posted on June 5 just before the release party, on the MFT blog.

MFT TagBox2 wm

For my project today I have used the the new Die-namics Traditional Tag Stax and also the new PI Lady Liberty to create this tag treat box.

To create this tag box I first die cut two tags from designer paper and two from navy card and and adhered the designer paper tag over the navy tag.

MFT_OwnYourStory_PreviewGraphic

For the box section of this tag box I cut my navy card at 11 inches x 5 inches. I scored across the 11 inch side at 3 inches; 5 inches; 8 inches and 10 inches. Along the 5 inch side I scored at 3 inches. Cut along all the solid lines at the bottom and cut out the piece that is blacked out in the template below. Assemble as you would a box and attach to the tags.

Tag-Box-Template

I added the sentiment to one of the smaller tags from the Die-namics Traditional Tags Stax.

For the tie at the top to keep the box closed I used Denim Twine and Maraschino Red Twine to keep the red, white and blue colors.

MFT TagBox3 wm

Here is a view of the back of my tag box (or it could be the front without the image as they are exactly the same).

Here you can see better the Traditional Tag shape of the box as you don’t have bows getting in the way of the photo. You can also see how I reinforced the whole for the tag using the small circle from the Die-namics Circle STAX Set 2 .

MFT_OwnYourStory_PreviewGraphic

Stamps: Pure Innocence Lady Liberty – MFT Stamps
Paper: White; Navy; Of Liberty DP – Bo Bunny
Die-namics: Traditional Tag Stax; Circle Stax 2 – MFT Stamps
Other: Black Ink; Blue Ink; Denim Twine; Maraschino Red Twine; Foam Tape; Copics


#aa-owl-signature

Sunday, June 3, 2012

MFTeaser–à la modes

MFT alamodesfirecracker wm

Hi everyone and happy Sunday! I hope you are all enjoying your weekend.

It’s day 5 of the MFTeasers and I have one more Teaser to share with you! Today the MFT Stamps Design Team are featuring more of the new sets that are to be released by MFT Stamps on Tuesday 5th June.

The sets being shown today are “à la modes Firecracker” and “à la modes Go for Gold”.

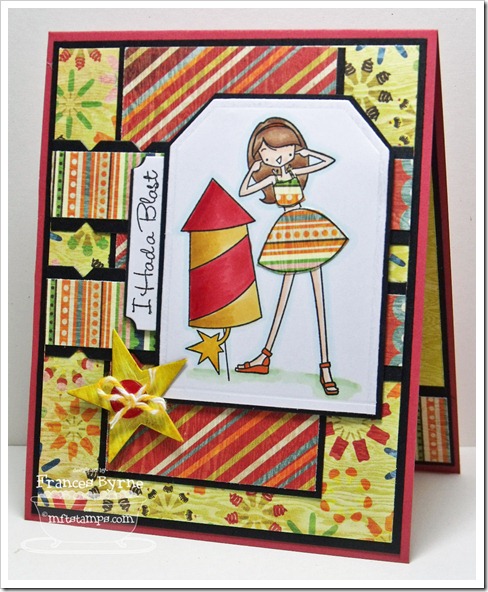
I have two cards to share with you today, for my first card I used the à la modes Firecracker set. For the layout of my card I used the sketch from this month’s MFT Guest Designer Challenge, of course I can’t enter the challenge as I am already on the design team, but I just had to play with the sketch and it is such a cool sketch. You still have time to enter if you haven’t already.

MFTGUESTDT0612

I have used the Die-namics Traditional Tags Stax for my main image, I used one of the larger tags for the width but cut it down as I didn’t need it that long. To keep the embossed border on the end I just scored along the bottom, but it would probably be easier to just put the tag back in the die and get the edge that way. I paper pieced the girls dress using designer paper.

For the sentiment I used the Die-namics Mini Tabs Foursome . The two panels going across the card have been edges with the Die-namics Notched Border. For the star I used the Die-namics Star Stax and added some Lemondrop Yellow Twine through the button on the top of the star.

MFT_OwnYourStory_PreviewGraphic

MFT_OwnYourStory_PreviewGraphic

MFT_OwnYourStory_PreviewGraphic

MFT_OwnYourStory_PreviewGraphic

MFT alamodesfirecracker2 wm

Here is the inside of my card. I have used one of the stars from the Die-namics Star Stax for my sentiments. I also added the Die-namics Notched Border along the edge of the striped designer panel.

Stamps: à la modes Firecracker – MFT Stamps
Paper: White; Black; Life of the Party DP – Basic Grey
Die-namics: Traditional Tags Stax; Star Stax; Notched Border; Mini Tab Foursome – MFT Stamps
Other: Black Ink; Button; Lemondrop Twine; Foam Tape; Copics

MFT alaGoGold wm

For my second card I used the à la modes Go for Gold stamp set. The Olympics are coming up in July, I love watching all the talented athletes. Of course living in Australia I cheer for the Aussies, so for my card today I have colored the girl using Australian official colors.

I have used a number of Die-namics on my card, first up the Die-namics Notched Border which you can see on the diagonal panel. I have used the Die-namics Mini Tabs Foursome for my sentiment. I have combined the Die-namics Star Stax and also the Die-namics Stacking Stars for all the stars around my image.

MFT_OwnYourStory_PreviewGraphic

MFT_OwnYourStory_PreviewGraphic

MFT_Stacking Stars Die-namics

MFT alaGoGold2 wm

Here is the inside of my card, this time round I have used the Die-namics Traditional Tags Stax for my sentiment and image. I have also used the Die-namics Star Stax for the stars.
TeaserTime_FullSize

Here are the details about the upcoming release on June 5 at 10 PM EST:

  • You can attend the New Release Party on June 5 from 8-10 PM EST HERE in the MFT forum, where you can enjoy fun, games, and PRIZES!
  • The MFT release, including all new stamp sets and Die-namics, is on June 5 at 10 PM EST.  You'll find all the newest products HERE at release time.
  • The guest designer contest is ON!  Check out the forum for details on how YOU can win $200 in stamp sets and Die-namics, and play along with the MFT Design Team for a month.
  • If you'd like to see all the teasers for today, please click on over to the MFT Blog NOW.  Be sure to leave comments as you go for the chance to win one of 2, $10 gift certificates given away daily.  The winners will be posted on June 5 just before the release party, on the MFT blog.
Stamps: à la modes Go for Gold – MFT Stamps
Paper: White; Black; Yellow; Handmade DP – LilyBee Design
Die-namics: Notched Border; Star Stax; Stacked Stars; Mini Tabs Foursome; Traditional Tags Stax – MFT Stamps
Other: Black Ink; Rhinestones; Thread; Foam Tape; Copics

#aa-owl-signature

Friday, May 25, 2012

…. It’s A Riley Blog Hop!

Riley MarchingBand wm

Hi everyone!
Welcome to Riley and Company’s blog hop! Come join us as the Riley and Company Design Team take you on a journey discovering all sorts of Riley fun! If you didn’t start at the beginning of this hop, you might want to head on over to the Riley and Company blog so that you don’t miss out on anything.

Here are this month’s specials:

  • Buy the entire set and get 10% off until Sunday night at midnight CST.
  • All orders over $25 placed in the first 24 hours get a FREE Riley Card Set!!! (It's a 6.99 value!) Limit ONE per customer please.
  • And, as an added gift for all of you, we are going to give you Free domestic shipping Thursday May 24th , until  Sunday night (May 27th) on your entire purchase!!!!!

Be sure to leave a comment on everyone’s blog as you travel from blog to blog as each of the Riley and Company Design Team members will be giving away one new Riley stamp to a random person who leaves a comment on their blog!

For my first card today I used Strike Up The Band … you have Riley and all his friends together in one stamp … Riley, Sophie,  Lulu the Lamb, Buster (the Rabbit) and Percy Penguin aren’t they all adorable!!!!!!!!

Stamps: Strike Up The Band – Riley and Company
Paper: White; Red; Blue; DP – Bo Bunny
Other: Black Ink; MFT Die-namics Fishtail Flags Stax; MFT Die-namics Squiggle Border Die; Brads; Foam Tape; Copics

Riley Bubbles wm

For my second card I used Blowing Bubbles Riley, another cutie don’t you think!

Well that is about it from me for today, now it is time to hop on over to the blog of Kelly Santi and see what stunning creations she has install for you today.

Enjoy the rest of the hop and thanks for dropping by! Don't forget to leave comments on all the blogs, so that you have a chance to win some blog candy.

Stamps: Blowing Bubbles Riley – Riley and Company
Paper: White; Brown; Blue; Snips & Snails DP – Doodlebug Design Inc.
Other: Black Ink; Brown Ribbon; Flower; Foam Tape; Copics

#aa-owl-signature

Monday, May 21, 2012

Drum Major!

Riley Batton wm

Hi everyone,

It is day 2 of our Riley sneak peeks in readiness of the of the new Riley stamps that will be available from Riley and Company this coming Thursday 24th May. This time round we have 14 new Riley’s being released.

For today’s sneak peek I used cute Drum Major Sophie. I used a recent I Spy sketch for the layout of my card.

  • Don’t forget to check out all the Riley and Company Design Team’s blogs for more sneak peeks everyday!
  • Join us for our release Blog Hop this Thursday 24th May 10 PM EST, starting on the Riley and Company Blog.
  • New Release Stamps available in the Riley and Company Store from Thursday 24th May 10 PM EST.

I’ll be back tomorrow with another sneak peek to share with you all.

Stamps: Drum Major – Riley and Company
Paper: White; Blue; Life of the Party DP – Basic Grey
Other: Black Ink; MFT Die-namics Fishtail Flags Stax; Blue Brads; Foam Tape; Copics

#aa-owl-signature