Showing posts with label Sliding Window Card. Show all posts

Friday, June 2, 2023

Cheers


Hi Crafty Friends, 

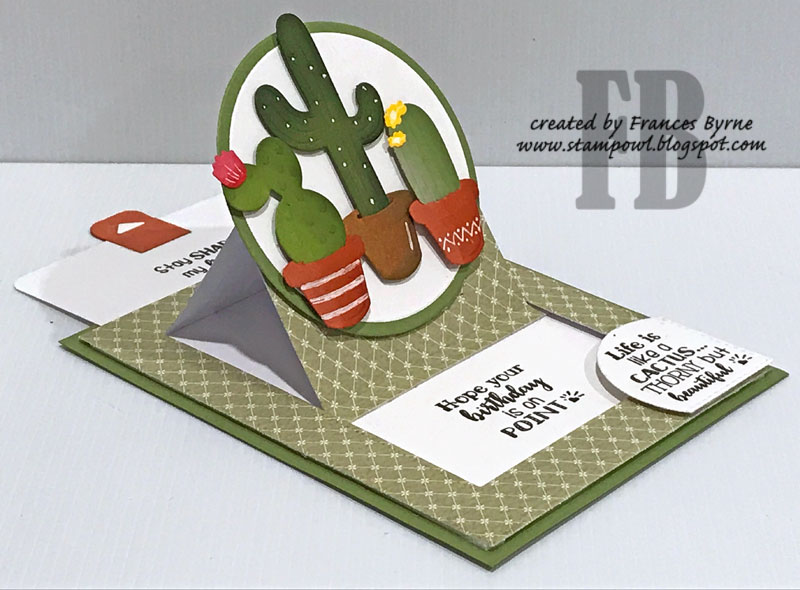
I have a fun Sliding Window or Sliding Pop-up Card using the 5 x 7 Rectangle & Zig Zag Slider Card die set from Made To Surprise by Sam Calcott's Super Sliders Collection. I thought this was going to be one die set I wouldn't be able to get hold of, as it has been out of stock for months and I noticed there was an SVG version of it on Craft World. However about a month or two ago, it appeared in stock on Craft Stash so I didn't waste much time adding it to my cart.


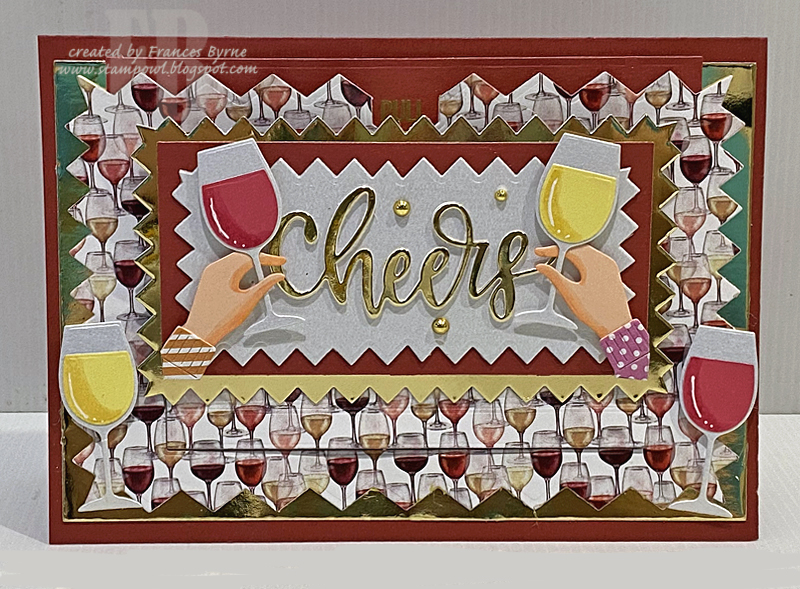
I wanted to make an alcohol/wine themed card using some of the die/stamp sets I have of this theme, so as I had this wine themed paper I started with that. I also used gold mirror cardstock and burgundy cardstock to match the colours of wines.

To decorate my card I used MFT Stamps In Good Hands and Long Stem Barware Die-namics sets. I also added the "Cheer" sentiment which is an older die also from MFT Stamps.


When you pull the tab at the top of the card, the main rectangle panel moves to the upright position revealing a secret message as it does. For the sentiment here I used another stamp set from MFT Stamps ... Raise A Glass Stamp set.


Here is a side on photo of my card, so you can see the pull up panel of the card a little better. Normally I would add a sentiment to this panel, but I didn't for this card.  I did add the stamped "Pull" to the top of the pull up panel using the Push Me Pull Me stamp set.


For the inside of the card, I used the large rectangle and Zig Zag dies to add my layers to the card. I stamped two more sentiments from the Raise a Glass Stamp set.

To finish the card, I added two more sets of hands holding a glass of wine to each bottom corner.


Tuesday, October 11, 2022

Witching You A Happy Halloween


Hi Crafty Friends,

As Halloween is only a few weeks away now, I decided to share a fun Halloween themed card I created recently using products from Made To Surprise by Sam Calcott.


For my card today I created a Sliding Window or Sliding Pop-up Card using the 6 x 6 Circular Slider Card die set from Made To Surprise by Sam Calcott's Super Sliders Collection. About a couple of month or so ago Sam also released her first Halloween dies in her Turn and Reveal Collection, so this was an opportunity to use the stamps, dies and papers from this collection before it was too late for this year.


When you pull the tab at the top of the card, the main circle panel moves to the upright position revealing a secret message as it does. This die set comes with a scallop circle to add under the plain circle, but as I was using the circle for a moon, I decided to just layer using another plain circle.

The witch and cobwebs are both from the Haunting times stamp/die set, the die cut house, tombstones and pumpkins are from the Halloween Icons die set. I also added the tree beside the house which is from the Easy Edges die set.


Here is a side on photo of my card, so you can see the sentiment on the pull up panel of the card. All sentiments used on this card are from the Halloween Sentiments stamp set. I also added the stamped "Pull" to the top of the pull up panel using the Push Me Pull Me stamp set.


I kept this card as a flat card rather than adding it to a folded card, this way I can display it with the main circular panel upright.  I added the square panels to the back of the card. I added another sentiment from the Halloween Sentiments stamp set and the spiders from the Haunting Times stamp set.


Sunday, September 4, 2022

Make No Mis-Steak


Hi Crafty Friends,

It's Father's Day down here in Australia! A few weeks ago I realised I hadn't made a special card for my husband for Father's Day, so I pulled out a stamp set from The Greetery and a die set from Made to Surprise and got to work. This is what I came up with.


For my card today I created a Sliding Window or Sliding Pop-up Card using the 6 x 6 Square Slider Card die set from Made To Surprise by Sam Calcott's Super Sliders Collection. I do have other Slider die sets, but I like how this set has all the layers other than the base plus some fun accessory dies to create cards. 

The photo above shows my card when it is closed ready to be placed in an envelope.


When you pull the tab at the top of the card, the main square panel moves to the upright position revealing a secret message as it does.

To decorate my card I used The Greetery's Dad Jokes High Steaks stamp set with coordinating dies. For the steak on the front of the card, I inked it using Tattered Rose and Fired Brick Distress Oxide inks to give it a look of rare steak. I used holographic cardstock on the fork and knife.


I added a tab to the top pull out panel using the tab included in the Lawn Fawn Double Surprise Pop-up die set. Adding the tab makes it so much easier to pull the tab up and down so the main square panel stands up.


I kept this card as a flat card rather than adding it to a folded card, this way display it with the main square panel upright.  I added the square panels to the back of the card. This time around I added my steaks well done and added the sentiments from the High Steaks stamp set and the Father's Day sentiment from Waffle Flower Crafts Be Him Sentiments stamp set.


Thursday, December 3, 2020

That's A Wrap


Hi Crafty Friends,


t's challenge time with my friends over on the CCEE Stampers challenge blog.  Being a brand new month, it's time to introduce our new challenge hostess which is Lynn McAuley.

Lynn tells us .... If you are like her, you are probably ready for the year of 2020 to be wrapped  up tight with a bow tied securely around it. Let's be done with it!! For this challenge make use of the Christmas wrapping paper of your choice as a part of your holiday design. Grab up some paper scraps from your gift-wrapping adventures and join us in this week's challenge. 


For my card today I created another Slimline Surprise (or Sliding Window Card) using Trinity Stamps Slimline Surprise die set. I used the main part of the die to die cut a panel which has red patterned paper on the top of the panel and wood grain paper on the bottom.

I used the Christmas Tree die from Elizabeth Craft Designs to create the Christmas tree that is behind the girl.

I added the "Merry Christmas" sentiment to the top of the card which is from The Ton's Essentials Sentiments Holiday stamp and coordinating die sets.


The girl and all the presents, wrapping paper etc are from Essentials by Ellen. Most of my Christmas wrapping paper, the patterns are too big to use on a card, but I did find one piece that had a tiny tree on it which I used for the bag near the girl.

I added the "That's A Wrap!" sentiment to the lower right hand corner of the card, it is adhered using foam tape so it doesn't get in the way of the sliding mechanism.


I adhered my Slimline Surprise card to a Slimline Scalloped Rectangle panel which is from Divinity Designs Slimline Scalloped Rectangles die set.

When you pull the slider mechanism up, it reveals a Christmas sentiment on the bottom red panel which is from the Handwritten Sentiments 2 stamp set from Stampers Anonymous.

 Another sentiment can be seen on the white slider panel, for this sentiment I used an older Print Works stamp which includes the words "wrapped in joy" which I thought suited this card.


I like to create this style of card so it is flat, rather than adhered to a card that opens. This way the card can be displayed with the slider pulled up to show whatever is standing up on the card. So I added a rectangle panel to the back of the card. 

I added a few more of the presents and wrapping papers to this panel and added a die cut sentiment from Mama Elephant and a gold foiled "Christmas" sentiment.

Don't forget to check out the CCEE Stampers blog (goes live 12 AM EST) to see the rest of the creations the CCEE Stampers created this week. You can also see more details of their creations on their individual blogs:


Christmas Tree Die - Elizabeth Craft Designs (discontinued)
Handwritten Holidays 2 Stamp Set - Stampers Anonymous
Wrapped in Joy Wood Mounted Stamp - Print Works


Saturday, February 22, 2020

Dog Gone It!


Hi Crafty Friends,

It’s challenge time with the “Crazies” over on the Crazy 4 Challenges blog. Kathleen Adams our challenge hostess for the month, continues to issue the challenges.

Apparently today is “Walk the Dog” day!  Put a dog or any kind of pet on your project.  It could even include a picture of your pet!


I have had this Simon Says Stamp Bone-A-Fide stamp set for a while sitting on my desk waiting to be used, so I thought this challenge was the perfect opportunity to use it. I make so many female themed card that I decided to create something that would be suitable for a male for today's challenge.


I created a Sliding Window Card using the die set from Sunny Studio Stamps. When you pull the tab at the top of the card, the centre portion of the card pops up revealing a message underneath. 

For the background of the panel on the base of the card I created an ombre background using Distress Inks in Weathered Wood, Faded Jeans and Chipped Sapphire. I then used a Newton's Nook Woof Stencil to add the stencilled background on this panel before die cutting the Sliding Window Card.


The two sentiments stamped in black are three of the stamps included in the Bone-A-Fide stamp set. I also added a sentiment using Taylored Expressions Simple Strips - Birthday stamp & die set to the bottom of the cake.

The pull tab at the top of the slider is from Lawn Fawn's Double Slider Surprise die set.


I kept this card as a flat card rather than adding it to a folded card. I created a stencilled background to the bottom of the panel, the same as the front of the card.

I added sentiments from Lawn Fawn's Critter Chatter stamp set and another of the sentiments from Simon Says Stamp Bone-A-Fide stamp set.

Don't forget to check out the rest of the “Crazies” cards over on the Crazy 4 Challenges blog and also their individual blogs for more details.


Supplies:
For your shopping convenience, all products are linked below. Compensated affiliate links are used where possible with no extra cost to you. This helps me to continue to share all the projects I include on my blog. For the benefit of my Australia readers, I have started to include some links to Australian stores when available. Please note I only use and share products I love.


Tuesday, January 21, 2020

Cacti Sliding Window Card


Hi Crafty Friends,

Today I am sharing a fun Sliding Window Card using Sunny Studio Stamps Sliding Window die set.


The three cacti used on the circle pop-up panel are created using Spellbinder's Potted Cacti die set. I die cut the cacti's from three different shades of green cardstock. I used two different brown/terracotta colors for the pots which I also added white gel pen to create the design on two of the pots.


When you pull the tab at the top of the card the centre portion of the card pops up revealing a message underneath. 


The stamped sentiments used on this card are from Darcie's Stay Sharp stamp set. 

I also added a tab to the top pull out panel using the tab included in the Lawn Fawn Double Surprise Pop-up die set. Adding the tab makes it so much easier to pull the tab up and down so the cacti stand up.


I kept this card as a flat card rather than adding it to a folded card.  I added a rectangle panel to the back of the card, so I had a place to write a greeting to the recipient of the card.

I added another cacti to the lower right hand corner of the card and a die cut sentiment.

Supplies:
For your shopping convenience, all products are linked below. Compensated affiliate links are used where possible with no extra cost to you. This helps me to continue to share all the projects I include on my blog. For the benefit of my Australia readers, I have started to include some links to Australian stores when available. Please note I only use and share products I love.


Thursday, September 19, 2019

Let's Get The Parrot-y Started


Ahoy there Me Hearties,

It's challenge time with my friends over on the CCEE Stampers challenge blog. As challenge hostess for the month, I continue to issue the challenges.

Today is Talk Like A Pirate Day, so grab those pirate stamps/dies to create your card this week. No pirate stamps, think beach, ocean or treasure.


For my card today I created a Sliding Window Card using the die set from Sunny Studio Stamps. I have made a few of these in the past which are the standard card size, however for my card today I wanted to try using it on a larger card with the sliding part of the card to the right, this allows you to add to the scene of the card with more images etc.


A month or two ago Craftin' Desert Divas had a sale on their stamps, so I decided to add a few of their stamps to my stash. Since then due they have announced they are closing.

To create my card I first die cut the sliding window card on the right hand side of a square card. I then created the background. Using one of the borders from Lawn Fawn's Stitched Hillside Borders die set to create a mask and then used distress oxide inks to sponge the sand and then the sky area. 


I cut another piece of white cardstock the same size as the main panel and added Antique Linen Distress Oxide to the area which will be seen when the slider is up. I then added a sentiment and parrot to this.

I then decorated the card using palm trees from Karen Burniston's Palm Tree Pop-up die set and stamps from Craftin' Desert Diva's Pirate Treasure and Pirate Pals stamp sets.


On the back of the card I added a sand area and then added a few more of the accessory stamps from the two stamp sets and added a sentiment from Lawn Fawn's Ahoy Matey stamp set.

Don't forget to check out the CCEE Stampers blog (goes live 12 AM EST) to see the rest of the creations the CCEE Stampers created this week. You can also see more details of their creations on their individual blogs:


Supplies:
For your shopping convenience, all products are linked below. Compensated affiliate links are used where possible with no extra cost to you. This helps me to continue to share all the projects I include on my blog. For the benefit of my Australia readers, I have started to include some links to Australian stores when available. Please note I only use and share products I love.


Wednesday, June 12, 2019

Let's Chill


Hi Crafty Friends,

There seems to be lots of fun "summer" themed stamps being released at the moment. I couldn't resist this one from Avery Elle called Pool Party.


For my card today I created a Sliding Window Card using the die set from Sunny Studio Stamps. 

I used Distress Oxide Inks in Tumbled Glass and Broken China to add the sky area to the base of my card. I then used white pigment ink to add clouds over the background.

The Sun is from Karen Burniston's Tropical Scene die set.


Along the bottom of the card I added grass which is die cut using the grass border die from Karen Burniston's Nature Edges die set.


When you pull the tab at the top of the card it reveals a sentiment on the white panel at the bottom and top of the card which is hidden when the card is closed. 


For the back of the card I added some grass along the bottom edge of the card and also the umbrella and cup. I also added two sentiments from the stamp set.


Supplies:
For your shopping convenience, all products are linked below. Compensated affiliate links are used where possible with no extra cost to you. This helps me to continue to share all the projects I include on my blog. Please note I only use and share products I love.