Today I am sharing a 5 x 7 Gatefold Shutter card using Made To Surprise by Sam Calcott's Effortless 5" x 7" Shutter Card die set. This die set had been out of stock for ages and it snuck back in about a month or so before Christmas, so my friend ordered it for me as a Christmas present.
Late last year I purchased this martini themed patterned paper, so decided to pull that out to use on my card today. I used the layering die included in the die set to die cut the patterned paper for the four panels and then hand cut some holographic cardstock for the layers.
The belly band was created also using the die included in the set. I used circle dies included in the die set and also the Creative Craft Products Circles die set for the layers.
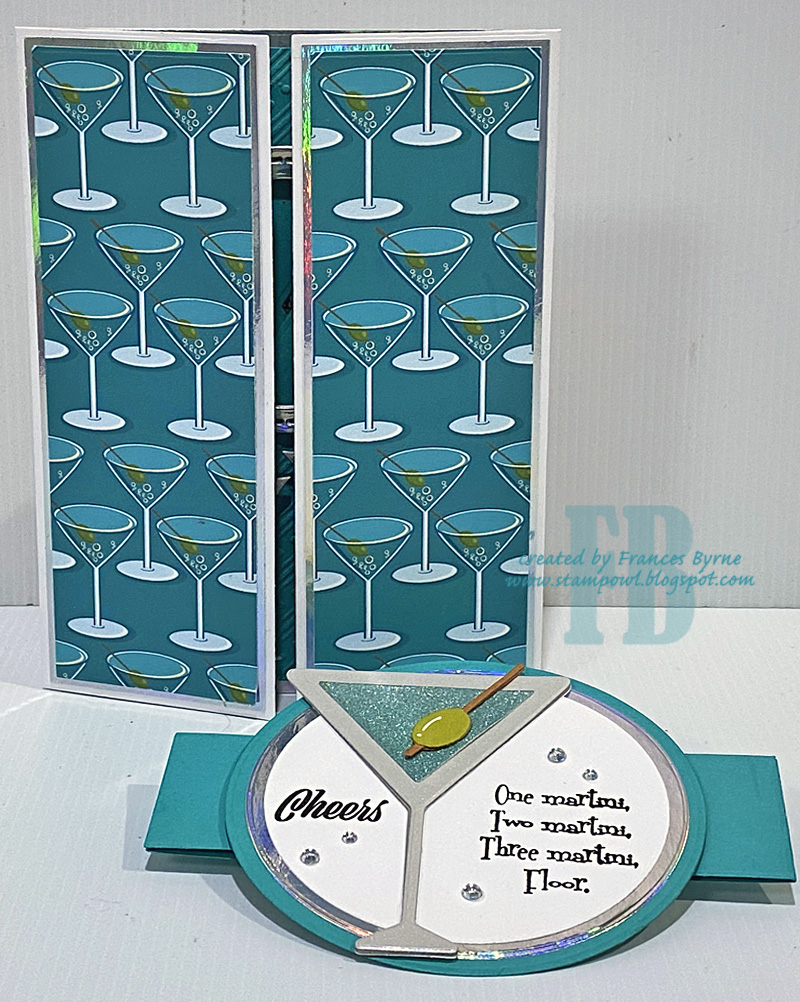
The martini is from a card kit I purchased a year or so ago from Picket Fence Studios. I used some Ombre Cardstock that had the right shade of teal on it to die cut the actual martini to put in the glass.
The "Cheers" sentiment is from the Here's To You stamp set from MFT Stamps. I also added the Martini Sentiment which is an older wood mounted stamp from Inky Antics.
To finish off the front of my card I added the Clear Drops Iridescent Pearls from Pink Fresh Studio.
Here the card is partially opened, starting to reveal the sentiment which is hidden behind the shutters.
Finally the full reveal. The sentiment in the centre of the card is also from MFT Stamps Here's To You stamp set. I also added two smaller martini glasses using dies from an older MFT Stamps die set called Let's Toast.
Other Supplies:
One Martini, Two Martini ... Wood Mounted Stamp - Inky Antics (retired)
Let's Toast Die-namics - MFT Stamps (retired)
Martini Shaker Die - Picket Fence Studios (retired)
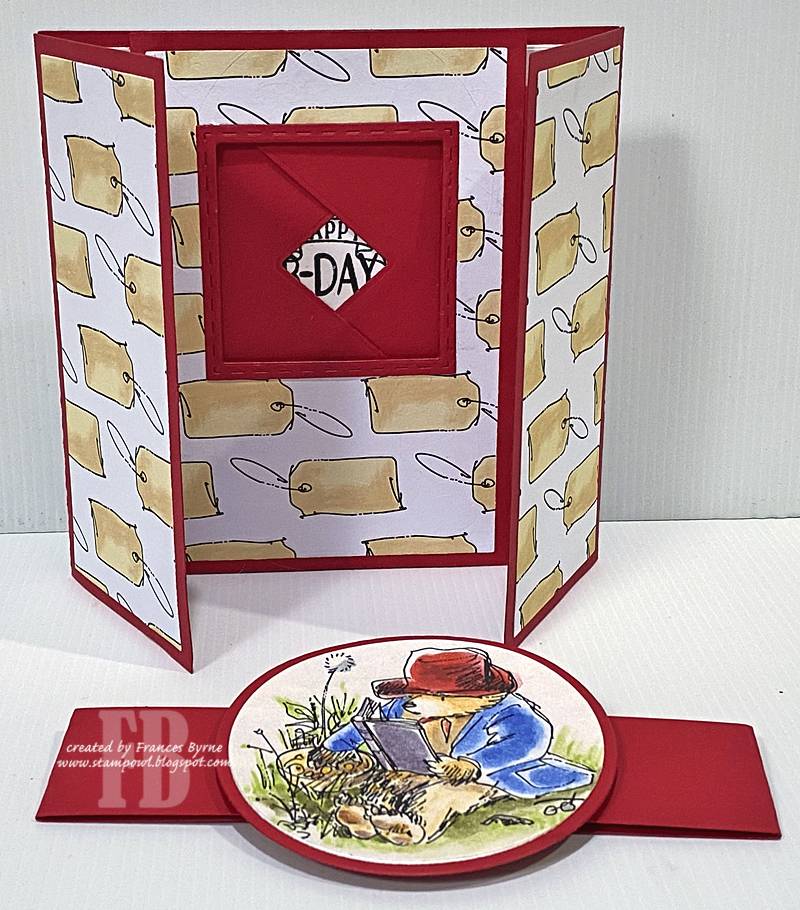
Today I am sharing a 6 x 6 Gatefold Shutter card using Made To Surprise by Sam Calcott's Effortless 6 x 6" Shutter Card die set. I have made Gatefold Shutter Cards in A5 (Australian Size); A2 (USA Size) and Slimline Size, but I believe this is the first 6 x 6 version I have made. And now I have the die set, it won't be the last!
Over recent months, I have made a couple of Paddington themed cards using stamp sets. I finally got my hands on the paper pad which is also available which includes patterned papers and toppers, so for my card today I made use of this.
Here you can see the front of my card with the belly band removed, the dies to create the belly band are also included in the die set.
Here the card is partially opened, starting to reveal the sentiment which is hidden behind the shutters.
Finally the full reveal, I used a birthday sentiment from LDRS Creative's Essential Birthday Sentiments stamp set for my sentiments on this card.
I added a panel to the back of the card so that I could add another birthday sentiment and some more Paddington images. There is also plenty of room here to write a personal greeting when I am ready to send this card to someone.
I have made lots of Shutter Cards in the past in both A5 (Australian Size) and A2 (USA Size}. I have been wanting to make a Slimline version, so when Kendra Morgan posted a tutorial for this style of card on her YouTube channel, I knew the time had come to make one. You can find Kendra's tutorial here.
My finished Slimline Shutter Gatefold Card measures 4 inches x 9 inches when closed and will fit in a #10 envelope.
To decorate my card I used a magnolia from Colorado Craft Company's Thinking of You Magnolias stamp set. I created a belly band to help keep the card shut and layered the magnolia onto circles using Divinity Designs Double Stitched Circles; Circles and Scalloped Circles die sets. The sentiment is also included in the stamp set.
When you open the card, the shutter portion of the card starts to open to reveal the sentiment or image.
I used the Happy Birthday sentiment from the Colorado Craft Company's Thinking of You Magnolia stamp set.
I also decorated the sides of the inside of my card using the opposite side of the patterned paper I used for the front and centre of my card. I added another of the magnolia's included in the stamp set to the top left and bottom right of my card.
Today I am sharing a Christmas themed Gatefold Shutter Card using stamps and dies from Lawn Fawn.
I have been wanting to create this style of card for some time now using the new Lawn Fawn Christmas themed stamps and dies I purchased back in August, but with everything else I have been doing this year it kept getting put on the back burner. So I am so happy to finally get something made using a number of the different stamp & die sets.
To create the background on my card, I started with a blue card base. I then used Broken China & Faded Jeans Distress Oxide inks to blend color around all the various panels of this card. Next I splattered white paint and Liquid Stardust over each of the panels.
For the front of the card I used the Build A House and Build A House Gingerbread Add On die sets to create the gingerbread house and gingerbread men. The house was layered onto an oval which had been colored the same as the other panels on the card.
I added white glitter cardstock to the bottom of the card and bottom of the oval using the Stitched Hillside Borders die set to die cut the hills.
The oval was attached to a blue belly band which helps keep the card closed.
Here you can see the front of my card with the belly band removed, ready to start opening the card.
Here the card is partially opened, starting to reveal the image which is hidden behind the shutter.
Finally the full reveal ... I used the Shutter Card Snow Globe Add On to add the snow glove to the centre portion of the card. I used MFT Stamps Shutter Card Components to create the shutter card, I didn't think I needed another shutter card die set in my stash so I didn't buy the Lawn Fawn one. The opening in MFT's die set is slightly larger than the snow globe opening, so I just used a circle die about the same size to die cut the opening.
I added snow to the bottom of the card again, using Lawn Fawn's Stitched Hillside Borders die set. I added the stamped images using three different Lawn Fawn Stamp sets ... Snow Globe Scenes; Tiny Gingerbread & A Creature was Stirring stamp sets.
To finish off the card I added an older Penny Black sentiment which worked with the theme of the card.
It’s challenge time with the “Crazies” over on the Crazy 4 Challenges blog. As challenge hostess for the month, I finish off the month with one last challenge.
Our challenge this week is .... Gatefold Cards. Create A Gatefold Card. There are many ways you can create a gatefold card. If you need inspiration on different types of Gatefold Cards, I have included links to some of Jennifer McGuire's Gatefold Card tutorials on the Crazy 4 Challenges blog.
For my card today I decided to create a Gatefold Shuttter Card, it's been a while since I have made one of these, so I thought it was time to pull out one of my Gatefold Shutter die sets to create one.
I had some sunflower sitting on my desk which I had made a few days prior to making my card using Lawn Fawn's Stitched Flower Frame die set. I had recently purchased this set to use with the new Lawn Fawn Magic Iris die set. As I will pulling out some supplies to make my card I thought as it would work with the Magic Iris, why not a shutter card too.
For my gatefold card today I decided to create a belly band to help keep my card closed. I added the sunflower to the centre of the belly band.
I decorated the front of the card and sunflower using Lawn Fawn's Hey Lady stamp set, adding a few of the lady bugs and a magnifying glass. The sentiment is from the Reveal Wheel Circle Sentiments stamp set.
When you open the card, the shutter portion of the card starts to open to reveal a sentiment or image. I used MFT Stamps Shutter Card Components Die-namics set for the shutter portion of the card.
To decorate the circle area of the card, I used the Stitched Flower Frame again, creating another sunflower from it. I needed to die cut a smaller circle in the panel in the centre so the circle was hidden by the sunflower. I added the stem and leaves to the sunflower. Along the bottom of the card I added a grass strip using Lawn Fawn's Grassy Hillside Border die set.
I stamped a birthday sentiment in the centre of the sunflower which is revealed when the card is fully open.
I added a few more of the lady bugs and magnifying glasses to the card.
Don't forget to check out the rest of the “Crazies” cards over on the Crazy 4 Challenges blog and also their individual blogs for more details.
For your shopping convenience, all products are linked below. Compensated affiliate links are used where possible with no extra cost to you. This helps me to continue to share all the projects I include on my blog. For the benefit of my Australia readers, I have started to include some links to Australian stores when available. Please note I only use and share products I love.
It's challenge time with my friends over on the CCEE Stampers challenge blog. As challenge hostess for the month, I finish off the month with one last challenge.
Apparently the 25th September was World Dream Day. So for our challenge this week create a card with someone/something sleeping/dreaming.
Recently Craftin' Desert Divas announced that they were closing their store and were selling their products for 65% off. Of course I had to check out what was on offer. While looking I came across this cute stamp set called "Twinkle Twinkle" which was perfect for this challenge, so I added this to my cart.
I created a Gatefold Shutter Card using MFT Stamps Shutter Card Components die-namics. You can see a quick video of my card in action above.
I added one of the images and sentiment from the stamp set to the front of my card.
Here is my card when it is partially opened.
You can see the centre image starting to be revealed as the card opens in the photo above. I used the image of the baby sleeping on the shutter portion of the card. I added the ZZZ to an oval above the image to be a thought bubble. I stamped the "Dream" sentiment to the bottom of the card.
Don't forget to check out the CCEE Stampers blog (goes live 12 AM EST) to see the rest of the creations the CCEE Stampers created this week. You can also see more details of their creations on their individual blogs:
For your shopping convenience, all products are linked below. Compensated affiliate links are used where possible with no extra cost to you. This helps me to continue to share all the projects I include on my blog. For the benefit of my Australia readers, I have started to include some links to Australian stores when available. Please note I only use and share products I love. Twinkle Twinkle Clear Stamp Set - Craftin' Desert Divas (discontinued)
Today I have another Teacher thank you card I created for my grandchildren to give to their teachers at the end of the year.
Taylored Expressions recently released a couple of items which I knew I needed to add to my stash. I am always looking for stamps/dies that would be suitable to make teacher cards and this pencil stamp called Create in Color Background is one I will think I will use a lot.
I also make a few Gatefold cards, so the Better Half Cutting Plates were a perfect addition for these types of cards.
Here is a quick video to see my card in action.
I die cut the one of the dies from the Better Half Cutting Plate die set four times from white cardstock and once each from red, orange, yellow, green, blue and purple cardstock. I then adhered each of the white panels onto white cardstock that had double sided adhesive tape on the front and paper pieced all the colored stripes into the white frames in rainbow order. I have plenty left to make more cards in the future.
I stamped the pencil background onto white cardstock and then die cut this using a circle die and layered that on the centre of the card. I added sentiments from Heffy Doodle Stamps Teach Me Clear Stamp set and die cut using Honey Bee Stamps Banner Builders die set.
Here is my card when it is partially opened.
For the inside of the card I added two more of the rainbow panels I used for the front of the card.
I created a Gatefold Shutter Card using MFT Stamps Shutter Card Components die set.
I stamped the pencil background again on white cardstock and added that to the centre panel at the bottom of the card. I used Heffy Doodle Stamps Teacher die and Teach Me Clear stamp set for the sentiments.
On both of the side panels I added two kids which are from Stamping Bella's Squidgy Pals stamp set.
Supplies:
For your shopping convenience, all products are linked below. Compensated affiliate links are used where possible with no extra cost to you. This helps me to continue to share all the projects I include on my blog. For the benefit of my Australia readers, I have started to include some links to Australian stores when available. Please note I only use and share products I love.