I have a funSliding Window or Sliding Pop-up Card using the 5 x 7 Rectangle & Zig Zag Slider Card die set from Made To Surprise by Sam Calcott's Super Sliders Collection. I thought this was going to be one die set I wouldn't be able to get hold of, as it has been out of stock for months and I noticed there was an SVG version of it on Craft World. However about a month or two ago, it appeared in stock on Craft Stash so I didn't waste much time adding it to my cart.
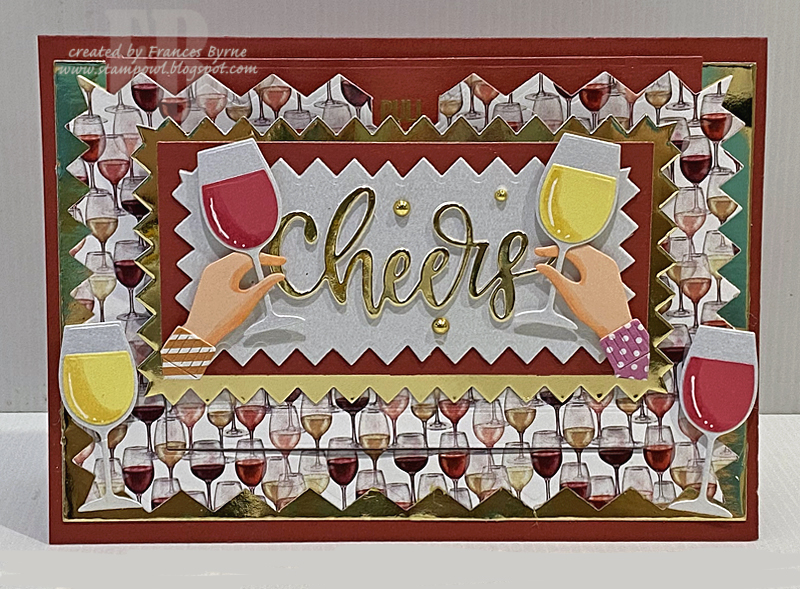
I wanted to make an alcohol/wine themed card using some of the die/stamp sets I have of this theme, so as I had this wine themed paper I started with that. I also used gold mirror cardstock and burgundy cardstock to match the colours of wines.
To decorate my card I used MFT Stamps In Good Hands and Long Stem Barware Die-namics sets. I also added the "Cheer" sentiment which is an older die also from MFT Stamps.
When you pull the tab at the top of the card, the main rectangle panel moves to the upright position revealing a secret message as it does. For the sentiment here I used another stamp set from MFT Stamps ... Raise A Glass Stamp set.
Here is a side on photo of my card, so you can see the pull up panel of the card a little better. Normally I would add a sentiment to this panel, but I didn't for this card. I did add the stamped "Pull" to the top of the pull up panel using the Push Me Pull Me stamp set.
For the inside of the card, I used the large rectangle and Zig Zag dies to add my layers to the card. I stamped two more sentiments from the Raise a Glass Stamp set.
To finish the card, I added two more sets of hands holding a glass of wine to each bottom corner.

It’s challenge time with the “Crazies” over on the Crazy 4 Challenges blog. Being a brand new month, it's time to introduce our new challenge hostess which is ME!
A Blue Christmas ... take inspiration from the song that Elvis used to sing and create a Christmas card which includes the color blue in it. Don’t celebrate Christmas … just make a card that includes blue.
For my card today I have another Slimline Sliding Window Pop-up Card using Trinity Stamps Slimline Surprises die set. To decorate the card I used a new Slimline stamp set from Woodware Stamps called Peaceful Nights.
I gold embossed the Peaceful Nights image onto blue cardstock and then layered this onto gold and then blue cardstock, so that when the image is pop-up by pulling the slider you can see both colors behind the image.
I used a sentiment from an older Papertrey Ink's Instant Photo: Holiday stamp set which is also gold embossed.
Here is a side view of my card when the sliding has been pulled up. here you can see the gold embossed sentiment in the front and also one at the top of the slider.
I used gold ribbon and blue cord to the top of the slider panel, this makes it easier to hold on to the panel when you want to pull it open.
I kept this card as a flat card rather than adding it to a folded card, this way the recipient is encouraged to display it in the open position. I added rectangle panels from Trinity Stamps Slimline Stitched Panels and Windows die set.
I added a Christmas sentiment from Divinity Designs Christmas Wishes stamp set to the white panel. While these sentiments weren't designed for Slimline cards, being longer than normal sentiments they are perfect sentiments to fit on a Slimline card.
Don't forget to check out the rest of the “Crazies” cards over on the Crazy 4 Challenges blog and also their individual blogs for more details.
It's challenge time with my friends over on the CCEE Stampers challenge blog. Kelly Santi our challenge hostess for the month continues to issue the challenges.
Tomorrow is National Shoe the World Day. Many teens and children around the world do not have a pair of shoes to wear, despite the climate or terrain, they walk barefoot. Let’s create a card using any type of shoe – cowboy boots, heels, flip-flops, to help the awareness to donate any shoes you may no longer need.
For my card today I created a Sliding Window Card or Sliding Pop-up Card using Sunny Studio Stamps Sliding Window die set.
To create the wood floor base I used Hero Arts Wood Floor Bold Prints stamp which I embossed in white onto white cardstock. I then applied Age Mahogany, Abandoned Coral and Tattered Rose Distress Oxide inks for an ombre look.
To decorate my card I used Art Impressions new Cowgirls Clear stamp set, as soon as I saw this stamp set I knew it would be perfect for this challenge.
I added two sentiments to my card which are revealed when you pull the tab at the top of the card. One is under the image (Warm & Cozy" and the other is on the top section of the pull out panel just under the pink pull tab.
The pull tab is from Lawn Fawn's Double Slider Surprise die set.
I kept this card as a flat card rather than adding it to a folded card, so I decorated the back of the card by adding some more of the wood floor in ombre fashion along the bottom of the card. I also added two sentiments from the Cowgirls stamp set and stars from Altenew's Halftone Stars stamp set.
Don't forget to check out the CCEE Stampers blog (goes live 12 AM EST) to see the rest of the creations the CCEE Stampers created this week. You can also see more details of their creations on their individual blogs:
For your shopping convenience, all products are linked below. Compensated affiliate links are used where possible with no extra cost to you. This helps me to continue to share all the projects I include on my blog. Please note I only use and share products I love.
Today I am sharing another Sliding Window Card or Sliding Pop-up Card which ever you like to call them, using Sunny Studio Stamps Sliding Window die set. I am having lots of fun making this style of card again and using this die set makes it very easy to do.
To decorate my card I have used Concord & 9th's Winter Wear stamp set. This set allows you to mix and match some of the different elements included in the set to create two different girls.
This time around I used oval dies from Hero Arts Oval Infinity die set to die cut the image of the girl and the layering oval and adhered that to the sliding portion of the card.
I also used rectangle dies from Heffy Doodle and Elizabeth Craft Designs for the rectangle portions of this card.
I added two sentiments to my card which are revealed when you pull the tab at the top of the card. One is under the image (Warm & Cozy" and the other is on the top section of the pull out panel just under the blue circle that says "pull here"
I kept this card as a flat card rather than adding it to a folded card, so I decorated the back of the card adding a birthday greeting and gloves.
Supplies:
For your shopping convenience, all products are linked below. Compensated affiliate links are used where possible with no extra cost to you. This helps me to continue to share all the projects I include on my blog. Please note I only use and share products I love.
My card today is for a challenge I do with a couple of friends of mine. Each month we challenge each other to create something using supplies we all own.
As this is our first challenge for the year and just after Christmas, our challenge this month was to create a card using anything new.
As I had just received the Sunny Studio Stamps Sliding Window Card die set and some fun space themed stamps from Whimsy Stamps, I decided to combine the two to create my card.
Here is a quick video to see my card in action.
To create my card I started by covering a piece of white cardstock with Altenew's Watercolor Nebula Washi tape, this washi tape is about 6 inches wide and gives a great galaxy or space background without lots of work.
I die cut the washi tape cardstock using the largest rectangle from Heffy Doodles Imperial Stitched Rectangles die set. Next I used the main die from Sunny Studio Stamps Sliding Window die set to die cut the centre of the panel.
For the moon I used Whimsy Stamps Moon Background stamp. I seem to make a few spaced themed cards each year and I know this stamp will get a work out in the future. I do have another moon surface type of stamp however this one is much deeper so a must have for me.
I stamped the moon background onto thinner white cardstock and colored the image and cut around the top edge of the moon. I then lay this over my card where I knew I wanted it to lay and used the same rectangle die to die cut the image so the stitched lines where on both the washi taped background and the moon.
Next I lay the moon back over the card and positioned the sliding window die back over where I cut it on the washi card panel and die cut the lower section of the sliding window portion.
I cut a rectangle panel which also had washi tape on it the same size as the sliding window and then adhere the moon to both this panel and around the bottom of my main card.
I constructed the card as per the instructions provided on Sunny Studio Stamps web site.
To decorate the card I used Whimsy Stamps Space Dragon for the main image on the panel that moves up. This image is also adhered to the panel using a action wobble so this gives the image some extra movement.
The sentiments and all other images used on this card are from Whimsy Stamps A Boy's Dream.
For this style of card you have the option of either mounting the sliding window to the front of a folded card or keeping it flat by just adhering it to a piece of cardstock. I decided to just adhere my card to a flat black rectangle panel so my card could be displayed as per the photos in this post.
Of course I still had to decorating the back of my card (it's what I do LOL!) so I added the moon, and a few more of the images from the A Boy's Dream stamp set.
Supplies:
For your shopping convenience, all products are linked below. Compensated affiliate links are used where possible with no extra cost to you. This helps me to continue to share all the projects I include on my blog. Please note I only use and share products I love.
Kelly tells us that Spring starts April 8th, 2012 (in the Northern Hemisphere) so how about a "Spring-ing" into action with Riley - create a card/project that moves - pop up card, wiper card, waterfall card, slider card, swing flip flop cards, etc -- SCS has tutorials for about 40!
For my card this week I used Stacked Eggs Riley, isn’t he a cutie!!!!! I decided to create a Sliding Pop Up card, you all find a tutorial for this also in the resources section of Splitcoast Stampers.
Don’t forget to check out the rest of the Design Teams blogs today so see what they created for this challenge.
It’s release day over on MFT Stamps, which means it is time to join the MFT Stamps Design Team for another "Blog Hop and Shop!".
The hop started at Kim's (MFT Lady) blog so if you didn’t start from there you may want to head over there now so that you can start at the beginning of the hop. You don't want to miss anything and believe me there is lots to see!
Tonight I am featuring one of the new stamp sets that are being released, PI Astronaut Girl, isn’t she just adorable!!!!!!
My card today is actually a Sliding Pop Up card, you will find a tutorial on how to create these in the resources section of SCS.
The inside of my card which is the yellow part I created to resemble the moon. I added a few stars using the Die-namics Stacking Stars die to the out side of my card. Each of the sentiments were stamped on the ribbon portions of the Die-namics First Place Award Ribbon Die.
Here is another view of my card this time from the side so you can see all the pop up pieces I used on this.
Well that is about it from me for today, now it is time to hop on over to the blog of the incredibly talented Michele Boyerand see what awesome creation she has to share with you today.
Stamps: PI Astronaut Girl – MFT Stamps
Paper: White; Yellow; Orange; Space DP – Bo Bunny
Die-namics: Stacking Stars; First Place Award Ribbon – MFT Stamps
Other: Black Ink; Boys Will Be Boys Cricut Cartridge; Rhinestones; Circle Punches; Foam Tape; Copics
Hi everyone and welcome to my blog. It time to join the Paper Pretties Design Team for our Paper Pretties New Release Blog Hop!!.
The hop started at Paper Pretties Blog, so if you just happened to hop onto my blog you might like to head back to the Paper Pretties Blog so you can start at the beginning.
For my card today I used the new Oh Baby stamp set. This is an adorable stamp set perfect for those baby cards we need to create on occasions.
As you can tell I have created another of the Sliding Pop-Up cards, you can find a tutorial on how to create these in the resources section of the SCS site.
As it is Wednesday, it is also time for another Paper Pretties Wednesday challenge. This week the challenge is an Inspiration Color challenge … to use Valentine’s Day as your color inspiration. You don’t have to make a Valentine’s Day card.
One of the colors I think of when I think of Valentine’s Day is pink so I made my card mostly pink.
Want to play along with us:
How to Enter: If you would like to play along with us, all you have to do is create a card/project using the above challenge and upload it to your blog and/or to your SCS Gallery using the keyword PWC140.
Don’t forget to include a link to your card on the Paper Pretties Blog, so everyone can see it too.You don’t have to use Paper Pretties stamps to play, but of course if you have them we would love to see you use them. One random participant will receive a Paper Pretties Stamps set … see the Paper Pretties Blog for more details.
Well that is about it from me for today, to continue on your journey you need to hop on over to Jacquie Peifer’s blog.
Enjoy the rest of the hop and thanks for dropping by!
Stamps: Oh Baby – Paper Pretties
Paper: White; Pink; Nursery Baby Girl DP – DCWV
Other: Black Ink; Oval Nestabilities; Pink Ribbon; Oval Punch; Circle Punch; Hand Button; Pink Studs; Copics