Saturday, February 10, 2018

Love You More Than Coffee


Hi Crafty Friends,

It’s challenge time with the “Crazies” over on the Crazy 4 Challenges blog. Karen Aicken our challenge hostess for the month continues to issue the challenges.

Valentine’s Day is right around the corner. Make your project reflect love or appreciation. Make a Valentine, Anniversary, Thinking of You or card showing support. 

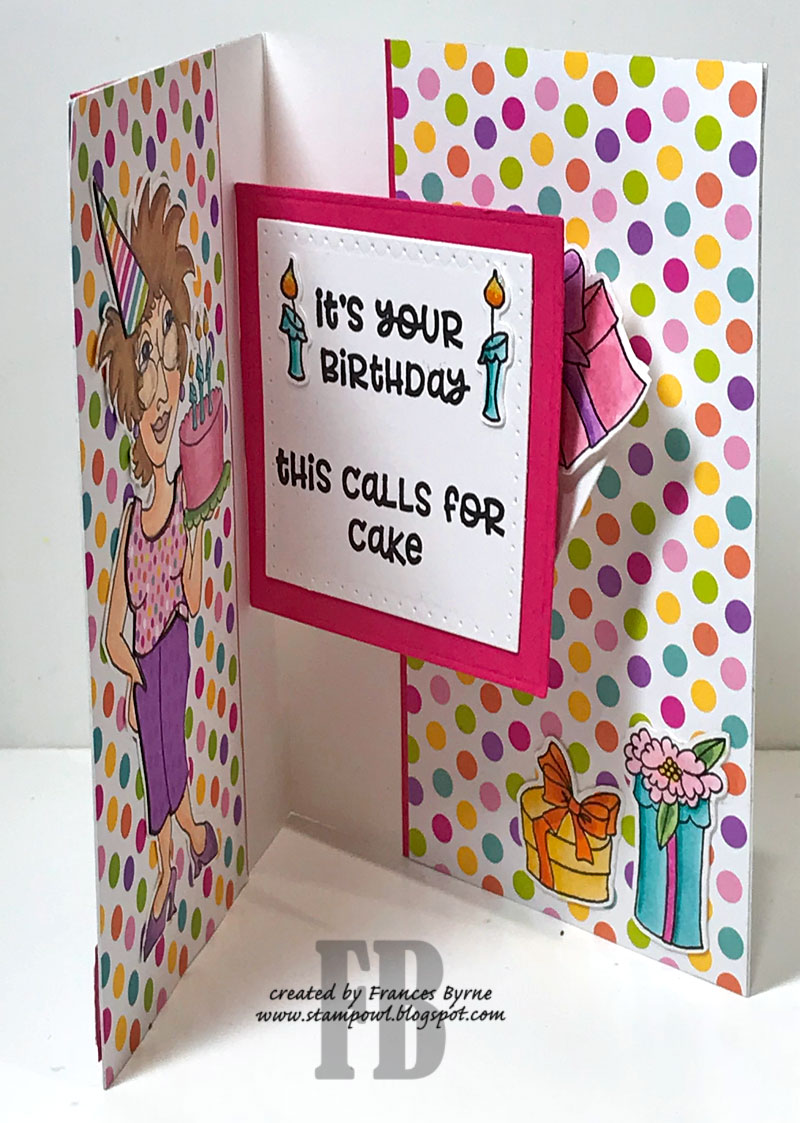
My daughter came home recently with a Starbucks "Valentine's" Gift Card, she knew I was after some pretty coffee gift cards to use with my new Karen Burniston Coffee Cup Pop Up Card die. Seeing that Valentine's Day is only a few weeks away I figured I better make a card so I could use it :). As the gift card was flowery and bright, I wanted to replicate that in my card.


I created the coffee mug using colors found in the designer paper used on the base. The striped paper also included colors in the designer paper so I added that to the card as well for some extra interest. I added a sentiment which is from Riley and Company. 


Seeing it was a Valentine themed card I added a few hearts to the coffee mug; napkin and sentiment. The hearts are from the heart border included in the Cake Trims die set.


Here is an overhead photo of my card, so you can see the whole card at once.


For the front of the card I added another coffee mug and used a few of the sentiments included in the Honey Bee Stamps Perfect Blend stamp set.

Don't forget to check out the rest of the “Crazies” cards over on the Crazy 4 Challenges blog and also their individual blogs for more details.


Supplies:
Karen Burniston:


Stamps: Perfect Blend - Honey Bee Stamps; Coffee is a Hug - Riley and Company
Paper: White; Red; Pink; Pinata DP - Kaisercraft; Lipstick Stripe DP - Doodlebug Design Inc.
Dies: Coffee Cup Pop up; Square Spinner Pop up; Cake Trims - Karen Burniston
Other: Black Ink; VersaMark Ink; Lawn Fawn Merman Ink; White Embossing Powder; Foam Tape


Friday, February 9, 2018

Soar


Hi Crafty Friends,

My card today uses products from Elizabeth Craft Designs. The starting point for this card was the  birdcage from the new Becky Seddon Free as a Bird die set, I knew I wanted to use that on my card.  While looking through my ECD supplies sitting on my desk I discovered a background I created last year which uses the Geometric Background and Tonic Studios Gilding Flakes which I decided to use for the background.

For the birdcage I die cut one from black cardstock and one from white cardstock that had Clear Double Sided Adhesive Tape on the front. I covered the adhesive birdcage with Copper Silk Microfine Glitter then layered the two together so they were slightly offset.

I used the Dashing Circles and Stitched Circles for the circle layers on the left hand side of the card. I trimmed off one side of the circles and adhered them to the lower left hand side of the background layer. I then adhered my birdcage to the top of these circles.

This background was then layered to a piece of patterned paper from the ModaScrap Wood Effects Patterned Paper Pack and onto a black side folding card.

I die cut the A Way With Words - Soar from black cardstock three times and then an additional one from white cardstock that has Clear Double Sided Adhesive Tape on the front and covered the adhesive with Copper Silk Microfine Glitter. This was layered using the Stitched Fishtail Banners die set.

To finish off the card I die cut two sets of the birds from the Free as a Bird die set, die cutting them all using white cardstock that has Clear Double Sided Adhesive Tape on the front. I glittered two of the birds using Bright Cranberry Silk Microfine Glitter and the other two with Copper Rose Silk Microfine Glitter. Using a black glaze pen, I added eyes to each of the birds. Adhere three of the birds to the front of the card.


For the inside of the card I stamped one of the sentiments from the A Way With Words - Soar Collection Clear Stamp set onto a die cut rectangle panel. I then added the remaining glittered bird to the top of the panel.

Supplies:

Elizabeth Craft Designs:


Other:
Cardstock - Black
Nuvo Gilding Flakes - Radiant Gold; Silver Bullion; Sunkissed Copper
Black Glaze Pen
Foam Tape

Thursday, February 8, 2018

You Make My Heart Melt


Hi Crafty Friends,


It's challenge time with my friends over on the CCEE Stampers challenge blog. Kelly McKown-Santi 
our challenge hostess for the month continues to issue the challenges.

It's almost Valentine's Day, so create a card showing something that YOU love!

Everyone knows I love owls and also love interactive style cards so that is what I went with for todays challenge. My favorite color is blue/aqua ... so I also included that in  my card.

For my card today I used the new Karen Burniston's Fancy Label Accordion card die set which has recently been rereleased.


 I decorated my card using MFT Stamps You Make My Heart Melt stamp set.


Here is a close up of the right hand pages of my card.


Here is a look at my card when it is closed ready to be placed in an envelope.


Don't forget to check out the CCEE Stampers blog (goes live 12 AM EST) to see the rest of the creations the CCEE Stampers created this week. You can also see more details of their creations on their individual blogs:


Supplies:

Stamps: You Make My Heart Melt - MFT Stamps
Paper: White; Aqua; Once Upon a Time Paper Pad - Echo Park
Dies: Fancy Label Accordion; Fancy Flourish Frames; Outdoor Scene - Karen Burniston
Other: Black Ink; Peacock Feathers Distress Oxide; Foam Tape; Copics

Wednesday, February 7, 2018

Amazing Friend


Hi Crafty Friend,

Today I have a floral card to share with you all. This card uses the Concord & 9th Dahlia Turnabout stamp set. I love the turnabout stamps, this one is a little different in that it doesn't create a background like the rest of the turnabouts do.


I stamped the Dahlia Turnabout using 4 different shades of pink ink, one is Delicata Rose Gold ink which gives the card I little bit of shimmer.

I die cut the white cardstock using MFT Stamps Stitched Scallop Basic Edge Die-namics. The sentiment is embossed over the flower.


For the inside of the card I have again used the same edge die I used on the front of my card and added a couple of sentiments from the Dahlia Turnabout stamp set.

Supplies:

Stamps: Dahlia Turnabout Stamp - Concord & 9th
Paper: White; Black; Pink
Dies: Stitched Scallop Basic Edge - MFT Stamps
Other: Black Ink; Gina K Dusty Rose Ink Cube; Gina K Innocent Pink Ink Cube; Delicata Rose Gold Ink Cube; Lawn Fawn Wild Rose Ink Cube; VersaMark Ink; Clear Embossing Powder; White Embossing Powder; Foam Tape


Tuesday, February 6, 2018

February 2018 Karen Burniston Designer Challenge


Hi Crafty Friends,

Welcome to our February Karen Burniston Designer Challenge.

Check out Karen Burniston's blog on Wednesday (US Time) when you will be able to see what all the designers created for the challenge this month, plus Karen will have an amazing video tutorial to share with us all.

Our challenge this month is .... "CASTLE" - use the new Castle Pop-up for a card of any theme. Will it be a fairy princess castle? A sand castle? The Eyrie? You decide! 


As you can see I decided to create a sandcastle using Karen Burniston's new Castle Pop-up Card die set. I kept the sandcastle and the sand base the same tones of the same color.

I added waves to the bottom edge of both sides of my card using the waves in the Tropical Scene die set.


I created mermaids using the Princess and Mermaids die set which I added to the right hand corner of each edge. I added Tonic Studios Shimmer Pen to the mermaids body so it would shimmer.

I added sentiments to the card using Honey Bee Stamps Mermaid Song stamp set. 


Here is an overhead view of my card so you can see the whole of the pop up card at one time.


For the front of the card I added some sand along the bottom edge using the Nature Edges die set.

I added another mermaid to the left hand side of the card.

I added the Happy Birthday sentiment which is another new die from Karen Burniston's new collection released in January.

To finish off the card I added the & Mermaid Kisses which is another sentiment from the Honey Bee die set. I used the fishtail banner from the Word Set 5 - Royalty to die cut this sentiment.


Don't forget to visit Karen Burniston's blog on Wednesday when you will be able to see what all the designers created for the challenge this month.


Supplies:

Karen Burniston:


Other:
Stamps: Mermaid Song - Honey Bee Stamps
Paper: White; Yellow; Pink;  Watercolor Wishes Paper Pad - Lawn Fawn
Inks: Black Ink; Gina K Designs Sweet Corn Ink Cube; Lawn Fawn Mermaid Ink Cube
Tonic Studios Shimmer Pen
Foam Tape
Copics


Monday, February 5, 2018

It's Your Birthday This Calls For Cake


Hi Crafty Friends,

Today I am sharing a birthday card I created recently.

The background of my card was created using Simon Says Stamp Wide Stripe Background. I stamped it once using Gina K Designs Peach Bellini ink pad and then moved the card up 1/2 inch and stamped again this time using Catherine Pooler Mint To Be Ink.


I added the Baker Lady image to my card which is from the Leading Ladies Collection of stamps from Ellen Hutson.

The sentiment is from Reverse Confetti. To finish the front of the card I added some Nuvo Jewel Drops.


For the inside of my card I used the left over background piece I had from the front of the card on the left side of the card. I also added a bowl and wooden spoon. The sentiment is a die from Simon Says Stamp.

Stamps: Leading Ladies Baker Lady - Ellen Hutson; Celebrate Your Day - Reverse Confetti; Wide Stripes - Simon Says Stamp
Paper: White; Black
Dies: Happy HB - Simon Says Stamp
Other: Black Ink; VersaMark Ink; Catherine Pooler Mint to Be Ink; Gina K Designs Peach Bellini Ink; Key Lime Nuvo Jewel Drops; Rosewater Nuvo Jewel Drops; White Gel Pen; Black Glaze Pen; Foam Tape; Copics


Sunday, February 4, 2018

My Little Pirate


Hi Crafty Friends,

Today I am sharing another card using some of the new Karen Burniston die set released in January.

This time around I have used the Palm Tree Pop-up die set to create my pirate scene card. To start I used Distress Oxide Inks to color the base of my card. I then die cut the pop-up die that comes with the Palm Tree Pop-up die set towards the back of my card and die cut the pop up palm tree and two smaller palm trees also included in the set. I assembled my palm tree and attached it to the card.

I used a combination of three different pirate themed stamp sets to create the background scene. And added a dashed line trail around the whole card. 

I stamped some of the images onto white cardstock and cut them out using my Scan N Cut and adhere them to my card. I attached the two pirates to the pop up palm trees and also added a pirate to one of the trees.

I hand cut the lake to the shape I wanted and colored that also using distress oxide inks.


I used the Word Set 5 - Royalty die set to die cut the "My Little on the fishtail banner and then added the word "pirate" to the right hand side of the banner using white embossing ink.

Above the banner I stamped "Happy Birthday". I used the Numbers die set to add the "8th" to the card. As my Grandson will be turning 8 in a few months, I will probably use this for his birthday card.

For the front of my card, I continued my pirate scene. I used distress oxide inks to color my sky and sand areas of my card.

For the beach area, I used the Tropical Scene and Nature Edges die sets, adding another two pirates to the beach. The sun is also from the Tropical Scene die set.

I die cut the "Happy Birthday" from red and black cardstock and adhered them to each other offsetting slightly so the black showed a slight border and added this sentiment to the top of the card.

To finish off the card I added a couple of birds in the sky.


Here is a look at my card when it is half closed, so you can see how the palm tree folds towards the side of the card as it is closing.


Supplies:
Karen Burniston:

Stamps:  Ahoy, Matey - Lawn Fawn; Party Like a Pirate - MFT Stamps; Pirate Party - Clearly Besotted; Bee4Me - The Stamps of Life
Paper: White; Black; Red; Brown; Green
Dies: Palm Tree Pop-up; Tropical Scene; Nature Edges; Happy Birthday; Word Set 5 Royalty; Numbers - Karen Burniston
Inks: Black; Vintage Photo Distress Oxide; Walnut Stain Distress Oxide; Fossilised Amber Distress Oxide; Broken China Distress Oxide; Salty Ocean Distress Oxide; Gina K Designs Jelly Bean Green; Gina K Designs Cherry Red; Gina K Designs Dark Chocolate; Gina K Designs Wild Dandelion; Gina K Designs Sweet Mango
Other: Clear Embossing Powder; Foam Tape; Copics


Saturday, February 3, 2018

I Love You


Hi Crafty Friends,

It’s challenge time with the “Crazies” over on the Crazy 4 Challenges blog. Being a brand new month it is time to introduce our new Challenge hostess which is Karen Aicken.

Karen has challenged us to .... Add a heart to your project this week. You can make a Valentine, put a little heart on a critter, make a heart shaped card - just show us a heart!

I had such fun making the Star Effect Card I made last week, that I decided to make another this time with a love/valentine theme.


To decorate my card I have used the ModaScrap True Love die set which I did cut from red cardstock and adhere to a scrap piece of white cardstock that had Clear Double Sided Adhesive on the front and then covered the adhesive with Antique Silver Silk Microfine Glitter.

To decorate the edges of my card, I added one of the heart borders from the Valentines Edges die set. 

To complete the sentiment I used the "I"  and "you" from the Words 2 -  Thinking of You die set which I adhered to a Stitched Fishtail Banner.


Here is side view of my card.


Here you can see my card taken apart so it can be placed in an envelope.


Don't forget to check out the rest of the “Crazies” cards over on the Crazy 4 Challenges blog and also their individual blogs for more details.


Supplies:
Elizabeth Craft Designs:


Other:
Red Cardstock
Foam Tape


Friday, February 2, 2018

You're So Sharp


Hi Crafty Friends,

My card today is for a challenge I do with a couple of friends of mine. This time around we were supposed to create a card using something new. Just about everything I have created in the past month would be "new" as I have been busy creating cards using new release products from two design teams and also playing with stamps & dies I received for Christmas.

Today my card uses new products which were recently released by Elizabeth Craft Designs.

For the background I used the new Krista Schneider Circles Background which I stamped onto Watercolor Card and embossed with white embossing powder. I then added Turquoise, Purple and Leaf Green Brusho Crystal Color. I have only recently purchased the Brusho Crystal Color and am having fun playing with them.

I die cut the background using the Dashing Squares die set and then decorated the card using the Cacti Clear Stamp Set which was layered using the Stitched Fishtails and Fitted Fishtails.


For the inside of the card I used another image and the sentiment which are included in the Cacti Clear Stamp set.

Supplies:
Elizabeth Craft Designs:


Other:
Paper - White; Watercolor Card; Black
Inks - Black Ink; VersaMark Ink
White Embossing Powder
Brusho Crystal Color - Turquoise; Purple & Leaf Green
Foam Tape
Copics


Thursday, February 1, 2018

This Calls for Cake


Hi Crafty Friends,

It's challenge time with my friends over on the CCEE Stampers challenge blog. Being a brand new month it's time to introduce our new challenge hostess which is Kelly McKown-Santi.

Apparently today is Spunky Old Broad's Day! So our challenge this week is to create a card/project featuring your favorite sassy ol' gal!


I enjoy the gals from Loralie Art Stamps, these are hard to get these days but I was fortunate to find this one on eBay recently.

I paper pieced the pants; shirt and hat which is something I haven't done for ages, a few years ago we used to do this all the time. I also added Nuvo Drops to the glasses and the flames of the candles.


For the inside of the card I used one of Karen Burniston's new dies, this one is the Spinner Square Pop-up. The present to the right of the sentiment spins behind the sentiment as it is opening and closing. 

As you can see I stamped the birthday girl again and added a few presents around the card. 


Here is another photo of the inside of my card, you can see how the present is moving behind the sentiment panel as the card is closing.

Don't forget to check out the CCEE Stampers blog (goes live 12 AM EST) to see the rest of the creations the CCEE Stampers created this week. You can also see more details of their creations on their individual blogs:


Supplies:
Karen Burniston:


Stamps: Birthday Girl - Loralie Art Stamps; Celebrate Your Day - Reverse Confetti
Paper: White; Pink; Fairy Tails Paper Pad - Doodlebug Design Inc.
Dies: Spinner Square Pop-up - Karen Burniston
Other: Black Ink; White Blizzard Nuvo Glitter Drops; Morning Dew Nuvo Crystal Drops; Foam Tape; Copics