Friday, August 19, 2022

Divinity Designs Inspiration


Hi Crafty Friends,

Today I am sharing two cards I created using stamps and dies from Divinity Designs August release.


My first card is a A2 Portrait card, and was created using Divinity Designs A2 Portrait Card Base with Layer die set. The layer was die cut using holographic cardstock, which is something I have been enjoying using lately.

To decorate the card I used the Rolled Roses Background die, which I die cut from orange cardstock and then layered some patterned paper from the Pretty Papers 3 Paper Pad. 

The rose is from the Rolled Rose Flower die set and I also added some leaves using the Rose Leaves die set. This was all layered onto a label using the Vintage Labels 2 and the Pierced Vintage Labels 2 die sets.

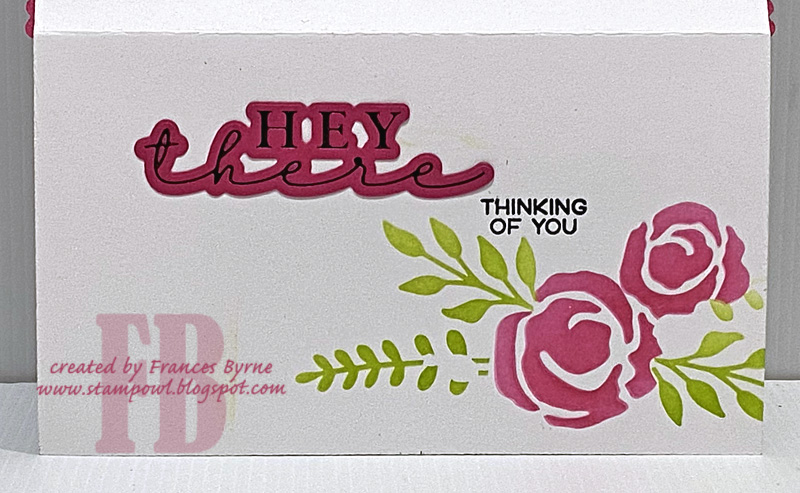
For the sentiment I added a silver foiled sentiment using the All Occasions Foiling/Die Duo set and the Solid Foiling Plate to get the negative image with the silver foil on the outside of the sentiment.


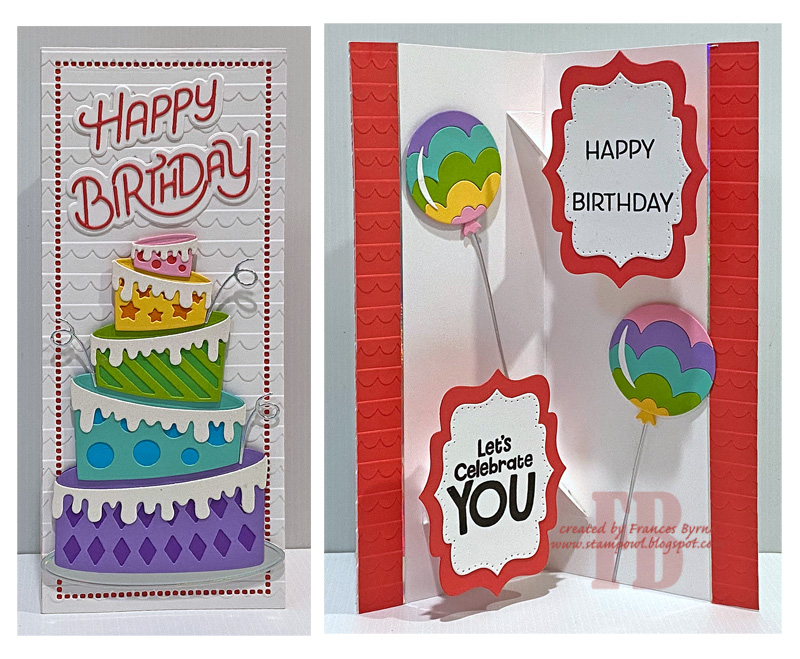
My second card is a Mini Slimline card. For the Mini Slimline portion of the card I used the Mini Slimline Card Base; Mini Slimline Rectangles and the new Mini Slimline Thin Pierced Frame die sets.

To create the background of my card I used the cherry included in the Fresh Fruit stamp set to randomly stamp all over a white card panel. I used my Copic markers to color the cherries and the background. I then die cut the panel using the largest rectangle included in the Mini Slimline Rectangles die set before adding to the base of my Mini Slimline card.

I used the label dies from the Vintage Labels 2; Pierced Vintage Labels 2 die sets to create the label to add another cherry and the "I Love You Cherry Much" sentiment.

The Mini Slimline Thin Pierced Frame die was used to add the red frame around the edge of the card.


Thursday, August 18, 2022

You're the Best


Hi Crafty Friends,

It's challenge time with my friends over on the CCEE Stampers challenge blog. As challenge hostess for the month, I continue to issue you the challenges.

Apparently August is Peach month and Monday 22nd August is National Peach Day, so for our challenge this week create a card that features one or more things that begin with the letter "P" .. A punched image; patterned paper; pansy; paint; person or a product that is from a company whose name starts with “P”.

For my card today I opted to go for the company whose name starts with "P", my card using stamps, dies, stencils and hot foil plates from Pinkfresh Studio. The stamp set I used is called Painted Daisies, another "P" word. As well as the company name, I used the colours peach and pink and added pearls as an embellishment.

One thing I love about Pinkfresh Studio's sets is there is normally a coordinating stencil and die and sometimes even a foil plate. After stamping the painted daisies onto white card, I used the coordinating stencils to color my image. You can see the colours I used in the supply list below.

I used the Stained Glass die to create the background panel, layering it over peach cardstock and then added highlights to the design with a darker peach color.

I used the new Script Sentiment Hot Foil Plate and coordinating die for the sentiment. To finish off the front of the card I added some metallic pearls in Sparkling Champagne.


For the inside of the card, I added another of the Painted Daisies image. to the lower right hand corner of the card. 

I added another sentiment using the Script Sentiment Foil Plate, foiled using Aura foil. I layered the sentiment onto peach coloured circles.

Don't forget to check out the CCEE Stampers blog (goes live 12 AM EST) to see the rest of the creations the CCEE Stampers created this week. You can also see more details of their creations on their individual blogs:

Wednesday, August 17, 2022

Birthday Wishes


Hi Crafty Friends,

Thanks for visiting my blog, today I have a fun birthday V Fold Pop-up to share with you.


If you follow my blog you know I love pop-up. interactive/kinetic cards. So it will come as no big surprise that I love the Made to Surprise by Sam Calcott range of dies/stamps. These products are available through Craft Stash which is in the UK, however there is a USA website too if you live in that part of the world. For my Aussie readers, you should know that Craft Stash offers free postage once you hit around $120 no matter what the weight and it comes reasonably quickly. I just keep adding stuff to my cart over time until it tells me postage is free and then I checkout. 

A few months ago, Sam released her Simple Pop-ups Collection, among these were three V Fold Pop-up dies which can be used individually or together. I missed out on the birthday set when it was first released, it sold out in a matter of hours. So when Sam announced they were back in stock I have to get it.

My card is 6 inches x 6 inches and as mentioned above uses the three different sized V Fold Pop-up dies included in the Simple Pop-ups die set. All the images are included in the Happy Days stamp/die set. There is a lot of colouring for this card as I added so many images, but that is relaxing for me.


For the sentiment at the front edge of the card, I used Mama Elephant's Big Birthday Wishes die set, this die is a two line sentiment, so I had to carefully cut the die cut apart to separate the two words but it really suited this card.

I haven't made a V Fold Pop-up before, so I am very happy how this turned out. I will definitely make more in the future.


As the focus of this card is on the inside, I kept. the front of the card fairly simple adding a few of the elements I had left over from decorating the inside.

I added a foiled birthday sentiment using Pinkfresh Studio's Perfect Sentiments Hot Foil Plate/Die set.


Tuesday, August 16, 2022

Happy Bird Day


Hi Crafty Friends,

I recently purchased some paper pads which included toppers to coordinate, this isn't something I normally buy but I like the look of both the papers and toppers.

I was planning on using one of the pads to create a card for today when I came across a tutorial by Sam Calcott on how to create a 3 Peak Arrow Fold Card which I figured would work well for one of my paper pads. You can find Sam's tutorial on how to create this style of card here.


This card uses minimal supplies, the main item being the paper pad. For this card I used the RSPB Summer Tropical Birds 8" x 8" Paper Pad and a circle die to layer the topper to the card.

In the photo above you can see an overhead shot of my card.


Here is another view of my card, this time taken from the side.


Here is a look at the back of my card, I added two white triangle panels to add sentiments from an older Stampendous Tweet Chirps stamp set which I believe is now discontinued. The band across the bottom of the card, helps keep the shape of the card without it falling over. 

When closed this card measures approximately 5 inches x 5 3/4 inches.


Other Supplies:

Tweet Chirps Stamp Set - Stampendous (discontinued)


Monday, August 15, 2022

Hello Friend


Hi Crafty Friends,

Today I am sharing three Mini Slimline cards that I created using a Triple Slim Layering Stencil set from Taylored Expressions. As the name suggests this stencil set allows you to create three mini slimline cards, there are four layering stencils included in the set which makes it easy to create a multi coloured card. 


I have been admiring this stencil set for a while now, and finally found somewhere in Australia that had it in stock. I used bright colours on my card using inks from Catherine Pooler Designs, you can see the list of colours I used in my supply list below.


I always like to decorate the inside of my card, so I used two of the stencils included in the set to add the roses and leaves using the centre design in the stencil. I didn't want to get too carried away for the inside of the card, so I left it to just the two colours/stencils.


For the Mini Slimline portion of the card, I used Mini Slimline dies from Divinity Designs. This included the Mini Slimline Card Base; Mini Slimline Rectangles and Mini Slimline Scalloped Rectangles die sets. I also hand cut a rectangle panel of black cardstock to go between the white panel and the scalloped panel.

For the sentiments on all the cards I used Waffle Flower Crafts Hey There Foil Plate and coordinating die set. I used black foil and the solid plate to get the negative image for two of the card fronts and the positive image for the other.


Some of my sentiments on the inside of the card I black foiled onto coloured cardstock. I also added a stamped "Thinking of You" sentiment using Honey Bee Stamps Miss You Big Time stamp set.


To finish off the front of all the cards, I added Glacier Pearls from Pinkfresh Studio.


One last photo of the inside of the card, I matched the colour of the sentiment background to the color of the scallop panel on the front of the card, for two of my cards.


Saturday, August 13, 2022

Sprout, Bloom, Grow


Hi Crafty Friends,

I have a Slimline card to share with you today, using stamps, dies and papers from Divinity Designs' July 2022 Blessings Box.

To create the Slimline card I used the Slimline Card Base, Slimline Scalloped Rectangles, Slimline Rectangles and Slimline Pierced Layering Rectangles. 

For the background of my card I used one of the papers included in the Slimline Heavenly Skies Paper Pad. The black floral border is the new Slimline Flower Silhouettes die, which I die cut from black paper.

I added a sentiment to the top right hand corner of my card using one of the sentiments in the Sow Seeds stamp set.

For the inside of my card I added the Slimline Flower Silhouettes die again along the bottom of the card.

I didn't add a sentiment to this card so it can be used for any occasion.


Friday, August 12, 2022

Apple of my Eye


Hi Crafty Friends,

Thanks for dropping by! I have a Mini Slimline card I created using stamps and dies from Divinity Designs August release.

To create the Mini Slimline portion of my card I have used the Mini Slimline Card Base, Mini Slimline Rectangles, Mini Slimline Layering Rectangles and the new Mini Slimline Thin Pierced Frame die sets.

The apples and sentiment are from the new Fresh Fruit stamp set, this set has a number of different fruit images with a coordinating sentiment. I used the Mini Slimline Rectangles and Mini Slimline Layering Rectangles to create the rectangle panels the images are stamped on.

The paper in the background, is one of the papers included in the Gardening Gnomes Paper/Die Duo Paper Pad which was part of the July 2022 Blessings Box.


Thursday, August 11, 2022

Embossed Hello


Hi Crafty Friends,

It's challenge time with my friends over on the CCEE Stampers challenge blog. As challenge hostess for the month, I continue to issue you the challenges.

A few months ago, Jennifer McGuire shared a technique using embossing folders. So for our challenge this week, we are playing with this technique. You can find Jennifer's tutorial here. 


It seems I don't have as many 3D embossing folders as I thought I had, I had tossed up buying one especially for this challenge, but in the end I didn't. Fortunately I do have a few 3D Slimline Embossing Folders, so I pulled one out to use for today's challenge. 

This card uses a 3D embossing folder from Lisa Horton Crafts that I purchased late last year called Christmas Rose. I am not ready yet to make Christmas cards but I didn't think it looked particularly Christmasy so I just created a generic card.

I played around with a few different colours of gloss cardstock when I was trying out this technique and decided to make two cards that I liked the look of. For my first card I used black glossy cardstock and then coloured the sanded areas using pink, yellow and green inks.

For the sentiments I used Waffle Flower Crafts Oversized Hello and Subsentiments Hot Foil Plates, as I layered the black panel onto holographic cardstock before adding to the white card base, I used silver foil for my foiling.


For my second card I used some matt gold cardstock for the embossing, this cardstock doesn't have a white back, but I knew it had a white core so I decided to give it a try. As I like the end results I used it for this card.

I used the same foil stamps for the sentiment this time using black foil and a pink glitter foil.

I added pearls to both of the cards before completing the card.

Don't forget to check out the CCEE Stampers blog (goes live 12 AM EST) to see the rest of the creations the CCEE Stampers created this week. You can also see more details of their creations on their individual blogs:


Wednesday, August 10, 2022

Topsy Turvy Birthday Slimline

Hi Crafty Friends,

Spellbinders Paper Arts celebrated their 20th birthday back in June. To celebrate, they released a number of birthday themed stamps, dies and glimmer plates etc. As I make a lot of birthday cards and these sets were different to what I already have in my stash I order a number of them.


I couldn't wait to play with the Topsy Turvy die set, which makes this fun cake. This cake can be adapted to use for birthdays, weddings etc and will also work on all card sizes. I decided to make a Slimline card today. To create my cake, I picked out two different shades of each color and die cut the pieces. I also die cut the icing using white glitter cardstock. I grabbed the plate from the Dish It Up die set, which I die cut from holographic cardstock to sit my cake onto.

I used the largest rectangle dies from the Slimline Hemstitch die set to die cut my background panel, which has the fun border (this is done using two dies included in the set). I then used the new Hand Drawn Scallops Embossing Folder to add texture to my background. If you haven't seen the new Spellbinders Embossing Folders, they are measure 5.5 inches x 8.5 inches which allows them to be used to create most popular sizes from A2 to Slimline, 5 x 7 etc. Hopefully other companies will follow suit.

To finish off my card, I added the birthday sentiment which is the Stylised Happy Birthday die set.


For the inside of my card, I created a double pop-up card using Karen Burniston's Katherine Label Pop-up die set. I stamped sentiments from two of the new Spellbinders stamp sets (listed in supply list below). I also used the embossing folder to add texture to the strips along each edge of my card. 

Finally I used one of the balloons from the Color Block Balloons die set to create the two balloons on either side of my card. I die cut the pieces using the same colours I used to create the cake.


Tuesday, August 9, 2022

Gone Fishing


Hi Crafty Friends,

Welcome to my blog. Earlier in the month, Sam Calcott released her brand new collection ... Shutter Blind Collection. This collection includes two Shutter Blind die sets, one for 6 x 6 cards and the other for 5 x 7 cards. There were also 4 Christmas themed stamp sets. As I love creating kinetic style cards, I of course had to order them.


It's too early for my to play with my Christmas stamp sets, so I decided to pull out my Paddington Bear stamp sets which I also recently received to create this fishing themed birthday card.

Here is a quick video to see my card in action.


When you pull the tab at the top of the card, the shutters on the front open to reveal an image or message underneath. You could also have an image on the front, but for this card I decided to just have coloured shutters.


Here you can see that the red shutters have completely disappeared, revealing Paddington Bear and a sentiment underneath him.

The tag at the top of the card is also included in one of the Paddington Bear stamp sets, with the "Gone Fishing" and buckets of fish are from an older Art Impressions stamp set.

The sentiment underneath Paddington is an older stamp in my stash from Rubbernecker Stamps.


I decided to make this card a "tent card" by adding a folded paper strip along the bottom of the inside of the card.


I added a panel to the back of my card, so that I could add a sentiment and another image.

The sentiment, note with hook and bucket of fish are all from the Art Impressions stamp set.  I masked Paddington's paw so it looks like he is holding the note.


Other Supplies:
Real Great Guys Stamp Set - Art Impressions
Your Friendship Is ... stamp - Rubbernecker Stamps (discontinued)