Sunday, July 31, 2016

Baby Girl


Hi everyone,

Today I am sharing a new style of card for me .... a Double Z Fold Card. I have seen a number of these around online and on Pinterest, that I finally had to give it a go. I always love making cards that are a little different.


I recently purchased the Tattered Lace Baby Blocks die set when it was offered for 50% off when my favorite Papercrafts store closed it's doors to become online only, so of course I had to use them for this card.


I decorated my card using a number of older stamps in my collection.


Here is a look at my card when it is closed ready to be placed in an envelope.

Stamps: Baby - Azadi Earles; Teddy Bear - Penny Black; A Baby Is … - Printworks; Baby Onesie - MFT Stamps
Paper: White; Pink; Sweetie Pie Stripe DP; Baby Bunting - Doodlebug Design Inc.
Dies: Baby Blocks - Tattered Lace; Baby Feet - Marianne Design; Oh Baby - MFT Stamps
Other: Black Ink; Pink Ink; Foam Tape; Copics


Saturday, July 30, 2016

Happy Mother's Day

Hi everyone,

It’s challenge time with the “Crazies” over on the Crazy 4 Challenges blog. Joanne our challenge hostess for the month finishes off the month with one last challenge.

Joanne tells us that .... she loves the ocean (thus the name of her blog).  Spending time there brings me peace and joy.  Make a card depicting the type of place that brings you peace and joy.

I thought about this challenge for some time before I made my card, I could have created something stamping related because I guess that is one of my favorite places to be as is my house. But then I thought some more and I thought the place didn't really matter if I can spend some time with my two grandchildren. 

I love this cute image of the boy and girl making funny faces, this line of stamps look so like my two grandchildren and because I didn't want to waste the card I figured I would create a Mother's Day card for next year.
  

As you can see I have created a Pull Card using the Spiral Circle Pull Card die set designed by Karen Burniston for Elizabeth Craft Designs


When you "pull" the card open it reveals two sentiment panels with sentiments suitable for Mother's Day.

Don't forget to check out the rest of the “Crazies” cards over on the Crazy 4 Challenges blog and also their individual blogs for more details.


Stamps: Funny Faces - CC Designs; Special Place in My Heart - Lucy's Stamps; Mother's Day - Printblocks
Paper: White; Dark Pink; Teal; DP Paper Pad - Durmaz Imports
Dies: Spiral Circle Pull Card
Other: Black Ink; Foam Tape; Copics


Friday, July 29, 2016

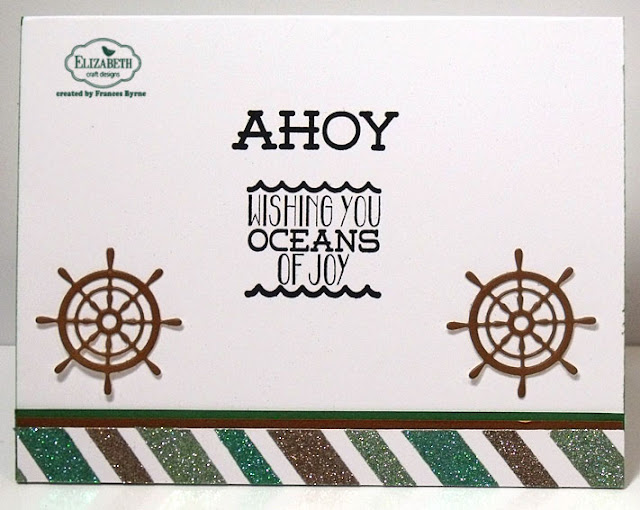
Ahoy Glittered Background


Hi everyone,

Today have a tutorial on how to create the card above using products from Elizabeth Craft Designs.  If you haven't heard Elizabeth Craft Designs recently introduced 21 new colors of Silk Microfine Glitter which are just amazing colors and add to the already amazing colors available. You can find all the Elizabeth Craft Designs Silk Microfine Glitters here.  Today I am playing with three of the new colors to create my card.

Here's how I created my card: 


1. Cut a piece of White Soft Finish Cardstock that measures 5 1/2 inches x 4 1/4 inches.
  • Place strips of 10mm and 6mm Clear Double Sided Adhesive Tape diagonally across the card so it is evenly spaced. (Tip - I used my cutting mat to help with spacing).
  • Trim off excess tape around edges.

2. Remove the protective backing from every third piece of adhesive tape and cover the adhesive with Light Brown Silk Microfine Glitter. Remove excess glitter and return to the jar. Polish the glitter on your card with your finger. 
  • Remove the protective backing from every third piece of adhesive tape and cover the adhesive with Dark Mint Silk Microfine Glitter. Remove excess glitter and return to the jar. Polish the glitter on your card with your finger.
  • Remove the protective backing from the remainder of the adhesive tape and cover the adhesive with Sea Glass Silk Microfine Glitter. Remove excess glitter and return to the jar. Polish the glitter on your card with your finger.
  • Trim down card so it measures 5 inches x 3 3/4 inches. (Reserve the long offset for the inside of the card).

3. Layer the glittered card to a piece of Rust Soft Finish Cardstock that measures 5 1/4 inches x 4 inches.
  • Cut a piece of True Green Soft Finish Cardstock that measures 11 inches x 4 1/4 inches. Fold along the long side at 5 1/2 inches to create a top folding card.
  • Adhere the glittered panel to the front of this folded card.

4. Using the Boat Die die set, die cut the following:
  • (1) Set of Sails using Dove Gray Soft Finish Cardstock
  • (1) Set of Stars using True Green Soft Finish Cardstock (that has Clear Double Sided Adhesive Tape on the back)
  • (1) Boat using Rust Soft Finish Cardstock
  • (1) Set of Portholes using Dark Chocolate Soft Finish Cardstock (that has Clear Double Sided Adhesive Tape on the back)
  • (1) Set of Flags using Dark Fuchsia Soft Finish Cardstock
  • Assemble boat using photo above as a guide.
5. Counting from the small centre die, die cut the fourth die from the Stitched Circles die set from White Soft Finish Cardstock.
  • Counting from the small centre die, die cut the fourth die from the Dotted Scallop Circles die set from Rust Soft Finish Cardstock.
  • Layer the white circle to the rust circle and attach to the right hand side of the front of the card using foam tape.
  • Adhere the boat to the circles using foam tape.


6. The Inside of the Card:
  • Using the offset glittered piece from the front card panel, adhere this to a piece of Rust Soft Finish Cardstock so that there is about 1/8 inch showing along the top edge. 
  • Next layer this to a piece of True Green Soft Finish Cardstock so that there is about 1/8 inch showing along the top edge.
  • Adhere this panel along the bottom edge of the inside of the card.
7.  Stamp the sentiments "Ahoy" and "Wishing you Oceans of Joy" from the Ahoy Sentiments Clear Stamp set using black ink.
  • Die cut two ships wheels from the Boat die set from Rust Soft Finish Cardstock that has Clear Double Sided Adhesive Tape on the back of the card. Adhere these wheels to either side of the lower part of the card. (Refer to photo above for placement.)
Thanks for visiting my blog today, I hope you enjoyed my tutorial.

Supplies:

Elizabeth Craft Designs:

Other:
Ink - Black
Die Cutting Machine


Thursday, July 28, 2016

Love you more than Chocolate


Hi everyone,

It's challenge time with my friends over on the CCEE Stampers challenge blog. Joanne Grzelak our challenge hostess for the month finishes off the month with one last challenge.

Apparently today is National Milk Chocolate Day.  Let’s make some deeeelish designs showing chocolate in some form or using the color chocolate.


For my card today I created a Pivot Card using the Katie Label Pivot Card die set designed by Karen Burniston for Elizabeth Craft Designs.

I recently found this chocolate designer paper while I visited my favorite Papercraft store but it closed it's doors to go online only. I also dug out one of my MFT Stamps ala mode stamp sets which I have had for years.


I added two sentiments ... one with a chocolate theme and another birthday sentiment that I thought worked with the chocolate theme.


Finally here is the back of my card.

Don't forget to check out the CCEE Stampers blog (goes live 12 AM EST) to see the rest of the creations the CCEE Stampers created this week. You can also see more details of their creations on their individual blogs:


Stamps: ala Mode Chocolate Bar; Chocolate Sentiments - MFT Stamps; Great Birthday Greetings - CC Designs Rubber Stamps
Paper: White; Brown; Pink; Want S'more DP - Three Bugs in a Rug
Dies: Katie Label Pivot Card - designed by Karen Burniston for Elizabeth Craft Designs
Other: Black Ink; Gathered Twigs Distress Ink; Gold/Transparent Glitter Border Peel Off Stickers; Foam Tape; Copics


Wednesday, July 27, 2016

Rebus - Name of Romantic Movie


Hi everyone,


It is time for another Rebus swap to share with you all. This time round our theme is 
"Name of Romantic Movie ". 


If you would like to solve my rebus puzzle, why not post a comment on my blog post with your answers. I will let you know what the correct answers are next time I post a rebus card here.


How did you go working out my March Rebus which was Things found in a Medicine Cabinet .... here are the correct answers for you to check how you did.


  1. Tweezers
  2. Thermometer
  3. Bandaids
  4. Cotton Balls
  5. Aspirin
  6. Eye Drops
  7. Ice Pack
  8. Gloves


You can find all my past rebus cards here.


Tuesday, July 26, 2016

Happy Birthday to You


Hi everyone,

Today I am sharing a birthday card I created using Avery Elles Balloons stamp and die set. This is a set I have had for a while and finally got around to playing with.


I kept the inside layout similar to the front and added a birthday sentiment.

 
Stamps: Balloons - Avery Elle; Birthday Joy Calligraphy - Paper Inspirations
Paper: White; Orange; Sunkissed DP - Doodlebug Design Inc.
Dies: Balloons - Avery Elle; Scallop Border - MFT Stamps
Other: Black Ink; Green Ink; Yellow Ink; Orange Ink; Blue Ink; Pink Ink; Red Ink; Foam Tape


Monday, July 25, 2016

July 2016 Pop It Ups Designer Challenge #2

Hi everyone,

Welcome to our second Pop It Ups Designer Challenge for July. This time round the challenge has been issued by Kelly Booth who has given us the challenge .....


"Stretch it out!" - use any of the Accordion dies for a project of any theme.

After a little thought I decided to create a Baby card. I used the Rectangle Accordion Card for the base of my card. 
To decorate my accordion card I used the Baby Charms which I have placed in the the basket from the Barrel Basket with Pop Up die set. The heart on the baby onesie is from the Poppy the Owl die set. 

For the centre page I stamped the sentiments from the Baby Clear Stamp set. I also added the frame edges from the Katie Stars Frame Edge die set.

I also added the Paris Edges panels to each end of the card. I used Gold/Transparent Glitter Border Peel Off Stickers to the edge where the Paris Edge joins the Accordion. 


Here is a look at my card then it is closed ready to be placed in an envelope. I added the words "Baby" and "Girl" on each side of the edges using the Alphabet 1 - Caps die set. I also added the umbrella which is also included in the Baby Charms die set.


I don't often decorate the back of the accordion card when I make one, but as the Paris Edges edge can be seen on the front when the card is closed (see front photo above), I decided to also add another panel with another of the sentiments from the Baby Clear Stamp set.

The two edges you see in the photo directly above are the ones seen when the card is opened and you are looking at the three pages together.
If you are looking to purchase Karen's Pop It Ups dies in Australia you can find them at Craft Giraffe (now online only).

Don't forget to check out  Karen Burniston's blog  on Tuesday when you will be able to see what all the designers created for the challenge this month, plus an amazing card/video tutorial from Karen Burniston.


Stamps: Baby Clear Stamps - designed by Karen Burniston for Elizabeth Craft Designs
Paper: White; Pale Pink; Pink; Bundle of Joy A New Addition Girl DP - Echo Park; Sugar & Spice DP - Doodlebug Design Inc.
Dies: Barrel Basket; Baby Charms; Paris Edges; Poppy the Owl (Heart) - designed by Karen Burniston for Elizabeth Craft Designs; Alphabet 1 Upper Case - Elizabeth Craft Designs
Other ECD Products: Clear Double Sided Adhesive Tape 64mm; Gold/Transparent Glitter Border Peel Off Stickers
Other: Black Ink; Pink Petunia Versamagic Ink; Foam Tape


Sunday, July 24, 2016

Happy 60th!


Hi everyone,

My sister turned 60 last week, so of course I had to make her a special birthday card. As she loves elephants it wasn't hard to figure out what to decorate her card with :)


As you can see I have created a Pop Up card using the Happy Birthday Pop Up Card die set designed by Karen Burniston for Elizabeth Craft Designs.

On the top edge of my card I added the Balloon from the MFT Stamps Blueprints 26 die set. I also added the 60th to the top of the balloon.


I also added three elephants to the inside on my card. The two standing up near the centre of the card are attached to the spinner from the Rectangle Pull Card die set, this meant I could have them sitting up without hiding the Happy Birthday Sentiment on the pop up  which is what would have happened if I had attached them straight onto the lower box of the pop up.


For the front of the card I have again used the balloon from the Blueprints 26 die set and added another elephant so it looks like it is holding the string of the balloon with it's trunk.

Hopefully my sister will like her card.

Stamps: Adorable Elephants; LJD Birthday Greetings - MFT Stamps; Best Birthday - Clearly Besotted
Paper: White; Pink; Bright Pink; Purple; Merci DP - Hunter Leisure Pty Ltd
Dies: Happy  Birthday Pop Up Card; Rectangle Pull Card - designed by Karen Burniston for Elizabeth Craft Designs; Blueprints 26; By the Numbers - MFT Stamps; Suffix Style - Papertrey Ink.
Other: Black Ink; Clear Double Sided Adhesive Tape - Elizabeth Craft Designs; Foam Tape; Copics


Saturday, July 23, 2016

Picnic Time


Hi everyone,

It’s challenge time with the “Crazies” over on the Crazy 4 Challenges blog. Joanne our challenge hostess for the month continues to issue the challenges.


July is National Hot Dog Month, probably due to the number of picnics that occur at this time of year.  Let’s have a picnic ‘connection’ on our cards this week.


When I think of picnics, I think of ants! So I decided to pull out my old Rubbernecker ants to create my card today. I stamped the ants onto white card and then used my Scan and Cut to cut them out ... this makes it sooooo easy!!!!

I created a Pull Card using the Rectangle Pull Card die set designed by Karen Burniston for Elizabeth Craft Designs.


When you "pull' the card open it reveals the ants picnic scene. I also used the slider die from the Oval Pull Card die set for the ant with the picnic blanket for a parachute.

Don't forget to check out the rest of the “Crazies” cards over on the Crazy 4 Challenges blog and also their individual blogs for more details.


Stamps: Ants - Rubbernecker; PI On a Picnic - MFT Stamps
Paper: White; Imagine DP - Authentique; Outdoors - Kaisercraft
Dies: Rectangle Pull Card; - designed by Karen Burniston for Elizabeth Craft Designs; A Way with Words 4 Seasons - Elizabeth Craft Designs; Picnic Basket - Cottage Cutz
Other: Black Ink; Scan N Cut; Foam Tape; Copics

Friday, July 22, 2016

Pinwheel Glittered Card


Hi everyone,

It's my turn to post a tutorial on the Elizabeth Craft Designs blog today. Elizabeth Craft Designs  recently released 21 new colors of Silk Microfine Glitter which are now added to my collection. 

One of the things I remember Els telling me when I first met her about 2 1/2 years ago was to keep the protective backing with the adhesive sheets when you use them as these pieces can come in handy when doing some glitter techniques. My project today shows how to make use of these saved up pieces of adhesive sheets and uses a couple of the new glitter colors.

Here's how I created my card:

1. Cut a piece of Perfect Purple Soft Finish Cardstock which is 4 1/4 inches x 11 inches. Score along the 11 inch side at 5 1/2 inches and fold.
  • Cut a piece of Rich Black Soft Finish Cardstock which is 4 inches x 5 1/4 inches. Layer this panel onto the folded purple card.
2. Cut a piece of White Soft Finish Cardstock that has Clear Double Sided Adhesive on the front of the card so it measures approx 4 1/4 inches x 5 1/2 inches. (save the protective backing you remove from the adhesive as we will need that for this technique)

  • Use the saved protective backing sheets and die cut the middle die from the Beaded Circle Frames die set five times. 
  • Before removing the protective backing from the adhesive covered card we created above, lay out the circles on top of the card to work out the layout. (Tip - use your phone or tablet to take a photo so you remember the layout)
  • Remove the protective backing from the adhesive covered card being careful not to touch the adhesive. Carefully place the die cut beaded circles protective backing die cuts as per your layout design. (Tip -  if you are in need to handle the adhesive card, place a piece of scrap protective backing paper onto the adhesive and use that to handle rather than touching the adhesive which will leave finger prints once glitter is added.)
  • Position the inner circle which comes when you die cut the Beaded Circle Frames back inside the beaded circles frames on the adhesive. (Tip - for easier placement into the beaded circle frames, look for the notches that line up with the three beads that are close together on the circle).
  • Place another large piece of protective backing paper over the adhesive covered card and rub all over with fingers or a bone folder to ensure that the frames and inner circles are secured done well.
  • Remove the large protective backing from adhesive covered card.

3. Working over a coffee filter, cover the large area of adhesive with Violet Silk Microfine Glitter. Shake off excess and return to the jar. Use your finger to polish the glitter into the adhesive sheet.
  • Carefully remove the Beaded Circle Frames backing paper pieces from the adhesive and cover this area with Black Silk Microfine Glitter. Shake off excess and return to the jar. Use your finger to polish the black glitter areas.
  • Finally remove the inner circle protective backing paper pieces and from the adhesive and cover this area with Lavender Ice Silk Microfine Glitter. Shake off excess and return to the jar. Use you finger to polish the Lavender Ice Glitter.
  • Trim down the card so it measures 3 3/4 inches x 5 inches and layer onto the folded card created in step 1.
4. Apply Purple/Silver Glitter Dots Peel Off Stickers to all the beaded parts of the circles.

5. Using the pinwheel die from the Pinwheel die set, die cut three pinwheels from designer paper. 
  • Assemble pinwheels using a brad to keep pinwheel closed. Cover the head of the pinwheel with a large Purple/Silver Glitter Dots Peel Off Stickers.
  • Attach the pinwheels to the centre of the circles as per photo above.

6. The Inside of the Card: 
  • Apply a strips of Clear Double Sided Adhesive Tape along the bottom of the card in the following widths: 10mm; 3mm; 10mm and 3mm.
  • Remove the protective backing from the 3mm strips and cover with Black Silk Microfine Glitter. Polish black glitter with fingers.
  • Remove the protective backing with the bottom 10mm strip and cover with Violet Silk Microfine Glitter. Polish violet glitter with fingers.
  • Remove the protective backing with the top 10mm strip and cover with Lavender Ice Silk Microfine Glitter. Polish violet glitter with fingers.
7. Die cut the middle die from the Beaded Circle Frames die set from Rich Black and Perfect Purple Soft Finish Cardstock that has Clear Double Sided Adhesive Tape on the back. 
  • Adhere the purple inner circle to the centre of the inside of the card and then adhere the black beaded circle frame around the edge.
  • Stamp the sentiment "Happy Birthday" from the General Sentiments Clear Stamps to the centre of the circle using black ink.
Thanks for stopping by today, I hope you enjoyed my tutorial.

Supplies:

Elizabeth Craft Designs:

Other:
Designer Paper - Bo Bunny Secret Garden Garland 12 x 12 paper
Inks - Black
Brads
Die Cutting Machine