Showing posts with label Bam Box Pop-up. Show all posts

Tuesday, November 7, 2023

November 2023 Karen Burniston Designer Challenge


 Hi Crafty Friends, 

Welcome to our November Karen Burniston Designer Challenge.

Check out Karen Burniston's blog on Wednesday (US Time) when you will be able to see what all the designers created for the challenge this month, plus Karen will have an amazing video tutorial to share with us all.

Our challenge theme this month is ... "WHAT'S COOKING?" - Use the Oven pop-up for a card of any theme.


For my card today I decided to make a 5 x 7 inch card, my last card I made using the Oven Pop-up card I made another 5 x 7 inch card which was a landscape version. This time I made a portrait style card.

As you can see I went with a Christmas theme for my card, using the traditional red and green colour combo. I die cut the oven from the Oven Pop-up die from black cardstock to make a black oven. 


The oven door opens to reveal a turkey that is cooking in the oven. For the turkey, mixer and pot on the stove I used the Oven Extras die set. The gingerbread men & tray are also from the Oven Pop-up die set.

I doubled up the white tiled backsplash which is also from the Oven Extras die set and then added my red cupboards and the range hood to the card.

I added the Christmas wreath and garland using the Street Lantern Pop-up (wreath) and the Fireplace Extras 1 die sets.

I used the Small Script Christmas die set to add the Christmas Greetings sentiment at the top of the card.


I added the gnome to the card using the Gnome and Santa die set, I added the whisk to the gnome using the Baking Charms die set. The gnome is attached to a small bam box from the Small Scenes Pop-up Bam Box die set.

I computer generated the sentiment on the oval panels which are die cut using the Ovals - Crosshatch die sets.

Finally I added the bowl and wooden spoon, also from the Baking Charms die set.


As the focus of this card is on the inside, I kept the front of the card fairly simple.

I added the sentiment using the Merry Christmas and Merry Christmas Shadow die sets.

I also added another gnome from the Gnome and Santa die set. The whisk, bowl and wooden spoon are from the Baking Charms die set.








Friday, March 17, 2023

Stop By For A Cup


Hi Crafty Friends,

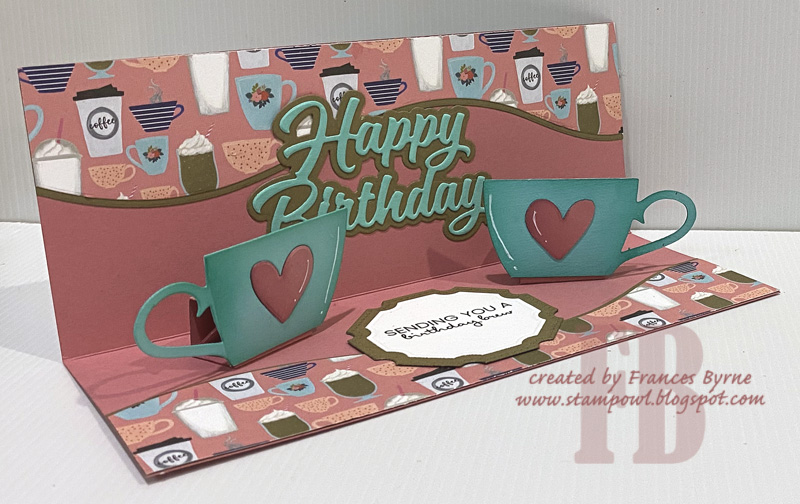
Today I am sharing a coffee themed Slimline card I created recently using dies from both Picket Fence Studios and Karen Burniston.

Here is a quick video to see my card in action.


The inspiration of the card started by using the Picket Fence Studios Slimline Stop By For A Cup Word Topper die. This die is a long slimline die complete with the words you see on the front and the coffee cup that I have used on the inside of the card. I was a little disappointed when I discovered this die measured approx 9 1/2 inch rather than the normal 8 1/2 inches - 9 inches length. As I didn't want to make a 9 1/2 inch wide card, I decided to trim the cup off the left side of the topper.

I used Slimline Nesting dies from Picket Fence Studios to create my layers and ended up making a 3 1/2 inch x 8 1/2 inch card. I die cut the topper in aqua and brown, offsetting them slightly and then adding foam tape to the topper to give it some height.

I added the words "of coffee" to the right hand side of the wide panel using a couple of older coffee themed stamp sets.

When I was looking through my coffee themed stash, I discovered the small coffee mug already coloured, and as it matched the color of some of the cups on the paper, I added that to the left side instead of the bigger one that came on the die.

I also added a couple of coffee beans to the card. The coffee beans and mug are both from La La Land Crafts.


For the inside of the card, I added some curved panels to the top and bottom edges using Lawn Fawns Slimline Stitched Hillside Borders die set.

I added the "Happy Birthday" sentiment to the back of the card which is from Karen Burniston.


I die cut two of the coffee cups, reversing one of the cups so I had a mirror image to use as the pop-up element of the card.

To make the coffee cups pop-up I used Karen Burniston's Bam Box Pop-up die set. These are such fun and allow you to create a pop-up anywhere on the card. 

You can see on the photo on the left, how the bam box and cups fold flat to allow the card to close. The photo on the right shows how the bam box looks when the card is open.


Tuesday, December 13, 2022

Karen Burniston - KB Riley LLC December 2022 Release Blog Hop


Hi Crafty Friends,
Welcome to our Karen Burniston Products - KB Riley LLC December Release Blog Hop. The Design Team have come together with Karen today for a fun blog hop to celebrate the release of 11 new dies. Sneak peeks of the new release started last week, and the dies are available to order NOW!


This release includes:
  • 2 new charm die sets
  • 1 new stand alone die set
  • 2 new Tiny House Add-Ons sets
  • 2 new Pop-up die sets
  • 1 new Woven Box Basket die set
  • 2 new Crosshatch die sets
  • 1 new Box die set
Dies are available to order now on the website.
GIVEAWAY:
To celebrate the release Karen Burniston and each of the Karen Burniston - KB Riley LLC Design Team members will be giving away a $25 Gift Certificate to some lucky person who comments on our blog posts, so make sure you join the hop and comment on everyone's blog post. Winners will be randomly chosen from ALL of the blog hop comments received on our blog posts by Monday, 19th December 2022. Lots of chances to win some goodies, so just leave a comment on this post or any other blog hop posts to enter! Don't forget to leave some way for us to contact you, in case you are a lucky winner!


My card today uses three of the new die sets being released ... Dog Tiny House Add-Ons; Bam Box Pop-up and Hexagon - Crosshatch die sets.

I have created a Slimline Card with a 3/4 Front. To create my card I cut two pieces of red cardstock for the base. The back measures 3 5/8 inches x 8 5/8 inches. The front is 3 5/8 inches x 6 inches, I then scored along the long side of this panel at 1/2 inch to adhere this panel to the back panel. Once I had the base of my card all done, I was then able to add my layers. As this is a Christmas card, I decided to bling it up a little by adding holographic card for the layer under the patterned papers.


Here is a quick video to see my card in action.


For the dog house I used the new Dog Tiny House Add-On die set with the Tiny House Pop-up die set. The new add on set comes with the walls for the dog house, a dog, bones, a paw print, a ball, collar and a dog. The walls and paw print have the stamp feature on them which means you can ink up the die to add the colour as you die cut.

Although this die set does come with a dog, as I had to make a pug themed Christmas card for my daughter to give to her vet, I decided to use pugs on this card. The pugs in this set are from an older Clearly Besotted Bah Hum-Pug! stamp set and as there were already a few pugs stamps, cut and coloured in the back of the stamp set and went with three of those. 


For the two pugs not attached to the dog house, I used the pop-up included in the new Bam Box Pop-up die set to pop them up. When my card is. closed the two pugs adhered to the Bam Boxes are on top of each other adding bulk to that area, next time I make this type of card I will make sure that I adhere them in different positions. The Bam Box folds flat for closing and pops up when you open the card.

I used the two of the labels included in the Bam Box Pop-up die set to add the two labels on the inside of the card. One has a stamped sentiment from an older pug themed stamp set, the other is blank for the sender to write a personal message.


As this card has three pop ups and is a little bulky, I needed a way to keep the card closed when needed. So I created a belly band. I used the new Hexagons -  Crosshatch die set for the layering panels and then added a pug image using Crafter's Companion's Bah! 
Humbug! stamp set.


Here is one last look at my card when it is open with the belly band sitting on the right side of the card.

Well that's about it from me today, thank you for dropping by. To continue on the blog hop, click on the next person on the list, which is  Nicky Foden


Here is the complete blog hop list in case you need it.


Blog Hop List:


Karen Burniston

Lois Bak

Sue Small-Krieder

Karen Aicken

Jennifer Webster

Frances Byrne. <<<< YOU ARE HERE >>>>

Nicky Foden

Sandy Diller

Suzanne Smit

Fran Sabad


Tuesday, December 6, 2022

December 2022 Karen Burniston Designer Challenge


Hi Crafty Friends, 


Welcome to our December Karen Burniston Designer Challenge.

Check out Karen Burniston's blog on Wednesday (US Time) when you will be able to see what all the designers created for the challenge this month, plus Karen will have an amazing video tutorial to share with us all.

Our challenge theme this month is ...  "FIREPLACE DIE THROUGH THE YEAR" - you signed up for a month to represent with a card using the Fireplace Pop-up matching the theme of that month.

As you might be able to guess from the photo of my card, I have December which of course is Christmas!

Sneak peeks for the new December release have also started, so I have used two of the new dies on my card today .. I will talk more about them later.


Here is a quick video to see my card in action.


I have used the fireplace pop-up die on a few different formats of card sizes so far ... Slimline; square and today I have created a 5 x 7 inch card. I am really enjoying this larger format card, like the Slimline it gives you extra room to create whatever you wish on it.

As well as the Fireplace pop-up, I also used the Fireplace Extras 1 and Fireplace Extras 2 to add the various details to my fireplace and scene. I positioned the fireplace to the left of my card to give me room for other things.

I couldn't do a Christmas scene without adding a Christmas tree, this time around I used the Christmas Tree Pop-up die set, using one of the larger trees in the set to die cut three trees. I then layered them up trimming as need to make a taller tree. I wanted the tree to be higher than my fireplace. This tree does have a few notches on it to create the 3D tree it was designed for, but I covered those up using baubles that I die cut using red mirror card. I also added a star to the top of the tree, making sure the star was enclosed in the card when the card is closed.


One of the new die sets being release next week is the Hexagons -  Crosshatch die set ... a great addition to the Crosshatch collection. I used two of the dies included in the set to create the rug in front of the fire. I also used this as a place to stamp a Christmas sentiment.


Another of the new dies included in this newest release is the Bam Box Pop-up. This is such a fun new die set and there are so many different ways this can be used, I am sure it will become a much loved favourite. I used the Bam Box Pop-up on this card to pop my girl up.I postitioned her on an angle and closer to the front, to give her enough room to fold down when closing the card. For the girl and the surrounding wrapping paper, I used two older stamp sets from Essentials by Ellen.

I also used the Gift Pivot Panels to die cut some presents to put under the tree and one beside the girl.


The focus of this card is on the inside, so I kept the front of my card fairly simple. I added the snowflake background using the Snowflake Pattern Plate die, die cutting it twice from white cardstock. I also created a white frame to go around the edge of the card.

I used the Hexagon - Crosshatch die set again to add the green panel to the centre of my card. I then added the sentiment using the Merry Christmas and Merry Christmas Shadow die sets.


Other Supplies:
Christmas Sentiment Stamp Set - Couture Creations (discontinued)