Monday, November 8, 2021

Foiled Daisy Wreath Slimline


Hi Crafty Friends,

Today I have a floral Slimline birthday card to share with you all.

To create the slimline portion of the card I used Scrapbook.com's Slim Moroccan Tile die to die cut white cardstock to create the background of my card. I layered this onto a top folding Slimline card that measures 8.5 inches x 3.5 inches.

I have had Pinkfresh Studio's Daisy Wreath Stencil for some time, which I have used a few times in the past. Recently they released a Hot Foil Plate that coordinates with the stencil so I decided to add that to my stash along with the coordinating die. This set can give you very different looks depending if you keep the wreath whole or cut it apart as I have on the outer edges of my card.

I used the Daisy Wreath Hot Foil Plate to gold foil the wreath three times on white cardstock. I then used the coordinating stencil along with Catherine Pooler inks (list of colors used are included in the supply list), to color the image.

I die cut a white circle which I placed under the centre of the daisy wreath to give the wreath a solid centre. 

I adhered the daisy wreath to the centre of the slimline card. I then cut the remaining two wreaths apart and adhered the part wreaths to either side of the whole wreath.

I used Pinkfresh Studio's Perfect Sentiments Hot Foil Plate and Coordinating dies with gold foil to create the sentiments. I adhered the "Happy Birthday" sentiment to the centre of the wreath.

To finish off the front of the card I added peach gems to the card.


For the inside of my card I added the remaining flowers from the wreath both sides of the card. I also added the "celebrate" and "you're a great friend" which are also from the Perfect Sentiments hot foil plate.


Sunday, November 7, 2021

Red and Gold Ornaments


Hi Crafty Friends,

Today I am sharing a Christmas Shaker card using products from Divinity Designs October 2021 Blessings Box.

I used two of the Vintage Ornament Shaker die sets included in the Blessings Box ... Vintage Ornament Shaker Set 1 and Vintage Ornament Shaker Set 3 die sets. I die cut the elements of the ornaments from red and gold cardstock. I added gold sequins to each of the shaker ornaments which are also included in the kit.

For the background of my card I used the Starry Night Background die which I die cut from Gold Metallic Cardstock, this was layered to patterned paper from the Christmas Collection 2015 Paper Pad.

I layered this panel to my card using the Matting Rectangle and the A2 Portrait Card Base with Layer die set.


 For the inside of my card, I added a left over strip of patterned paper to the left side of my card.

I stamped a sentiment to the right side of my card using one of the sentiments included in the Star of Wonder Stamp set.


Saturday, November 6, 2021

Gingerbread Hugs


Hi Crafty Friends,

It’s challenge time with the “Crazies” over on the Crazy 4 Challenges blog. Being a brand new month, it's time to introduce a new challenge hostess which is ME!

Home Sweet Home - Create a card that features a house/house or any element you might find on a house … door, window, roof etc.


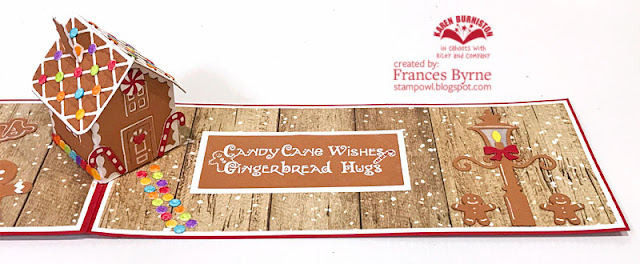
I have been wanting to play with Karen Burniston's Gingerbread House Add-on die set which goes with the Tiny House Pop-up die set, so I decided to pull that out to use for today's challenge as it works with this challenge.


Here is a quick video to see my card in action.


I created a Slimline card with a 3/4 front.

To create my card I cut two pieces of red cardstock for the base. The back measures 3 5/8 inches x 8 5/8 inches. The front is 3 5/8 inches x 6 inches, I then scored along the long side of this panel at 1/2 inch to adhere this panel to the back panel.


To decorate my card I die cut Karen Burniston's Merry Christmas and Merry Christmas Shadow dies using the gingerbread colored cardstock, I layered them  together and then used a white gel pen to outline the letters to give the sentiment a gingerbread look. I borrowed this idea from Karen Burniston's Assembly Video she created for the Gingerbread House Add-on.

I also added a large gingerbread man which is from the Winter Charms die set.


On the right side of my card, I added the "Candy Cane Wishes Gingerbread Hugs" sentiment which is an older stamp from my stash from Penny Black. I white embossed the sentiment and then layered it with white cardstock.

I added the street lantern from the Street Lantern Pop-up die set which I added to the end of the card and two smaller gingerbread men. These were positioned onto my card, so that it could be seen when the card is closed.


For the front of the card, I added some Gingerbread House patterned paper to the 3/4 sized panel. I didn't want to hid too much of the patterned paper, so I just added a small sentiment. The sentiment is from an older Waltzing Mouse Stamps stamp set.

Don't forget to check out the rest of the “Crazies” cards over on the Crazy 4 Challenges blog and also their individual blogs for more details.

Other Supplies:

Candy Cane Wishes Stamp - Penny Black (discontinued)

Christmas Cottage Stamp Set - Waltzing Mouse Stamps (discontinued)


Friday, November 5, 2021

Joy To The World

Hi Crafty Friends,

Today I am sharing a Christmas themed Mini Slimline card I created recently using dies, embossing folders and papers from Divinity Designs.

To create the Mini Slimline portion of my card I used the Mini Slimline Card Base, Mini Slimline Layering Rectangles and Mini Slimline Rectangles die sets.

The beautiful red and white paper is from Divinity Designs Candy Cane Paper/Die Duos set. I die cut the patterned paper using the Mini Slimline Layering Rectangle die and then used the Slimline Petals Embossing Folder to add texture to the panel. 

I used the dies included in the Candy Cane Paper/Die Duos set, to die cut the candy cane circle frame, sentiment and bow and adhered these together and added to the front of my card.


For the inside of my cards I created layers using the Mini Slimline Layering Rectangles and Mini Slimline Rectangles die set. I then die cut another of the candy cane frames and sentiments from the Candy Cane Paper/Die Duos set.


Thursday, November 4, 2021

You're Manatee-rific


Hi Crafty Friends,

It's challenge time with my friends over on the CCEE Stampers challenge blog. Being a brand new month, it's time to introduce our new challenge hostess which is Kelly Santi.

Apparently November is Manatee Awareness Month, so our challenge this week is to create a card featuring a Manatee.


It seems up until this challenge I didn't have any manatee images in my stash, so I went searching online and found one store nearby that had two different stamp sets available. As I couldn't decide which one I would end up using I decided to buy both. The first was Manatee Mischief from Clearly Besotted which included the three manatee's I included on the front of this card. The second was Manatee-rific which included two manatees and a number of sentiments including the one used on the front of this card.

For the ocean background I used Hello Bluebirds Ocean Waves Scene Horizontal die. Instead of using it as a beach scene I used it as an underwater scene.

Besides the manatee stamps sets I used three other Lawn Fawn stamp sets ... You're Sublime; Mermaid For You and Ocean Shell-fie.


For the inside of the card I created an underwater scene, popping up the manatee images from the Lawn Fawn Manatee-rific stamp set. I used the pop up die from Karen Burniston's Street Lantern Pop-up die set to pop up the manatee images.

I used two of the dies from Honey Bee Stamps Makin' Waves Ocean Borders Slimline die set to create the waves and sand along the bottom of the ocean.


I added another of the sentiments from the Lawn Fawn Manatee-rific stamp set.


Don't forget to check out the CCEE Stampers blog (goes live 12 AM EST) to see the rest of the creations the CCEE Stampers created this week. You can also see more details of their creations on their individual blogs:


Other Supplies:
Manatee Mischief - Clearly Besotted 


Wednesday, November 3, 2021

Christmas Winter Scene Slimline


Hi Crafty Friends,

Today I am sharing another Christmas themed Slimline card I created using new dies and papers from Divinity Designs November/December Release.

For the base of my card I used the Slimline Card Base die set which I die cut from white cardstock.

I used the largest slimline rectangle from the Slimline Rectangles die set to die cut the red and black plaid paper which is from the Plethora of Plaids Slimline Paper Pad.

I die cut the snowy hills/trees using the Slimline Tree & Hill Silhouettes die set from white glitter cardstock which I adhered to the bottom of the card. I added the deers and smaller trees using the Tree & Hill Silhouettes die set. This scene was adhered to the centre of my top folding slimline card.

I added a frame around my scene using the new Slimline Thin Pierced Frame die from red cardstock.

To finish off the front of my card I added the Merry Christmas banner using the new Slimline Merry Christmas Banner and Layer die which I die cut from red and black cardstock.


For the inside of my card, I added a strip of the red and black plaid paper to the bottom of my card. 

I then added the "Joy To The World" Sentiment along the top the the patterned paper and a deer I had leftover from the front of the card.


Tuesday, November 2, 2021

November 2021 Karen Burniston Designer Challenge


Welcome to our November Karen Burniston Designer Challenge.

Check out Karen Burniston's blog on Wednesday (US Time) when you will be able to see what all the designers created for the challenge this month, plus Karen will have an amazing video tutorial to share with us all.

Our challenge theme this month is ... "WINDOW CARDS" - make a card of any theme incorporating a window.

For my card today, I decided to create a Rockin' Rectangle Pop-up card with an acetate window in the front using the Rockin' Rectangle Pop-up die set.


I decorate the inside of my card using the Santa from MFT Stamps Selfies with Santa stamp set. I also added two sentiments which are from Hero Arts Hero Greetings Christmas Gift Shop stamp set.

My finished card measures 5 inches square, the back red panel is 6 3/4 inches x 5 inches and scored at 1 3/4 inches.


For the front of the card, I added the "Ho Ho Ho" sentiment using Karen Burniston's Alphabet die set. I also added a border using a border from the Border Blends - Argyle die set.

Other Supplies:

Grafix Craft Plastic Sheets Clear .020


Monday, November 1, 2021

Divinity Designs New Release


Hi Crafty Friends,

It's beginning to look like Christmas with Divinity Designs November/December release ... you guessed it, it's a Christmas theme. This month Divinity Designs is releasing 1 stamp set; 16 die sets; 1 paper/die duos set; 4 Paper Pads and 1 embossing folder. The Design Team will be sharing ideas using products from this release over November and December.

Today I am sharing a gift set of a Slimline card and Nugget Box I created using some of the products from this release.


First up the Slimline card I created. For the slimline portion of the card I used the Slimline Card Base die set which I die cut from white cardstock and the Slimline Rectangles die set. I die cut the rectangle from red cardstock and then used the Lattice Embossing Folder to add texture to the panel.

I then used the Nugget Box Snowflake Background which is designed to work with the new X-Large Nugget Box die set. The good news is it is a perfect size for a slimline card. The designer paper underneath the background was die cut using the rectangle die included in the X-Large Nugget Box die set and layered together. I centred this panel onto my slimline card.

I added the Merry Christmas & Layers 2 die set to the centre of the card.

On either side of the Christmas sentiment I added gnomes using the new Merry Gnomes Paper/Die Duos set ... this is full of fun pre-colored Christmas gnomes which are perfect for those quick Christmas cards. I layered the gnomes to my card using the Circles and Scalloped Circles die sets.


Of course I always like to decorate the inside of my card when I am creating them, it saves time later. For this card, I added another strip of the beautiful patterned papers I used on the  front of  my card.

I added another of the gnomes and two candy canes which are also included in the Merry Gnomes Paper/Die Duos set.

To finish off the inside of the card I added a sentiment which is from the Candy Cane Wishes stamp set.


My Nugget Box was created using the X-Large Nugget Box die set, this set has dies to create the lid and bottom sections of the box, and rectangle die for layering on top of the box lid and wrappers for the Nuggets.  


The completed box measures approximately 9 inches x 2 3/4 inches x 1 inch in height, and while it was designed for nuggets, I am sure there are other things that would be perfect to be added inside the box.


This Card is Bigger On The Inside


Hi Crafty Friends,

Today I am sharing a birthday themed Slimline card I created for my daughter, who celebrated her birthday recently. My daughter loves Doctor Who, and I have made her cards with that in the past but not for some time. 

I have also been wanting to make a Tardis using Elizabeth Craft Designs Phone Booth Kit that was released last year ... so that was my inspiration for my card. To turn the phone booth into a Tardis, first I had to make alterations to the door, which I did by adhering a solid blue panel over the phone booth door and then adding smaller rectangles to this solid panel. I used a white paint marker to draw in the windows to the top two panels and then computer generated both the signs.

I used stamp sets from Kindred Stamps to decorate my card. On the front I added the 13th Doctor plus one of the sentiments from the older stamp set.

The door of the Tardis opens to reveal two sentiments and two images ... my daughter's favorite doctor is the tenth ... so that is what I added here.


The "Look Whoo's having a birthday" is from a Dare 2B Artzy Owl stamp set, the rest are all from Kindred Stamps ... I used three of their stamp sets in total. 


On the front of the card I added the sentiment "This Card is Bigger on the Inside". So to make it bigger, I added panels to both sides of the inside of the card and added more of the stamps and sentiments to each panel.

Here is a close up of the bottom panel on the inside of my card. The white panel was die cut using another of the dies included in the Elizabeth Craft Designs Phone Booth kit.


And one last look at the inside of my card, this time a close up of the top panel.

I have been wanting to use both the stamps and phone booth dies to make this for ages, so I was very happy to finally get it made.

Other Supplies:
Time Traveller Stamp Set - Kindred Stamps (retired)