Showing posts with label Missees. Show all posts

Friday, August 18, 2023

Drive Me Happy


Hi Crafty Friends,

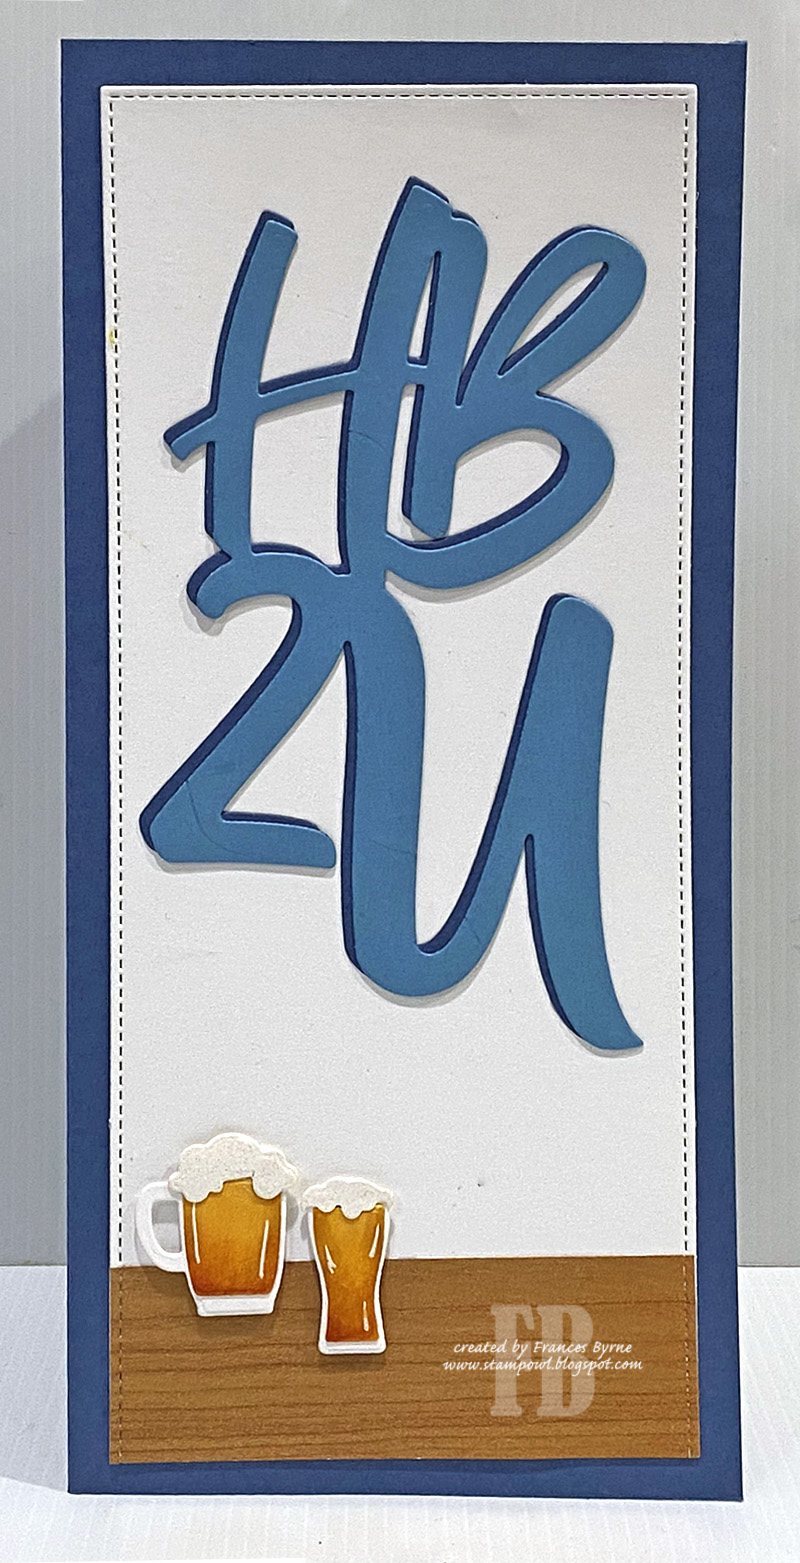
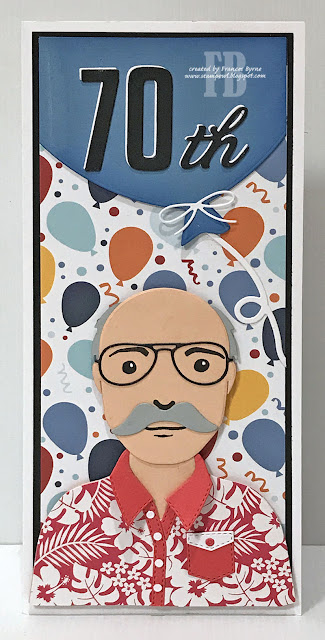
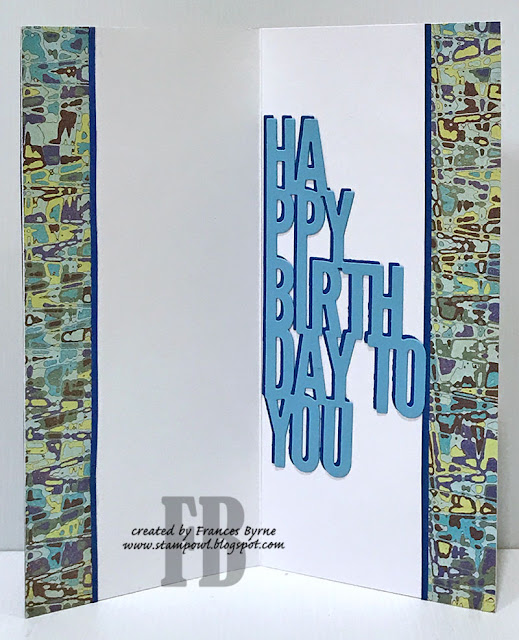
Today I am sharing a 5 x 7 Card I created recently.

For the layers of this card I used Card Making Magic's 5 x 7in Alternative Stitched Nestables die set. 

I used Lawn Fawn's On the Road die set for the road at the bottom of the card.

The car is Studio Light's Creative Craft Lab Car die set. I also used Benny Bear from the Missees Pets line from Studio Light.

I pulled out an older Pine Tree die from Sizzix to add the trees on either side of the card.

Finally I used a sentiment from Stampendous, which is one I have had in my stash for years.


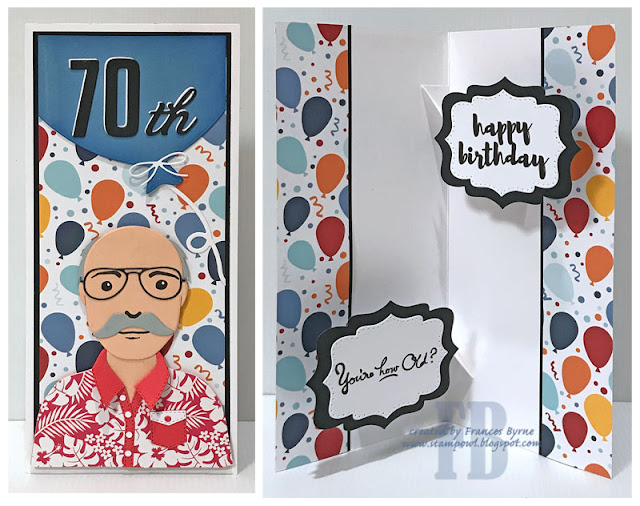
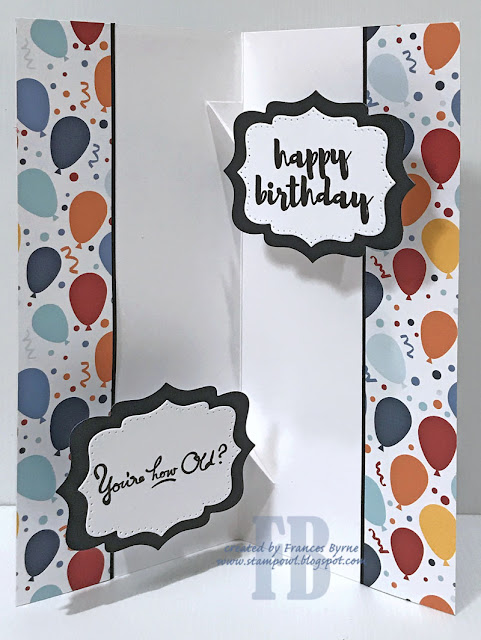
For the inside of the card, I added the road again to the bottom portion of my card. I used a mix of sentiments from two Honey Bee Stamps stamps sets to add the sentiment.

Other Supplies:
  • Missees Pets Benny Bear Stamp/Die Set - Studio Light 
  • Drive Me Happy Stamp - Stampendous (discontinued)
  • Pine Tree Die - Sizzix (discontinued)
  • Love Bug Stamp Set - Honey Bee Stamps (discontinued)


Monday, August 29, 2022

Male Birthday


Hi Crafty Friends,

I have a male themed birthday card to share with you today, which I created to give to my Son In Law who celebrated his birthday this month.

Earlier in the year, I saw a card using the Missees Men range of dies that reminded me on my son in law, so for his birthday card this year I figured I would pull out my dies and see if I could do something similar.  I am not sure whether he will be able to tell it is supposed to look a little like him, but I am happy with how it turned out. I used dies from both the Brian Man Fancy and Andrew Man Classic to create my image.

I adhered him higher up on my slimline card, so that I could add something below the image to make it look like he was behind something ... maybe a table, bar etc. I added Picket Fence Studios' Slimline Happy Birthday Word Topper to the base of my card.

The beer mug which is sitting on the last to letters of the word "birthday" was created using MFT Stamps Pint Sized die set.

The layers of the slimline card were created using Picket Fence Studios Slimline Nesting Rectangles die set.

Finally I added a few holographic stars to finish off the card.


For the inside of my card I added Picket Fence Studios' HB2U die and added some more woodgrain card along the bottom of the card, so that I could add two more beer glasses.


Friday, August 5, 2022

Birthday Wishes


Hi Crafty Friends,

Anyone who follows my blog, knows that I love the Missees range of paper doll dies, so when I saw that that there was a new release which included dies to do various styles of hands and also a new girl die set I knew I had to get them. Fortunately Craft Stash had them in stock, so I was able to order them and didn't have a long as I normally have to wait for them to arrive across the ocean.

Of course I had to create a card using both sets, and as you can see I created a 5 inch x 7 inch card. For the background of my card I used Spellbinders Eyelet Lace Frame die set, this fits perfectly on a 5 x 7 card. I die cut the frame. from white cardstock and then layered onto dark pink, so the pink showed through the eyelets on the frame. 

To create the girl I used the new Missees Chiquita die set as well as the new Arms and Hands die set. The Arms and Hands set also included a different shaped body which I also used for this card. The stamps for the face are also from the new Chiquita set. 

I love all the different hands, and I die cut a number of the various ones as I wasn't sure which ones I wanted to use for my card, what I didn't use this time are in a pocket and can be used on another card when needed. In the end I decided I love the hands that formed the shape of the heart. To make sure I got the heart shape when assembling the hands/arms, I adhered the hands to the lower arms and positioned those where they were needed before adding the upper arms.

I added Matt Silver Metallic Pearls around the frame. The birthday sentiment is from a Spellbinders stamp set which I white embossed on black cardstock.


For the inside of the card, I used the inner rectangle which was die cut when I cut the frame for the front of the card. I used the square border die also included in the die set to create the border around the rectangle panel before layering to a dark pink card. 

I added two sentiments to the top portion of the panel ... the first is from a new Spellbinders stamp set and the "Happy Birthday" from a Honey Bee Stamps stamp set.

As I had plenty of hands left over, I decided to create the effect of the hands holding the rectangle panel for something a little different.


Thursday, May 26, 2022

(Spec)tacular Birthday


Hi Crafty Friends,

It's challenge time with my friends over on the CCEE Stampers challenge blog. Kelly Santi our challenge hostess for the month, finishes off the month with one last challenge.

Apparently May is Healthy Vision Month - show us your cards with glasses, eye charts, any kind of eye balls as the focal point.

I recently had to go to the optometrist to get new glasses, when you get the glasses they are put into a white paper bag which has images of different glasses all over. I decided to keep the bags to use for the background of my card. As I ended up making a Slimline card, I had to carefully piece together the paper.

To decorate my card, I pulled out my Studio Light Missees die sets to create this cute girl ... complete with glasses.

I used my computer and printer to create the sentiment at the top of the card.


For the inside of my card, I added four pair of spectacles to the white panel using MFT Stamps Geek is Chic die-namics set.

I also added the Eye Chart Birthday sentiment I have had in my stash for years.

Don't forget to check out the CCEE Stampers blog (goes live 12 AM EST) to see the rest of the creations the CCEE Stampers created this week. You can also see more details of their creations on their individual blogs:


Other Supplies:
Geek is Chic Die-namics - MFT Stamps (discontinued)
I Chart Wood Mounted Stamp - Penny Black (discontinued)


Monday, March 28, 2022

Pete's 70th

 
Hi Crafty Friends,

A friend of ours celebrated his 70th birthday earlier in the month, so of course I had to make him a card. 

As you can see I created a Slimline card which measures 4 inches x 9 inches.


I just had to try and make an image that looked similar to our friend, so I pulled out the Missees Men dies ... Brain & Andrew. I used mostly dies from the Brain die set, but I did need a couple of things from Andrew especially to add the grey hair at the sides of his head.

I am not sure if he owns a red shirt like this, but I do know for sure he has a blue one.

I added the Big Balloon designed by A Way With Words for Elizabeth Craft Designs. I added the "70th" to the balloon using two sets of discontinued dies.


For the inside of the card, I added a double pop-up using Karen Burniston's Katherine Label Pop-up die set.

I added the "Happy Birthday" sentiment to the top pop-up using Altenew's Birthday Builder stamp set. For the bottom pop-up I added the "You're How Old?" sentiment which is an older sentiment from Stamp It Australia.

Other Supplies:

You're How Old Stamp - Stamp It Australia (discontinued)
Suffix Style Die Set - Papertrey Ink (discontinued)
High Rise Numbers - MFT Stamps (discontinued)


Thursday, March 3, 2022

Super Birthday

Hi Crafty Friends,

It's challenge time with my friends over on the CCEE Stampers challenge blog. Being a brand new month, it's time to introduce a new challenge hostess, which is ME!

Just like Slimline & Mini Slimline cards, the  5 x 7 inch card size is becoming more and more popular. For this week’s challenge create a 5 x 7 inch card.

I have been looking forward to be able to play with the male version of the Missees range of dies ... these sets are called Missees Man. There are two different die sets right now, Andrew and Brian. For my card today I used mostly dies and stamps from the Andrew set, however the mouth is from the Brian set.

Most of the cards I have made using the Missees die sets to date have either been Slimline or Mini Slimline sized, so making this for today's challenge it was fun to be able to make a 5 inch x 7 inch card size.

For the boy, I used my grandson for inspiration. I am not sure it really looks like him, but it does have red hair just like him. For his t-shirt I decorated the front using the batman logo using a die from Frantic Stamper.

I used Lawn Fawn's Window Frame die which I added to the background of my card. I adhered a scene from a piece of patterned paper behind the window.

For the sentiment I used a die from Whimsy Stamps' Comic Speech Bubble die set and a sentiment from Frantic Stamper's Superheroes stamp set.


For the inside of my card, I added the layers using Waffle Flower's A7 Layers die set. 

The sentiment uses the Happy Birthday To You die from Lawn Fawn.

I added two more of the Batman logos to the card.

Don't forget to check out the CCEE Stampers blog (goes live 12 AM EST) to see the rest of the creations the CCEE Stampers created this week. You can also see more details of their creations on their individual blogs:


Friday, January 7, 2022

Hello To You


Hi Crafty Friends,

I made this card in late October, but with all the Christmas and Design Team cards I have been posting during November and December I rescheduled this to post now in January.

I have been having fun playing with the Missees range of dies and stamps from Studio Light over the past eight or so months and was hoping that one day they would release a male version too. Well a couple of months ago that finally happened and of course I couldn't wait to order both the Brian & Andrew die sets. 

Of course I couldn't wait to play with at least one of the die sets, even though I have been busy making Christmas cards. For my card today I have used the Brian die set. I love how the color of the shirt stands up at the front.

I added a speech bubble to the top of the card using one of the speech bubble dies from Whimsy Stamps Comic Speech Bubbles die set. I added the "Hello" sentiment from Honey Bee Stamps Thinking of You Big Time stamp set and coordinating dies. The smaller sentiment is from the Miss You Big Time stamp set.


For the inside of the card I added strips of the patterned paper I used on the front of the card to the left and right edges of the card.

I added the birthday sentiment to the right side of the card which is from Concord & 9th's Perfect Pairings Birthday die set.


Thursday, August 12, 2021

You Rock


Hi Crafty Friends,

It's challenge time with my friends over on the CCEE Stampers challenge blog. As challenge hostess for the month, I continue to issue the challenges.

Today is Vinyl Record Day! For many Vinyl Records are a thing of the past, but in recent years they have started to make a big comeback with even new albums being released. For our challenge this week it's all about music … bonus points if you included an image of a vinyl record on your card. 


It's been a month or so since I have played with my Missees paper doll dies, so I decided to pull them out to create the girl for my card inspired by the girls from the 50's & 60's.

As you can see, I created a Slimline card using slimline dies from Picket Fence Studios to create the layers.

To create my vinyl record background, I used dies from SugarPea Designs Greatest Hits Stamp/Die sets. I added a smaller record to the girls hand which was also created using this die set.

I added a sentiment to the card using a Honey Bee Stamps stamp set. This was stamped onto a speech bubble using one of the dies from Whimsy Stamps Comic Speech Bubbles die set.


I created a double pop-up for the inside of my card using the pop-up mechanism from Karen Burniston's Katherine Label Pop-up die set. As vinyl records are round I added circle dies to each of the labels.

On the top circle I added a sentiment from one of the Honey Bee Stamps stamp set along with the birthday sentiment from the SugarPea Designs stamps set.

On the bottom circle pop-up I added a record being held by a hand, cutting of the arm so it can't be seen when the card is closed.

I used the record die from the SugarPea Designs die set to add the border along each side of the card.

Don't forget to check out the CCEE Stampers blog (goes live 12 AM EST) to see the rest of the creations the CCEE Stampers created this week. You can also see more details of their creations on their individual blogs:


Friday, June 11, 2021

Hello Friend


Hi Crafty Friends,

I have a Mini Slimline Card to share with you today. 

I recently purchased a couple more Missees Paper Doll stamp and die sets. For my card today I am using the new stamp set called Anna & Bella, the stamp set contains a body stamp and then various other stamps to allow you to create different faces, hair styles and clothing options. I stamped the body twice and then used the other stamps included in the set to create the two paper dolls on my card. I paper pieced the girls clothing using patterned paper.

I created a Mini Slimline Card using Waffle Flower Crafts Mini Slimline Layering die set. The patterned paper for the background is from Catherine Pooler Designs Little Black Dress Slimline Paper Pad.

I used sentiment stamps from Spellbinders to add the two sentiments at the bottom of the card.


For the inside of the card I used the Mini Slimline Layering die set again that I used on the front of my card. I added a strip of the patterned paper along the bottom of the card.

I added the birthday sentiment which is one of the stamps included in the Birthday Stamp set from The Stamping Village.


Wednesday, June 2, 2021

Hello


Hi Crafty Friends,

Today I am sharing a Mini Slimline Pop-up Card using another of the Missees Range of dies.


I recently received a new Studio Light Missees die set that I ordered called Primarina, this one includes the body and new hair style dies among other things and new face stamps. I used only stamps and dies from this die set to create the girl on the front of my card.

I created a top folding Mini Slimline Card using Mini Slimline Layering Dies from Waffle Flower.


For the inside of my card I created a pop up card using a simple block pop up. 

I created the border panels using Whimsy Stamps Slimline Zig Zag Edge die set. I also added the arm to the bottom panel which is from the Tasha Missees Die set.

I added the Thinking of You sentiment to the pop up panel which is from Concord &  9th's Thinking of You Perfect Pairings die set.


Sunday, May 30, 2021

Celebrate


Hi Crafty Friends,

Today I am sharing a birthday themed Slimline Pop-up card I created for my daughter who celebrated her birthday last week.

Earlier in the year Crafter's Companion released a set of Pop-Out Individual Numbers die set. Loving Pop-ups of course I had to add this to my stash, I finally got a change to pull this die set out to make a birthday card.


If you follow my blog, you know I have been enjoying playing with the Missees Range of dies and stamps from Studio Light. As this card is a special one for my daughter, I wanted to use the dies to create a card that features my daughter on the front. Hopefully she will see that it is meant to be her!

I used the three Missees die sets that I own, although there is a new die set which at the time of making this card is somewhere between the USA & Australia.

For the fancy border in the background, I used Dare 2B Artzy's Curve Slimline Borders Die set. I added the "Celebrate" sentiment from Catherine Pooler Designs to the right hand side of the card.

To finish off the front of the card I added light pink clay hearts randomly over the card.


As mentioned before, for the pop-out I used Crafter Companion's Pop-Out Individual Numbers die set to add the pop-out "45"

I used the Dare 2B Artzy dies that I used on the front of the card, to add the border panel to the top and bottom edges of the card.

To finish off the card I added the "Happy Birthday" die cut which is from a Karen Burniston die.


Here is one more look at the inside of my card, looking at it from a different angle.


Thursday, May 20, 2021

Queen for a Day

Hi Crafty Friends,

It's challenge time with my friends over on the CCEE Stampers challenge blog. Liz Williams our challenge hostess for the month continues to issue the challenges.

Apparently It’s International Tiara Day, and also the birthday of Queen Victoria.  So get out your crowns and gemstones and see what kind of creation you can create. It might be a card for your most favorite little princess in your life, maybe you would like to create a crown for someone you have had regard for, or maybe you love the look of Victorian styled art and décor. Do whatever your imagination leads you to.


I have been having lots of fun lately playing with my Studio Light Missees Paper Dolls die and stamp sets. So I pulled them out to create my card today. You can see the sets I used in the supply list at the bottom of my post. 

All my other cards using these paper dolls I have added the girl to the front of a slimline card, so I decided this time to add her to a pop up on the inside of the card.

I used Picket Fence Studios Slimline Die Cutting System sets 1 & 2 for all the layers of my card. 

I created a pop up  by creating a pop-up box from cardstock, to which I added my paper doll. I added the tiara to her hair, the tiara is from Karen Burniston's Treasure Charms die set, which I die cut from white glitter cardstock and added tiny purple gemstones to.


I added the "Queen for a Day" sentiment to the top of the card using Karen Burniston's Word Set 5 - Royalty die set.

On the bottom panel I added Catherine Pooler Designs "Celebrate" die set which I layered using a Mega Oval die.


As the focus of this card is the inside of the card I kept the front of the card fairly simple. 

I used Concord & 9th's Perfect Pairings die set to add the large "Happy Birthday To You" Sentiment. I am loving this die set and it works so well for slimline cards on both the front and inside of a card.

I die cut two of the arms from one of the Missees die sets and added them to the top and bottom of the card.

Don't forget to check out the CCEE Stampers blog (goes live 12 AM EST) to see the rest of the creations the CCEE Stampers created this week. You can also see more details of their creations on their individual blogs:


Other Supplies:
Mega Ovals Die Set - Spellbinders (discontinued)