Tuesday, April 9, 2019

Cottontail Cutie Easter Card

Hi Crafty Friends,

Welcome to our April Paper Pros challenge. This month our challenge is hosted by Sandy Diller who has given us the theme .... Easter.

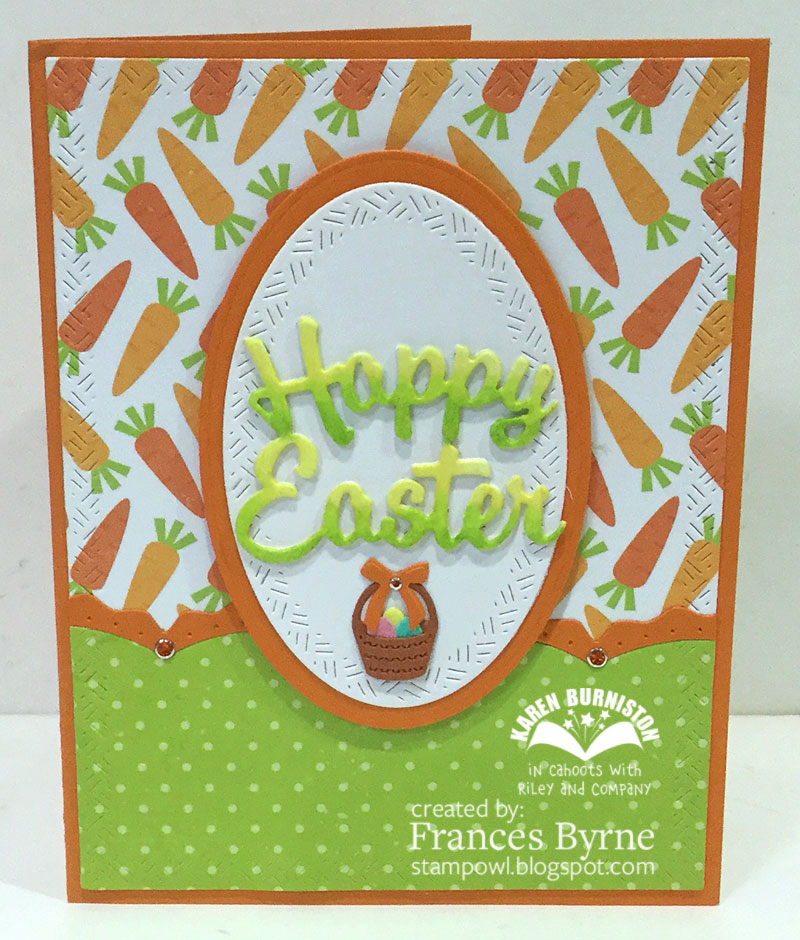
I decided to create another Rockin' Rectangle Pop-up card using the acetate window on the front. You can find Karen's tutorial on how to create this style of card here.


Here is a quick video to show my card in action.


For the background of my card, I used Simon Says Stamp Doodle Egg Background stamp. I stamped this onto White Bristol Smooth Cardstock using VersaMark ink and then white embossed. I then colored the eggs using Orange, Light Pink, Lemon Yellow Zig Clean Color Real Brush Markers to watercolor the background.

The bunny is MFT Stamps Cottontail Cutie Die-namics which I die cut from tan and cream cardstock and attached directly to the end of the Rockin' Rectangle arm.

The "Happy Easter" is from Karen Burniston's Easter Charms die set.


I used Karen Burniston's Alphabet die set to die cut the word "Easter" to add to the side panel on the front of the card, die cutting the letters from pink and white cardstock and offsetting slightly.

I used the two Easter Eggs included in the Easter Charms die set to add the Easter Eggs along the edge of the panel.

You can see what the other "Paper Pros" created for this challenge on their blogs:


Supplies:
For your shopping convenience, all products are linked below. Compensated affiliate links are used where possible with no extra cost to you. This helps me to continue to share all the projects I include on my blog. Please note I only use and share products I love.

Orange Zig Clean Color Real Brush Marker
Lemon Yellow Zig Clean Color Real Brush Marker
Light Pink Zig Clean Color Real Brush Marker


Monday, April 8, 2019

Mother's Day Love


Hi Crafty Friends,

Today I am sharing a Mother's Day card I created recently.

I used Concord & 9th's Darling Petals Turnabout Stamp, using various pink and green Altenew inks to stamp the flowers. The full list of inks are included in the supply list at the bottom of the post. I also used the two single flowers included in the stamp set and added them to my card when it was completed.

I die cut the finished Turnabout design using the Scallop Rectangle from Mama Elephant's Framed Tags - Hexastar die set. I die cut this twice once from the decorated cardstock and once from white cardstock. I trimmed the scallop edge off the decorated cardstock and layered this over the white panel.

I used the Crafter's Companion Edge'ables Love die set to create the love along the bottom of the card.  This was die cut from two different colored pinks and layering slightly offset.

I added the Happy Mother's Day sentiment to the bottom of the sentiment, embossing with white embossing powder.


For the inside of the card I created another Darling Petals Turnabout Panel and layered using the Scallop Rectangle that I used on the front of my card. 

I added the Lawn Fawn Mother's Day Line Border to the edge of the turnabout panel.


Supplies:
For your shopping convenience, all products are linked below. Compensated affiliate links are used where possible with no extra cost to you. This helps me to continue to share all the projects I include on my blog. Please note I only use and share products I love.


Sunday, April 7, 2019

Wishing You A Hootiful Day Shaker


Hi Crafty Friends,

Today I am sharing a Shaker Card I created recently. Shaker Cards have come a long way since when I first started creating these about 25 - 30 years ago. Now there are so many wonderful products to use that makes creating Shaker Cards easy.

For the March Release, MFT Stamps released two new products which help make Shaker Cards. The first is the A2 Rectangle Frames which have a lot more uses other than for shakers, but using the largest frame with the other new product the A2 Rectangle Pouches definitely make Shaker Cards so easy. 

For my card today I decided to create a scene inside my Shaker Card Window using the cute owls and tree from Gerda Steiner's Fall In Love Stamp set. I stamped the owls and tree, masked both and then added the clouds and grass area using stencils.

I used Heffy Doodles Hootiful Clear Stamp set for my sentiments and also added a few Doodle Bug Designs Puffy Heart Stickers.


I die cut the largest rectangle from the A2 Rectangle Frames 3 times, once from blue cardstock and the other from white to give a little extra depth inside the shaker and adhered the shaker pouch between two of the frames.

I added some sequins and beads inside the Shaker Pouch and then adhered the scene over the top of the shaker pouch.


I used one of the rectangle panels which came out of the white rectangle frames I did cut for the inside of the card. I stamped the "Hip Hip Hoo-ray" sentiment which is also from the Heffy Doodle Stamp set and then the "Happy Birthday" from the Altenew Birthday Builder Stamp set.

I also added the owls and a tree trunk to the lower left hand side of the card.

Supplies:
For your shopping convenience, all products are linked below. Compensated affiliate links are used where possible with no extra cost to you. This helps me to continue to share all the projects I include on my blog. Please note I only use and share products I love.


Saturday, April 6, 2019

Metallic HB2U


Hi Crafty Friends,

t’s challenge time with the “Crazies” over on the Crazy 4 Challenges blog. Being a brand new month, it is time to introduce our new challenge hostess which is Rebecca Ednie.

Metallics are super trendy right now! Use at least 3 metallic or metallic-coloured embellishments on your card or project.


Earlier in the year I purchased Pink Fresh Studio's Gatsby die set, so I decided to pull that out to use on my card today. I have had this idea floating in my head for a little while now and glad that I was able to make it work for this challenge.

There is plenty of "metallic" elements on this card. Firstly the bottom layer of the Gatsby die was die cut using Gold Metallic cardstock as was the HB2U sentiment in the centre of the card. I also splattered Gold Metallic Paint from the Starry Night Kuretake Gansai Tambi paint set. 

I added 5 metallic brads to finish off my card, one in the centre and the other 4 on either side of the card on the Gatsby die cut.

The HB2U probably doesn't match with the Art Deco feel of the card, but it was the best I could think of when making this card and I was running out of time to get it made. For this I used Karen Burniston's Alphabet & Numbers die sets.


For the inside of my card I created a Pop-up card using Karen Burniston's Katherine Label Pop-up die set. I replicated the front of my card by adding paint splatters and the Gatsby die cut layered to the top and bottom of the card.

I added a birthday sentiment to the pop-up portion of my card using gold embossing powder.


Here is another view of the inside of my card so you can see the pop-up part of the card a little better.

Don't forget to check out the rest of the “Crazies” cards over on the Crazy 4 Challenges blog and also their individual blogs for more details.


Supplies:
For your shopping convenience, all products are linked below. Compensated affiliate links are used where possible with no extra cost to you. This helps me to continue to share all the projects I include on my blog. Please note I only use and share products I love.

Birthday Wish Clear Stamp set - Stampendous


Friday, April 5, 2019

Swinging By To Say ....


Hi Crafty Friends,

Today I am sharing an Interactive Card I recently creating using the new MFT Stamps Interactive Swing Die-namics. 

This die enables you to create fun swing themed cards that actually "swing" using either stamps or the swing die included in the set. MFT also released two different swing themed stamp sets that can be used in conjunction to this stamp set, but I discovered I already had a number of swing themed stamps that would work with this die, that I only purchased the die set.


Here is a quick video to see my card in action.

This is a tall card, it measures 7 inches x 4 3/8 inches. To create the cloud background I used MFT Stamps Mini Cloud Edges Stencil and Tumbled Glass Distress Oxide ink on white cardstock.

I used the Tree/Cloud die included in the Interactive Swing Die-namics set to create the tree the swing is connected to. I die cut the tree twice from two different colored green cardstocks and layered the two together so that you could partially see the darker one on the bottom. 

I added grass to the bottom edge of my card.

The swing is one of my favorite stamp images from the Roberto's Rascals Collection from CC Designs. This stamp so looks like my two grandchildren, so I colored them to look like them.

I added flowers and a bird from Honey Bee Stamps Birds and the Bees Clear Stamp set around the trees and grass.

The sentiment is from a now retired Paper Pretties stamp set.


For the inside of the card I added a sentiment using Crafter's Companion's Happy Edge'ables stamp/die set and added another CC Designs stamp set which matches the one on the front.

Supplies:
For your shopping convenience, all products are linked below. Compensated affiliate links are used where possible with no extra cost to you. This helps me to continue to share all the projects I include on my blog. Please note I only use and share products I love.


Thursday, April 4, 2019

Happy Birthday Matey


Hi Crafty Friends,

It's challenge time with my friends over on the CCEE Stampers challenge blog. Being a brand new month it is time to introduce our new challenge hostess, which is Lynn McAuley.

Apparently tomorrow is Read a Road Map Day. Create a card which incorporates a map or has a travel theme.


Now my card doesn't use a road map as such ... the challenge said a map not necessarily a road map. As I had pirate stamps I purchased earlier in the year and also the torn paper dies which make perfect pirate maps, I decided to go that route for my card.

For the map part of the challenge, I created my pirate maps (3 in total) by using the largest die in the Craftin Desert Divas' Torn Paper Rectangles. I could these using various shades of brown inks and then added stamped images from Lawn Fawn's Ahoy Matey Stamp set.

I added the "Happy" Edge'ables die to the bottom of my card and then added some of the pirate images from Craftin Desert Divas' Pirate Pals stamp set.


For the inside of the card I created a Pop-up card using Karen Burniston's Rocking Rectangle Pop-up die set. This is fast becoming a favorite of mine!!!! I again added pirate maps which are exactly the same as the one on the front.

I used the smaller Torn Paper Rectangle die for the pop-up portion of the card as this suited the card better than the rectangles included in the Rocking Rectangle die set. I added more images from the Pirate Pals stamp set around my card, including another treasure map. So technically there are 4 maps on this card.


Here is another view of the inside of my card, taken at a different angle.

Don't forget to check out the CCEE Stampers blog (goes live 12 AM EST) to see the rest of the creations the CCEE Stampers created this week. You can also see more details of their creations on their individual blogs:


Supplies:
For your shopping convenience, all products are linked below. Compensated affiliate links are used where possible with no extra cost to you. This helps me to continue to share all the projects I include on my blog. Please note I only use and share products I love.


Wednesday, April 3, 2019

Gnome Way Wiper Card


Hi Crafty Friends,

Today I am sharing another Wiper Card using Mama Elephant's Wiper Surprise Die set.


Here is a quick video to see my card in action.


My card started with the Mushroom House from Lawn Fawn. I was debating whether to created a Mushroom House Shaped card or add the mushroom onto a card of some sort. Well on it's own the mushroom house is fairly smallish and I wanted to add a few other elements to my card so I decided to create a wiper card using Mama Elephant's Wiper Surprise die set.


I die cut two white panels from the main die from the Wiper Surprise die. For the back panel I colored the background using various blue Distress Oxide Inks.

For the front panel I used the grass border included in the Lawn Fawn Mushroom Border die set to die cut about half way up the panel. I also place the mushroom border above the grass border so I could adhere that behind the grass. I colored the grass panel using to different green Distress Oxide inks. I then added shading to the mushroom border, die cut the top of the mushrooms from red cardstock and adhered this border behind the grass. 

As the Mushroom House was going to hide three of the mushrooms on the Mushroom Border, I cut them off so I could add them to other parts of the card.

Lawn Fawn did release a cute Gnome themed stamp set when they released the Mushroom House etc. However as I already had a number of Gnome stamp sets (one not used until this card was made), I decided not to buy it. The Gnomes added to my card are from a Hunkydory stamp set called Gnome Way! which I think is now discontinued.

I added the gnome which is shovelling dirt to the tab which pops up from behind the mushroom house when you pull the sides of the card.


The  back of the card is a great place to add a panel for a personal handwritten sentiment. I also added  a gnome image and sentiments to this panel.

The gnome, sign & "Love You Gnomie" sentiment are all from the Hunkydory Stamp set and the other sentiment is from SugarPea Designs Gnome Sweet Gnome Stamp set.


Supplies:
For your shopping convenience, all products are linked below. Compensated affiliate links are used where possible with no extra cost to you. This helps me to continue to share all the projects I include on my blog. Please note I only use and share products I love.

Gnome Way! Clear Stamp Set - Hunkydory (retired)
Rock Pathway Wood Mounted Stamp - Stampendous (retired)


Tuesday, April 2, 2019

April 2019 Karen Burniston Designer Challenge


Hi Crafty Friends!!!

Welcome to our April Karen Burniston Designer Challenge.

Check out Karen Burniston's blog on Wednesday (US Time) when you will be able to see what all the designers created for the challenge this month, plus Karen will have an amazing video tutorial to share with us all.

Our challenge theme this month is .... "EASTER OR SPRING" - incorporate the Easter charms, Spring animals or Happy Spring into your project with an Easter or Spring theme.


For my card today I used the Oval Frames Pop-up die set, I added designer paper to the background of both the front and inside of my card by using the largest rectangle from the Crosshatch Rectangles die set. For the green panel along the bottom, I used one of the borders from the Border Blends - Party die set, die cutting the top of the patterned paper. I used the same die set to create the scallop etc from orange cardstock which I added along the top of the patterned paper.


To decorate my card I used the Easter Charms, Spring Animals & Garden Charms die sets.

I added a stamped sentiment to an oval on the bottom right hand side of my card.


For the front of the card I added an oval using the Crosshatch Ovals die set and added the "Happy Easter" sentiment from the Easter Charms die set as well as the basket of Easter Eggs from the Spring Animals die set.

Don't forget to visit Karen Burniston's blog on Wednesday when you will be able to see what all the designers created for the challenge this month.


Supplies:
For your shopping convenience, all products are linked below. Compensated affiliate links are used where possible with no extra cost to you. This helps me to continue to share all the projects I include on my blog. Please note I only use and share products I love.


Monday, April 1, 2019

Divinity Designs - April New Release


Hi Crafty Friends,

Today I am sharing two projects I created using Divinity Designs April Release.  I am featuring the two new stamp sets being released .... Daughter's Best Friend and Grandmother's Heart. For more inspiration using the April Release and to see the other designers projects, be sure to visit the Divinity Designs Blog


Unfortunately my supplies from the April Release are still making their way to me from the USA, sometimes the post can be slow to get down here to Australia. So due to this reason, I can't share any of the new patterned papers or die sets being release this month just yet. But I was able to get hold of the digital version of the new stamp sets so I could at least make a couple of cards to share with you today.

For my first card I have used the Daughter's Best Friend Stamp set, which includes this beautiful floral image and some fabulous Mother's Day themed sentiments.


I  created a Flip Fold Card using the Vintage Label Flip Fold Card with Layers die set. I also used the Beautiful Blooms 6 x 6 Paper Pad for the layers of this card.

The flower image was stamped onto white cardstock and then die cut using the smaller Vintage Label die included in the die set. I masked the flower and while the die was still in place I sponge pink ink over the label.

I added a fishtail tag to the top left side of the label using a die from the Test Tube Trio die set.


When you pull the card open, it reveals one of the beautiful Mother's Day sentiments on the flip side of the front label.

I also added the "Happy Mother's Day" sentiment which I die cut using a rectangle from the Rectangles die set.


For my second card today, I have used the new Grandmother's Heart Stamp set. 

For this card I created an A2 Center Step Card using the  Center Step A2 Card and Center Step A2 Layers die sets. This time around I used one of the papers from the Spring Flowers Collection 2019 6 x 6 Paper Pad.


To create the layers for my flower and "To my Mom" sentiment, I used the Ovals, Scallop Ovals, Circle and Scallop Circles die sets.

I added the "Happy Mother's Day" sentiment to the bottom section of the card.


I added one of the sentiments from the stamp set to the inside of my card.


Supplies:
For your shopping convenience, all products are linked below. Compensated affiliate links are used where possible with no extra cost to you. This helps me to continue to share all the projects I include on my blog. Please note I only use and share products I love.