Friday, February 29, 2008

Hoppy 2008!

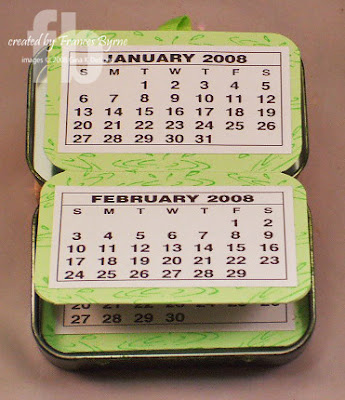
Yes I know it is getting late to be making calendars for 2008 .... however I recently purchased some of those small calendars from a friend and I still have a few sitting here that need to be used up. So when I received this cute little tin from Gina K Designs to do something with for the Design Team I thought why not do a calendar ... as it was different to what I had seen the other Design Team Members do.

To start of I used my alcohol inks to color the outside of my tin ... I used lettuce & meadow adirondack alcohol inks to do that. I added a number of layers to the tin heat setting between layers to get the color and effect I wanted.

I used my oval nestabilities to create my layers for my Hoppy frog.

I created a little scene for the top panel of my calendar ... the Hoppy is from the same set as the rest of the images ... the 2008 is created using Karen Foster snap stamps. I also added a piece of ribbon between the panels to help lift up the calendar when you open the tin.

To create the inside accordion panels I measured the size of the inside of the tin and then cut my card to size by the length of the tin ... I then used the measurement of the width of the tin as my guide to score the card to create the accordion panel. I did have to add on some card to make the accordion the size I needed.

I also used my corner rounder to round all the corners ... this helps the accordion card fit in the tin better as the tin has rounded edges.

Before attaching the calendar pieces to there respective places ... I first stamped the puddle from Hoppy for You by Melanie Muenchinger at Gina K. Designs.

The bottom panel is attach to the bottom of the tin.

Recipe:
Stamps:
Hoppy for you - Gina K Designs; Karen Foster Snap Stamps (2008)
Paper: White; Gable Green - SU
Other: Black Ink; Celeste Blue Impress Ink; Green Galore SU Ink; Oval Nestabilities; Tin from Gina K Designs; Meadow & Lettuce Adirondack Alcohol Inks; Paper Piercing Mat & Tool; Score It Board; Corner Rounder; Grosgrain Ribbon

Thursday, February 28, 2008

Ride Em Cowboy!


This week for the challenge I do with my fab/sassy friends ... we had to CASE a card from the latest SU catalog. I decided to CASE this card here.

I did make a few changes to the one in the catty .... changing the DP and the colors of the card used..... instead of having the separate piece for the scallop border I add my scallops to my cranberry panel. I also changed the ribbon that was used around the circle to a scallop nestabilitiy. I added paper piercing to the bottom of the card ... and obviously I also changed the image used.

Recipe: Stamps: The Cat's Pajama's
Paper: White; River Rock, Cranberry Crisp & Blue Bayou - SU; DP - Basic Grey
Other: Black Ink; Burgundy Grosgrain Ribbon; Circle Nestabilities; Crop a dile

Wednesday, February 27, 2008

AND THE WINNER IS!

Thank you to everyone who left a comment yesterday for the Rubbernecker Stamps blog candy. It was interesting to read what everyones favorite place to visit was.

I used random.org to help decide the winner
and the winner is.......................................................................

DRUM ROLL PLEEEEEEEEEEZ

Anonymous said...

Oh, I'd really like to go to Rome...Venice...anywhere in Italy actually. Ah, some day...

Thanks for the opportunity to win $10! Regina Davis


Regina ... please email me within the next 24hrs so I can organise your prize ..... If I do not hear back from the winner by 6am PST Thursday 28th February I will do a redraw.

It's Your Day!


Well I finally succumbed and had to order some of those cute Magnolia stamps I have been seeing on SCS and various blogs around town. As they arrived on Monday and I hadn't had a chance to ink them as yet due to Design Team commitments I was hoping that todays sketch challenge on SCS would be suitable for these stamps .... and it was!!!! :)

I also managed to get a few of the new cuttlebug embossing folders today as well ... so of course I had to use one of those as well hehe!

Recipe:
Stamps: Tilda - Magnolia Stamps; Sentiment - MFT Stamps
Paper: White; Black; Cool Caribbean, Gable Green - SU; DP - ??
Other: Black Ink; Word Window Punch; Pink Grosgrain Ribbon; Floral Fantasy Cuttlebug Embossing Folder; Flowers; Blue Brad; Crystal Stickles; Foam Tape

A Color Challenge


This is just a quick card I made earlier today for this weeks color challenge on SCS. The colors we had to use today were white; river rock and black. I figured this was a great combo to use with my Ornamentum fishing kids stamp ... pretty basic card and I think self explanatory.

Recipe:
Stamps: Fishing Kids - Ornamentum
Paper: White; Black; River Rock & River Rock DP - SU
Other: Black Ink; Black Brads

Tuesday, February 26, 2008

Up Up & Away ... It's Treasure Hunt Tuesday!

Ahoy ye mateys!

It’s TREASURE HUNT TUESDAY @ RUBBERNECKER. The Treasure if Youfind it, will be a free image. However, to receive the Treasure a purchase of any size is required, and your treasure must be claimed between 4:00 am PST until 9:00 pm PST today (7:00 am EST - 12:00 am EST). Not only is today Treasure Hunt Day, but for every $50 in stamps purchased, you will receive one FREE stamp. You can check out more information on the Rubbernecker Home Page.

You will find the first clue of todays treasure hunt in the Stain Glass section of Rubbernecker.

While you are on the Rubbernecker Homepage make sure and read about the Rubber Bucks Monthly Drawing AND the FREE stamp offer:

*** Each month you can qualify to win $100 coupon good for Rubbernecker or Stamp Oasis stamps! For every $20 you spend, your name is entered once into a drawing.

*** For every $50 you spend on Rubbernecker, Stamp Oasis or KK Originals stamps, you get to choose a FREE stamp!

We also have some Rubbernecker Bucks Gift Certificates to give away as Blog Candy!!! These are redeemable for any stamps in the Rubbernecker or Stamp Oasis sections!

This week's Blog Candy links:

ME!!! - See below!

Broni Holcombe

Tosha Leyendekker

Kittie Caracciolo

How about some Blog Candy?

rubbernecker-10-gift-card-form.jpg

To enter my blog candy drawing for a Rubbernecker Gift Certicate, please leave a comment on this post telling me where your favorite place to visit would be .... being an Aussie and also a stampaholic ... I would love to get to the US one day, so I can visit your fantastic shops and a stamp convention ... one day maybe!

I will choose a random winner on Wednesday 27th February at 4:00 AM PST.

Good luck!!


Todays card is using one of Rubbernecker's stained glass stamps .... as I have a friend who likes hot air balloons I guess I have collected my share of them too in stamps anyway ... so I just had to have this one too!

The hot air balloon is stamped in black on white card and colored. I used the travel background stamp on my background at the top part of my card ... this was also stamped in black. I inked jut the "happy birthday" portion of my sentiment and stamped that in the lower corner.

Recipe:
Stamps: Hot Air Balloon Stained Glass; Travel Background; You Party Animal Text - Rubbernecker Stamps
Paper:
White; Black; Not Quite Navy & Cranberry Crisp - SU; DP - Basic Grey
Other:
Black Ink; Black Brads; Foam Tape


Make A Wish .... Riley!

I am trying to play catch up today with a couple of challenges ... first this is for this weeks Hanna Stamps challenge posted on the Hanna Stamps Member Forums of SCS ... this week the challenge was a color one .... using Chocolate Chip; Cool Caribbean & Wild Wasabi ... I did kind of do this challenge earlier in the week ... but as I didn't use Hanna Stamps at the time I didn't post it as such .... so now I have ... I decided to use Riley again .... he is such a cute guy .... who would have known I would fall in love with a moose .... hehehe!

I also got to do Jen's of I Heart 2 Stamp's sketch challenge or as she calls them a sketch for you to try (SFYTT)

Recipe:
Stamps: Coffee Riley & Words Hanna would say - Hanna Stamps
Paper: White; Cool Caribbean, Chocolate Chip & Wild Wasabi - SU; Retro DP - DCWV
Other: Black Ink; Chocolate Chip SU Ink; Bubbles Cuttlebug Embossing Folder; Circle Nestabilities; Brown Brads; Brown Ribbon; Word Window Punch; Foam Tape

Blooms with Delight!


This card is for this weeks MFT sketch challenge on the MFT Members Forum on SCS. This sketch is a little different in some ways ... for one the main image is divided and the sentiment runs down the card rather than across. So I had to think about this one for a little bit until I worked out what I could do and stay in line with the sketch. I am very happy with the end result!

To start I stamped the vase of flowers from MFT's "Bundle of Bouquets" set and I also stamped the scroll from " Boho Blossoms" at the top of the panel using chocolate chip SU ink. I used my cuttlebug die to create the lattice piece which I used to divide the panel .... adding a couple of olive brads on each end of the lattice piece.

The sentiment is also from "Bundle of Bouquets" .... which is actually in 3 lines but I stamped it on this card so it appears in 1 line.

Recipe:
Stamps:
Bundle of Bouquets & Boho Blossoms - My Favorite Things
Paper: White; Chocolate Chip, More Mustard & Old Olive; Scarlett Letter DP - Basic Grey
Other: Black Ink; Chocolate Chip SU Ink; Old Paper Distress Ink; Brown Grosgrain Ribbon; Lattice Cuttlebug Die; Petaloo Flower; Brown Brad; Olive Brad; Brown Flower Brad

Monday, February 25, 2008

Hi Friend!


Hi everyone ... hope you all had a great weekend ... it is Monday here which means it is time for another challenge with my goofy CCEE friends on SCS. This month it was my turn to supply the items for our supply challenge ... so I guess that means I can't complain about anything in the challenge right hehe! Just as well then that I didn't have any problems with it.

Everyone was posted the same items and were instructed to do the following:
  • 2 sheets of double sided DP by Imaginisce (use at least one side of this DP)
  • 3 violet brads (use at least 1 on your card)
  • 1 clear flower (must use on card)
  • 1 ribbon charm (please use)
  • Ribbon - this could be substituted with their own ribbon if they wished
For my card I decided to use a new Rubber Romance image " Ally & Her Dog", that a friend sent to me this week ... I had been trying to get this image for a little while with no luck ... so I was thrilled when I got it in the mail. I was able to make use of both sides of the DP I selected using this layout. I added a couple of additional clear flowers to my flower ... the centre one I colored using alcohol inks and attached it to the top of my card using the brad I had to use. To the top left hand corner I used my paper piercing mat & tool to create a paper pierced corner. I threaded my ribbon onto the ribbon charm and then tied it in a knot to form a bow. The sentiment is by Papertrey Ink ... I thought it fitted this card as it certainly looks to me that Ally & her dog are friends.

Recipe:
Stamps:
Ally & Her Dog - Rubber Romance

Papers:
White; Elegant Eggplant, Old Olive & Morning Glory - SU; Out on the Whim DP - Imaginisce

Other:
Black Ink; Old Paper Distress Ink; Clear Flowers; White Grosgrain Ribbon; Violet Brad; Ribbon Charm; Oval Punch; Label Punch;
Eggplant Adirondack Alcohol Ink; Paper Piercing Mat & Tool; Foam Tape

Sunday, February 24, 2008

Your Teepee!

It is time for another featured stamper challenge and this week the featured stamper is Mary Jo Albright ... congratulations! Mary Jo has some fantastic cards in her gallery so it was quite hard to decide which one to CASE, but in the end I decided to CASE this one here.

As per the rules of the featured stamper challenge I had to change at least 2 things on my card. Here are my changes:
  • Changed the images used
  • Changed the colors
  • Changed the sentiment
  • Used different brads
Recipe:
Stamps: Havin' a Pow Wow - The Cat's Pajamas
Paper: White; Black; Really Rust, Cranberry Crisp & Chocolate Chip - SU
Other: Black Ink; Really Rust SU Ink; Black Brads; Circle Nestabilities; Burgundy Grosgrain Ribbon; Clip; Paper Piercing Mat &
Tool; Foam Tape


Happy Easter!


Well after 2 whole months of owning the Cricut Design Studio I was finally able to use it and make a card .... I have had a few dramas getting mine to work ... so I was really really happy when I could actually do something with it.

I have seen a few cards around that have used the design studio to create the letters at the edge of the card so I really wanted to try one myself ... I found this great tutorial on how to do it on my friend Susan's blog .... she has some great tutorials which help with this program if you are interested.

I decided to combine mine with the rabbit from Gina K Designs " Just so Hoppy" and of course my nestabilities too. For those interested I used the Base Camp cricut cartridge to create the letters around the side of the card.


Recipe:
Stamps: Just so Hoppy - Gina K Designs; Grass - Hero Arts; Clouds - Mostly Animals
Paper: White; Gable Green, Pretty In Pink & Regal Rose - SU
Other: Black Ink; Gable Green SU Ink; Celeste Blue Impress Ink; Rectangle Nestabilities; Foam Tape

Saturday, February 23, 2008

Party On Frog!

Well it is Saturday here again and a very very hot Saturday at that .... so it is a good time to just sit inside with the air con on and stamp stamp stamp!

This card is for this weeks Beate's weekend sketch challenge .... my image is a little larger than what her sample shows ... but I really wanted to play with this images ... so hopefully it will pass hehe ... it does still follow the basic idea of the sketch.

I also discovered that the challenge on Hanna Stamps member forums was a color challenge this weekend ... the colors being Wild Wasabi, Cool Caribbean & Chocolate Chip which also fitted in well with this card ... I would normally use a Hanna stamp for that particular challenge but on this occasion I didn't, sorry!

Recipe:
Stamps: Party Frog & Background - Rubbernecker Stamps
Paper: White; Wild Wasabi, Cool Caribbean & Chocolate Chip - SU
Other: Black Ink; Chocolate Chip SU Ink; Brown Brads; Brown Grosgrain Ribbon & Foam Tape

How! & A Checkerbox Card Tutorial

Hi ... I promised that I would get the tutorial up for my checker box card I posted yesterday which you can find here. Of course I couldn't post the tutorial without also letting you see another card I created using the same technique. For this card here I used my Indian stamps from The Cat's Pajama's. I just adore these stamps.

Here is the inside view of my card.

Now for the tutorial!

Please note ... as I work in metric measurements I will include an approx conversions in brackets ... they are not exact conversions as it isn't essential for this card ... as long as the small measurement is half the size of the other measurement it will work ... eg ... 6 x 12; 5 x 10; 10 x 20 etc.

You need two pieces of card the same size ..... for the Indian card above my card was 13cm (5inches) x 26cm (10inches). You card can be the same color as per the sample above or you can use two different colors as per my Easter card in previous post.


Measure down 6.5cm (2.5inches) at both ends and score & fold at these marks ... as per the above diagram .... if you have changed the size of your card then it is 1/4 of whatever the largest measurement is.
Apply adhesive to the centre portion of one of the pieces of card and then attach to the other so the cards look like the diagram above.
Fold the flaps in to the centre (if you have difficulty folding it trim a little of the edges of the flaps ... not too much) ... and weave the pieces so that one is over and under as per the diagram above.

Decorate your checkerbox card as desired.

Alternative Method:

another way to make the same card ... is to take one piece of card .... in this case 26cm square (10inches) and score & fold as before at 6.5cm (2.5inches) .... use a craft knife or scissors to remove the 4 corner pieces (the pink areas in this diagram above). Weave the flaps closed as previously instructed. This works well when using one color card.

Recipe:
Stamps: The Cat's Pajamas
Paper:
White; Really Rust, Cranberry Crisp & Not Quite Navy - SU

Other: Black Ink; Soft Sky SU Ink; Brown & Rust Grosgrain Ribbon


Friday, February 22, 2008

Easter Checkerbox Card


Here is another card using Hanna Stamps " Springtime" set which is to be released along with "Route 66" on Friday 22nd February. This card uses the baskets and easter eggs that are in this set. The basket with the eggs is an empty basket so it can also be used any time of the year either on its own or with other items in it.

Today's card is a construction type of card ... called a checker box card .... the front flaps are interwoven together .... I shall post a tutorial for this over the weekend.

Here is the inside view of the card.

Recipe:
Stamps: Springtime set - Hanna Stamps; Sentiment - Gina K Designs
Paper: White; Pretty In Pink; Certainly Celery; Regal Rose - SU
Other: Black Ink; Score It Board; White Grosgrain Ribbon.


Thursday, February 21, 2008

More to Route 66

As you know this week I have been showing you cards using the new stamps which will be released on Friday 22nd February by Hanna Stamps. Here is another card for you using some of the accessory stamps in the Route 66 set .... that is the set that has Hanna riding a motorbike. As I have said earlier this is a very versatile set ... as it comes with a fair number of stamps that are great for creating scenes. Of course I couldn't resist making up a mini scene using the lizard/gecko also in this set.

The layout of this card I found on my friend Dawn's blog last week as I really liked the layout I printed it out to use at a later date .... and I felt it would be just right for this lizard scene.

I would have like to have used something different for the sentiment ... maybe a lizard/gecko related word or something ... but as I couldn't think of anything I just went with what I have here.

Recipe: Stamps: Route 66 & Words Hanna would say - Hanna Stamps
Paper: White; Old Olive, Soft Sky, River Rock - SU; DP - K & Company
Other: Black Ink; Creamy Carmel & River Rock SU Ink; Celeste Blue Impress Ink; Circle & Oval Nestabilities; Olive Brads; Foam Tape

A No Flower Sympathy Card!

Wow the week flies by so quickly .... it is hard to believe that it is already time for another challenge with my fab/sassy friends on SCS. This week for our challenge we had to create a sympathy card .... but there was a catch ..... we weren't allowed to use flowers!

Well when I read this challenge I was hoping that my new Gina K Design stamps would arrive before I had to make my card ... luck was with me as they did a few days before so I used the stamps from the "He is Risen" set to create my card.

Now making a sympathy card without using flowers .... isn't too hard ... but the hard part is to remember that when choosing your DP or embellishments that they aren't flowers either ... it would have been so easy to forget ... but I didn't.

The image I used is actually 2 stamps ... the verse & the cross. I first stamped the verse onto my white card using chocolate chip ink ... I inked up the cross, stamped it off once on scrap paper and then stamped it over the verse ... I also used my stamp positioner so that it was in the place I wanted it to be.

Recipe: Stamps: He is Risen set - Gina K Designs
Paper: White; Chocolate Chip & Not Quite Navy - SU; Norwegian Wood DP - Kelly Panacci
Other: Chocolate Chip SU Ink; Brown Brads; Blue Brads; Foam Tape

Wednesday, February 20, 2008

You Make Me Happy!

I am really enjoying playing with the new Gina K Designs stamps! This is another card made from the "Baskets of Happiness" set ... again although it can be an Easter set it certainly isn't limited to Easter. I created this card for this week's sketch challenge over at SCS.

I stamped the flower image onto white card and colored .... I used my paper piercing mat & tool to created the pierced corners in all the corners. I then used my script cuttlebug embossing folder to create the background on my blue panel, the raised areas were highlighted by sponging blue bayou over the top of them. I had to color my grosgrain ribbon to get the color I needed ... this was done using my alcohol markers. The background on my pink card was created using Cornish Heritage Farm's Weave Backgrounder with pretty in pink ink.

The plastic flower outline is another new product from Gina K Designs ... these come as a white color that you can then color using various products ... I used my alcohol markers again.

Recipe:
Stamps: Baskets of Happiness - Gina K Designs; Weave Backgrounder - CHF
Paper: White; Black; Pretty In Pink, Rose Red & Blue Bayou - SU
Other: Black Ink; Blue Bayou SU Ink; White Grosgrain Ribbon; Pink Brads; Script Cuttlebug Embossing Folder; Paper Piercing Mat & Tool; Plastic Flower Outline (Gina K Designs); Foam Tape

Baskets ful of happiness!


I received my Gina K Design stamps this week .... these are my first stamps I received as a member of the Design Team. Of course I have been stalking my postie for the last week hoping they would arrive, so of course I was really happy when I went to see what my postie had just delivered to see these waiting for me to pick up.

I really like these stamps and although they have an Easter theme .... they can be used anytime of the year. Here is the first card I made using these stamps.

Of course I had to get out my nestabilities dies again ... the ovals this time and I stamped the basket onto the white oval and colored the image using my alcohol markers.

I hope to have another card for you tomorrow using the new Gina K stamps.

Recipe:
Stamps:
Baskets of Happiness set - Gina K Designs
Paper: White; Pretty In Pink; Regal Rose & Certainly Celery - SU; Nana's Kids Stack Pack - DCWV
Other: Black Ink; Oval Nestabilites; White Grosgrain Ribbon; Green Brads.

Biker Hanna!


I promised yesterday that I would show you a card using the other new set "Route 66" by Hanna Stamps which will be released this Friday 22nd February. Doesn't Hanna look good on a motorbike! I think this is a very versatile set ... many of the accessories in this set would be just as suitable for a male.

I decided to give Hanna a pink motorbike this time round .... I know there are a few pink bikes around as I checked that online before I started coloring. As I colored the tyres, seat etc using grey I felt a pink & grey color scheme would be good for this one.

The background used here is Cornish Heritage Farm's Scratched Grid stamped in charcoal fluid chalk.

I used my computer to create the sentiment using the Microsoft Word's Word Art option. I got this idea from another of the Hanna Stamps Design Team Members Kendra Wietstock who did a similar thing on one of her cards yesterday ... I need to play around a little more to see the options for this but I think it has many uses .... if you want to find out how to duplicate this idea check out Kendra's blog here. The stop sign is part of the Route 66 set that I stamped and cut out and added to the centre of the sentiment.

Recipe:
Stamps:
Route 66 - Hanna Stamps; Scratched Grid - CHF
Papers: White; Pretty in Pink; Regal Rose - SU; Stormy - Bazzill
Other: Black Ink; Charcoal Fluid Chalk; Jumbo Brads; Foam Tape

Tuesday, February 19, 2008

One Of Those Days & Some Treasure!

treasureIt’s TREASURE HUNT TUESDAY @ RUBBERNECKER. The Treasure, if you find it, will be a free image. However, to receive the Treasure a purchase of any size is required, and your treasure must be claimed between 4:00 am PST until 9:00 pm PST Tuesday (8:00 am EST - 12:00 am EST). Not only is today Treasure Hunt Day, but for every $50 in stamps purchased, you will receive one FREE stamp. You can check out more information on the Rubbernecker Home Page. Go to Sherry's blog, Walkin on the bad side, for your first clue.

While you are on the Rubbernecker Homepage make sure and read about the Rubbernecker Bucks Monthly Drawing AND the FREE stamp offer:

*** Each month you can qualify to win $100 coupon good for Rubbernecker or Stamp Oasis stamps! For every $20 you spend, your name is entered once into a drawing.

*** For every $50 you spend on Rubbernecker, Stamp Oasis or KK Originals stamps, you get to choose a FREE stamp!


We also have some Rubber Buck Gift Certificates to give away as Blog Candy!!! These are redeemable for any stamps in the Rubbernecker, Stamp Oasis or KK Original
sections!


This week's Blog Candy links:
Candy Williams

Jeanne Streiff

Sherry Cheever

Shelly Kuck

and now to my card!

I am sure we have all experienced " one of those days" hehe ... it seems poor Ethel here has .... I am not sure what I problem is but it looks to me she might be waiting for her hubby to come how the way she is holding that frying pan ... ouch!!!!!

This is Beate's weekend sketch challenge .... this time round I decided to flip the sketch. I paper pierced three of the corners of the panel that the main image is stamped on ... the fourth is hidden by the sentiment so I didn't bother with that one. I layered my DP onto a piece of purple card before placing it onto the base card. I used my score it board to create the two rows of score lines at the bottom of the card. The ribbon I used for this was actually white ... I used my alcohol markers to get the color I needed.


Recipe:
Stamps:
Ethel with frying pan & one of these days text - Rubbernecker Stamps
Paper: White; Saqge Shadow - SU; Heather & Pansy - Bazzill; Floral DP - DCWV
Other: Black Ink; Wisteria Fluid Chalk; Paper Piercing Mat & Tool; Score It Board; Oval Punch; White Grosgrain Ribbon; Foam Tape

Hanna and her Rabbits!

I am really enjoying playing with this new Hanna Stamps "Springtime" set. It reminds me so much of the nursery rhyme and fairy tale characters we have all grown up with. In this scene it reminds me of Snow White ... although of course Snow White had black hair!

For this scene I stamp the background first ... that is the grass and sky ... everything but the sky is from the "springtime" set, the clouds are actually from Route 66 which is the other set which will be released on Friday the 22nd February.

To get Hanna so that she appears to be sitting I stamped her on a separate piece of white card and then cut off the bottom of her dress and her legs (ouch!) ... I promise it wasn't really painful for her :) ... doing this it looks like her legs are tucked up under her dress which gives you more options using this set. The rabbits where then stamped and cut out and attached onto Hanna using foam tape.

Come back tomorrow as I will have another Hanna card for you ... this time using Route 66 ... Hanna looks great on a Motorbike!!!!!!


Recipe: Stamps: Springtime & Route 66 - Hanna Stamps
Paper: White; Pretty In Pink & Regal Rose - SU; Floral Stack Pack - DCWV
Other: Black Ink; Green Galore SU Ink; Celeste Blue Impress Ink; Pink Brads; Foam Tape

Sending You Sunshine!


This card is for this week's MFT sketch challenge on the MFT member forums of SCS.

I stamped my scene onto white card and then used my rectangle nestabilities to create the layers for this piece. I used my score it board to create the score lines around the edge of the blue piece on the base of the card. Everything was colored using my alcohol markers including the sand and the sky.


Recipe:
Stamps: By the beach - My Favorite Things
Paper: White; Ballet Blue & Real Red - SU; DP - My Minds Eye
Other: Black Ink; Rectangle Nestabilities; Score It; Foam Tape


Monday, February 18, 2008

Hanna Had A Little Lamb!

Hanna had a little lamb, little lamb, little lamb .... Hanna had a little lamb it's fleece was white as snow. Sorry ... but I just couldn't help myself .... hehe!

The stamps used on this card are from the new Hanna Stamps Springtime set which is to be released this coming Friday 22nd February .... I just love this set ... Hanna reminds me of Little Bo Peep and Mary Had a little Lamb! I had such fun creating the scene in this card.

It is also Monday which means it is time for another CCEE challenge with my goofy friends on SCS, this weeks challenge was to make a card with 18 buttons on it. Wow 18 buttons .... I am not really a big button person when it comes to cards ... I do sometimes use buttons or decorative buttons on my cards ... but never 18. When I first read this challenge I thought what on earth and then remembered that I had a button background stamp and various other button related stamps so I had planned on using those on a card .... and then saying I had more then 18 buttons on my card. However when I was creating this card, I needed to add something else to it to finish it off ... my first thought was brads ... but then I remembered the button brads I got last year and I discovered that I could fit 6 on either side of the sentiment ... which made 12 buttons so I only needed to find a place to put 6 more ... I can do that! So I decided to add the photo corners to the top corners of my card and add the button brads there. Yeah I did it .... 18 buttons yah!

Yes I know button brads aren't real buttons .... but they are still button related so I figure that is close enough LOL! My friend Cindy who set this challenge will no doubt have something to say .... but as she has pulled some fast ones in these challenges in the past she won't be able to say too much hehe!!!!

I stamped Hanna onto the white card and masked it to create the scene .... I also stamp the dress onto the floral DP and paper pieced this onto card.

Recipe:
Stamps: Springtime Set & Things Hanna Would Say - Hanna Stamps
Paper: White; Black; Lavendar Lace & Sun Yellow - SU; DP - ?
Other: Black Ink; Old Olive SU Ink; Celeste Blue Impress Ink; Photo Corner Punch; Oval Punch; Word Window Punch; Button Brads

Sunday, February 17, 2008

A Pyramid Card

Hi everyone ... my card today is a pyramid card. These are fun and are fairly simple to make once you know how. I have included a few different angles of this card today ... the front on photo above and then 2 photos of it side on which you can see below.


Ok so how are these made, you will need:
2 pieces of card 10.5cm square (4inches) color 1
1 piece of card 10.5cm square (4 inches) color 2

1. Fold all pieces of card in half to create a triangle .... unfold.

2. Postition the 2 pieces of card that are the same color side by side as per the diagram below so that the fold starts from the centre (where the two cards meet) out towards the lower outside edges.

3. Place the 3rd piece of card (the different colored piece) so that the fold runs along the join of the previous 2 pieces. Adhere this piece so that the right side is over the square on the right and the left side is under the square on the left ... see diagram below.

4. Cut a slit as indicated this is so that when the card is folded in upright position the card remains closed (this is optional)

5. Decorate your pyramid card as desired.
Recipe:
Stamps: Bee - Stampendous
Paper: Lavendar Lace & Elegant Eggplant - SU; White; Floral Stack Pack - DCWV
Other: Black Ink; Circle Nestabilities; Purple Brads; White Gel Pen; Foam Tape

Saturday, February 16, 2008

Cupcakes .....Yum!!

It has been a little challenging getting my sketch card made today for Beate's weekend sketch challenge. My DH is busy putting the door on my stamp cupboard he made me some time back and a lot of the things I needed were in that cupboard is it has been a case of everytime he goes out for something to quickly grab something else I needed ... and of course I don't know at the start exactly what I will need as it is a work in progress ... hehe! But I finally did get it done and even the photo taken which was another problem as his tools and some of my stuff was on the table I take my photos!

I really enjoyed this sketch today .... and I got to use some of my au chocolat DP that I haven't used for soooo long. I think my card is pretty much self explanatory ... in case you can't see in the photo I did add 3 rows of paper piercing to the bottom of the card.

Recipe:
Stamps: Tiers of Treats - Stampendous; Sentiment - Eat Cake Graphics
Paper: White; Pretty in Pink, Chocolate Chip & Au Chocolat DP - SU
Other: Black Ink; Pretty In Pink SU Ink; Oval Punch; Paper Piercing Mat & Tool; Brown Brads; Pink Polka Dot Grosgrain Ribbon; Foam Tape

Friday, February 15, 2008

Perfect Package!

Today is my turn to host a challenge over at the Hanna Stamps members forum on SCS ... you are welcome to come and play too if you like!

My challenge is a sketch challenge .... you all know I enjoy doing sketch challenges. I used my rectangle nestabilites to do the scallop layers for both the image and the sentiment ... to get the size I needed for the sentiment, I actually cut out 3 scallop rectangles and joined them ... this is a great way of getting more out of your nestabilities.

Recipe: Stamps: Gift Giving Hanna Set - Hanna Stamps
Paper: White; Cool Caribbean, Real Red & Green Galore - SU; DP
Other: Black Ink; Rectangle Nestabilities; Foam Tape

Thursday, February 14, 2008

Floral Calendar


Hi, it is time for another challenge with my fab/sassy friends ... this week our challenge was to create anything but a card. As I got some of these tiny calendars of a friend last week I thought i would create a calendar for my challenge. I actually created this calendar a couple of days ago ... it is was this that inspired me to make the card I created yesterday for the sketch challenge.

These are pretty easy to create ... here is what I did.

1. Start with your cardstock at 17cm x 21cm

2. Fold this in half so it measures 17cm x 10.5cm

3. Measure up 3cm from the bottom edge of the card and fold towards the centre (do this on the front and back.

4. Decorate the top portion of the front of your card ... I just used my kindness rollagraph wheel in black and colored the flowers using my white gel pen. The large flower is from Boho Blossoms and is also stamped in black.

5. Attach the calendar to the left side and the flower to the right side.

6. Apply some tape to one of the bottom pieces and tape these together to create the stand.

Recipe:
Stamps:
Boho Blossoms - MFT; Kindness Wheel - SU
Paper: White; Rose Red - SU
Other: Black Ink; Calendar; Deco Brad; White Gel Pen

Wednesday, February 13, 2008

Boho Blossom

Hi .... well it is Wednesday again so time for another sketch challenge on SCS. I didn't take me long to decide what I was going to do ... and this card was inspired by a project which I created yesterday which I will be uploading to my blog tomorrow for another challenge.

I started by stamping the flower from boho blossoms twice ontoo white card using black ink and then cut them out, curled the leaves and layered them onto my white panel using a brad. I stamped the floral background from behind the scenes onto the rose red card and colored the flowers and dots using a white gel pen. These two panels were then attached to the cool caribbean panel .... I paper pierced the top right and bottom left corners of this panel and also added the hardware.

To finish I stamped "friendship" all around the rose red panel using rose red ink and then assembled the card.

Recipe:
Stamps: Boho Blossoms & Behind the Scenes - My Favorite Things
Paper: White; Black; Rose Red & Cool Caribbean - SU
Other: Black Ink; Age Paper Distress Ink; Cool Caribbean & Rose Red SU Ink; Paper Piercing Mat & Tool; White Gel Pen; Hodgepodge Hardware; Deco Brad; Foam Tape

Tuesday, February 12, 2008

Fashion Fades and some Treasure!

Today's card was created using stamps from Rubbernecker Stamps .... this one is Jessica!

I stamped the image and sentiment onto white card and then layered them to black & rose red card. I used my script cuttlebug embossing folder to create the texture on the river rock piece and once I had emboss this I went over the raised areas of my card using old olive SU ink ... but I made sure I rubbed most of my ink of my sponging block first so that the color wouldn't be too strong.

I felt this one needed a large prima flower which I added to the lower left side of my card.

Ahoy ye mateys!

It’s TREASURE HUNT TUESDAY @ RUBBERNECKER. The Treasure if you find it, will be a free image. However, to receive the Treasure a purchase of any size is required, and your treasure must be claimed between 5:00 am PST until 9:00 pm PST today (8:00 am EST - 12:00 am EST). Not only is today Treasure Hunt Day, but for every $50 in stamps purchased, you will receive one FREE stamp. You can check out more information on the Rubbernecker Home Page.

While you are on the Rubbernecker Homepage make sure and read about the Rubber Bucks Monthly Drawing AND the FREE stamp offer:

*** Each month you can qualify to win $100 coupon good for Rubbernecker or Stamp Oasis stamps! For every $20 you spend, your name is entered once into a drawing.

*** For every $50 you spend on Rubbernecker, Stamp Oasis or KK Originals stamps, you get to choose a FREE stamp!

Recipe:
Stamps: Jessica & Fashion Fades Text - Rubbernecker Stamps
Paper: White, Black, River Rock & Rose Red - SU
Other: Black Ink; Old Olive SU Ink; Script Cuttlebug Embossing Folder; Prima Flower; Black Brad; Foam Tape.