Hi Crafty Friends,
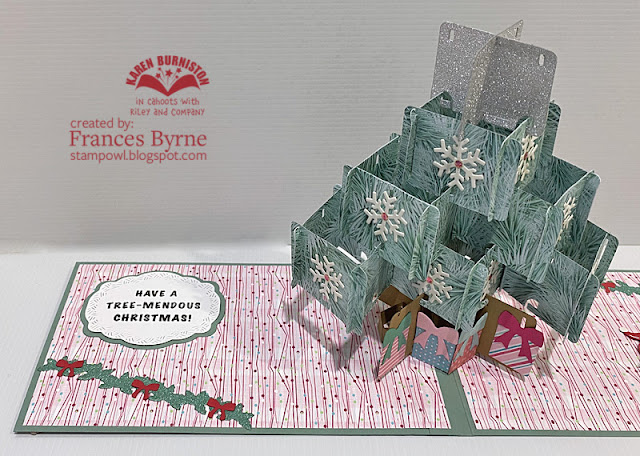
Today I am sharing two Christmas themed cards I created recently using dies from Karen Burniston. I started out making the Christmas tree using some patterned paper from Crafter's Companion, and then I found another paper this time with the pine needles/branches on it which I liked even better so had to turn that into a tree too. Hence I have two cards which are similar but different.
This is my first Christmas card for 2023, I don't normally make them this early but I thought it would be fun to make these to celebrate "Christmas in July".
Here is a quick video to see my cards in action.
When the members of Karen Burniston's Design Team where making their sample cards for the June release using the House of Cards die set, it made me think it would work to create a Christmas tree if assembled a certain way. So of course, then I had to make one.
For my card, I started with the base with the 4 card "X" which is for the trunk. Next I created a row of 3 square; the next row 2 squares and finally one square for the top of the tree. I finished off the tree by adding a "star" which is the single "X" suing the smaller card die set included in the set.
NB: Because I added the extra row (the star) to my card, this measures I had to make the width of my card longer to all for the tree to fit within the card when closed. So my card is 5 inches x 8 inches instead of the 7 inches I did for the last card using the House of Cards die set.
To make it look more like a Christmas tree, I added present to the base using the Big Birthday Charms die set.
I added snowflakes to the fronts of some of the tree squares using the Holiday Charms die set.
For the sentiment I used one from a Made To Surprise Christmas sentiment stamp set, I really wanted something tree related. The sentiment is layered using the Rectangles and Labels - Crosshatch die set.
As you can see, I added a blank label to the lower right hand corner for a place to be able to write a personal greeting.
I also added a Santa, using the Gnome and Santa die set.
The garland on the top right and bottom left corners of the card were created using the Fireplace Add-ons 1 die set.
I kept the front of the card fairly simple and flat, I normally would add. foam tape under most of these images, but as the focus was on the tree on the inside and I wanted the card to be even when open, I resisted that urge.
I added the Merry Christmas and Merry Christmas Shadow, layering this to the card using the rectangles from the Rectangles and Labels - Crosshatch die set.
To finish off the front of the card I added two more presents from the Big Birthday charms, this time keeping them solid card rather than patterned paper, seeing they were going onto a busy background.
This is my second card, this time using the patterned paper from Crafter's Companion. The inside is pretty much the same as the first one except for the pattern paper. Deciding which patterned paper to use for this card was probably the hardest part of making these cards LOL!
And here is the front of my second card. I had some left over patterned paper that I used for the tree (which I didn't for the first card), With the first card, I turned the patterned paper in a opposite direction to the one on the very base of the card. As I couldn't do this with a plaid pattern without it looking the same, I opted for the tree paper instead which I liked on this one. Other than that everything is again the same.


2 comments:
Wow - what a surprise when the cards are opened
What a great idea! It really does look like a pop up Christmas tree!
Post a Comment