Thursday, September 14, 2023

Hocus Pocus


Hi Crafty Friends,

Today I am sharing another sneak peek of some of the new dies being released by Karen Burniston on Monday 25th September. For my card today I am sharing 4 of the new dies being released.


Here is a quick video to see my card in action.


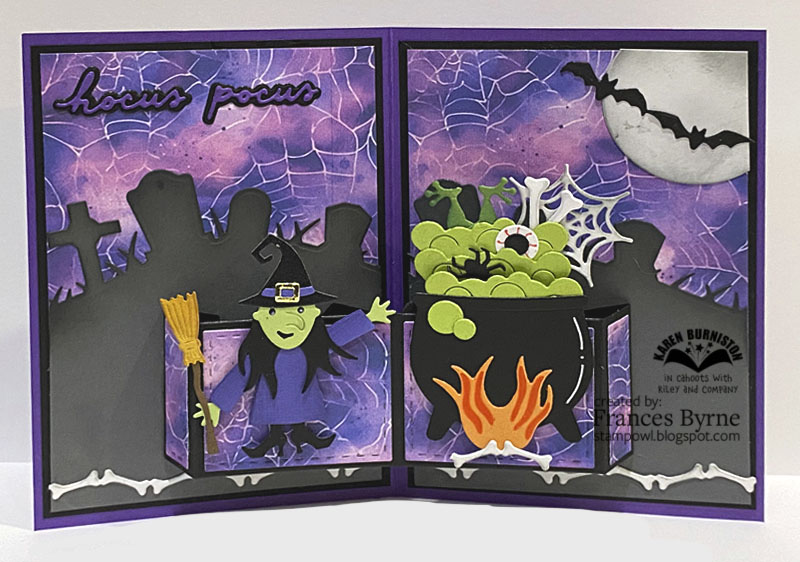
As you can see, I have created a Halloween themed pop-up. For the pop-up portion of my card, I used the pop-up mechanism from the Stocking Pop-up Card die set. I placed the pop-up towards the bottom of my card, so I could add the tomb stones from the Halloween Scene die set. Along the bottom of the card I added the bones border which is from the new Halloween Borders die set.

The Witch and cauldron are from the new Witch and Cauldron die set, the bubbles and the items in the cauldron pop-up when the card is opened.

I die cut a circle for the moon, which I added to the top right hand corner of the card. I added two of the bats using the bat border which is also from the Halloween Borders die set.

I added the "Hocus Pocus" sentiment to the top left hand corner of the card, which is from the Small Script - Halloween die set.


For the front of the card, I added the Tombstone border from the Halloween Scenes die set, adding the bone border along the bottom of the card.

I added the witch to the top of the card, styling the witch so she was flying on a broom stick. I added three bats which I cut apart from the bat border around the witch.

Finally I added the Happy Halloween sentiment which is also from the Small Script - Halloween die set.


Wednesday, September 13, 2023

Candy Cane Christmas


Hi Crafty Friends,

Today I am sharing a Christmas card using three of the new dies that are being released by Karen Burniston on Monday, 25th September.


Two of the new die sets being released this time round, are Christmas border die sets. I used the Candy Cane Border from the Christmas Border 2 die set to create my card today. I used the two larger rectangles from the Crosshatch - Rectangles & Labels die set for the layers. I then die cut three of the Candy Cane Borders and placed them evenly spaced apart on my card.

For the "Merry Christmas" I used the new Small Script Christmas die set.

To finish off the front of my card, I added gold peel off sticker lines between each row.


I was going to keep the inside of my card, simple ... but who can resist a pop-up when you open a card. 

I again used the Crosshatch - Rectangles and Labels for the layers on my inside panel. I also added two more Candy Cane Borders to the top and bottom of the white rectangle panel.


Next I pulled out the Christmas Stocking from the new Stocking Pop-up die set using just the stocking and Candy Canes from this set as a stand alone die. To get the stocking to pop up, I used the Small Scenes Bam Box Pop-up die set. I used the small bam box in the Small Scenes Bam Box die set to enable the stocking to pop-up when the card is opened. I positioned the bam box and stocking so that the stocking lay in the space that didn't have anything in it.

To finish off the card, I added another of the Christmas sentiments, included in the Small Script Christmas die set.


Here is another look at the inside of the card, so you can see the panel a little better.


Tuesday, September 12, 2023

Holly Jolly Christmas


Hi Crafty Friends,

Today I am excited to share my first sneak peek of the new dies being released by Karen Burniston on Monday 25th September. This time round there will be 9 dies being released which include dies for Christmas and Halloween and some dies for any occasion.


Here is a quick video to see my card in action.


For my card today I created a Christmas card using three of the new die sets ... first up the Stocking Pop-up die set, the pop-up mechanism in this die set can be used as intended with the Christmas Stocking or with lots of other fun dies. I also used the Christmas Borders 1 die set and the Small Script Christmas die set

I used the largest die included in the Crosshatch - Rectangles and Labels die set to die cut the patterned paper and the white borders on the side.


I kept the front of my card simple, as the focus of this card is on the inside of the card. I used the Merry Christmas and Merry Christmas Shadow die sets for the sentiment. I also added the Christmas tree using the Christmas Trees Pop Stand die set. I added some ornaments to the tree using circles die cut using a die included in the Oven Pop-up die set which is another new die being released.


Monday, September 11, 2023

Plant Your Dreams


Hi Crafty Friends,

Thanks for stopping by my blog, today I am sharing a garden themed Slimline card I created recently.

This Slimline card measures 4 inches x 9 inches, I made it larger than most of the other Slimline cards I make as I wanted the extra space for the window and garden scene.

I used my MFT Stamps English Brick Wall Stencil to add the brick background to my card. I then used two of the grass borders from the Lawn Fawn Grassy Hillside Borders to add the grass along the bottom of the card.

For the Window I used Creative Craft Products' In The Windows Double Aperture die set to add the window to the top portion of my card.

For the garden scene I used the Adventures In Ink Love Grows stamp set. I also used one of the notched square die from Creative Craft Products Nesting Squares Notched Edges die set.


For the inside of the card, I added two plants and a sentiment from the Adventures in Ink Love Grows stamp set.


Friday, September 8, 2023

It's A Special Time


Hi Craft Friends,

A couple of months ago, Craft Stash re-released a few of Paper Discovery's "Statement Pieces" dies. While they were available, I purchased a few I didn't have already to add to my stash.

One of those die sets was the Time on Your Hands die set which includes dies to create a large clock or a pocket watch. So for my card today, I used this die set to make a clock shaped card.

I die cut the main clock die from cream cardstock and then used pink ink to stencil colour to the stencilled area of the die.


Here is a look at my card from the side. 

I used the cogs included in the die set to die cut from gold cardstock to add to the cut out area of the card. 

The hands of the clock move so you can change the time of the clock.

I used a stamp from Made To Surprise by Sam Calcott to add the sentiment to the card.


For the inside of the card, I added another sentiment from the Time Stamp set from Made To Surprise. I added the It's Your Birthday sentiment which is from another stamp set from Made To Surprise.

I also added three more gold cogs to the top of my sentiment.


Thursday, September 7, 2023

Santa and Rudolph


Hi Crafty Friends,

Every year, I try to get a stamp or die set which I can use to make some special Christmas tags to use on some of my Christmas presents I am giving to family and friends. This year Creative Craft Products released their Sweet Christmas Collection which consists of 6 different Christmas characters which make a fun chocolate holder. I thought these would work perfectly for gift tags. 

Today I am sharing 6 'gift tags' I created using the Santa Himself and Rudolph the Reindeer die sets. I plan to make more later with the other 4 characters which I have included in the supply list below.


Here you can see the front and back of one of the Santa tags I created. The hole in the belly holds a round chocolate.

I added the stamps "to & from" to the back of the tag so I can add the name of whoever's present it is attached to.


Here is a look at all three of the Santa gift tags I made which are all ready to be placed on a present.


Here is a look at the front and back of one of the Rudolph the Reindeer gift tags I made. I am really happy how these turned out.


And finally, all three of the reindeer gift tags.


Wednesday, September 6, 2023

Just for You


Hi Crafty Friends,

Today I am sharing a Mini Slimline card I created recently.

I used Mini Slimline dies from Divinity Designs to die cut all the layers and card base for this card.

To decorate my card I used Concord & 9th's Weekend Market die set. 


I kept the inside of this card simple, just adding a few layers and a stamped sentiment.


Tuesday, September 5, 2023

September 2023 Karen Burniston Designer Challenge


 Hi Crafty Friends, 

Welcome to our September Karen Burniston Designer Challenge.

Check out Karen Burniston's blog on Wednesday (US Time) when you will be able to see what all the designers created for the challenge this month, plus Karen will have an amazing video tutorial to share with us all.

Our challenge theme this month is ... "HOLIDAY HOUSE" - use the Holiday House die for a card for any holiday.


For my card today, I opted to use the Holiday House die set to make a Christmas card with a gingerbread theme.

I used partial die cutting on the two main house panels of the Holiday House die set, to extend the height, so that they were bigger than the house panel which is in the centre of my gingerbread house. I used the candy canes and peppermints from the Gingerbread Tiny House Add-ons die set to embellish the gingerbread house.

I used the pop-up die from the Explosion Pop-up die set to pop up the gingerbread house. I used a light blue card for my card base and then blended Distress Oxide inks in Broken China, Faded Jeans & Prize Ribbon to create the sky background. I die cut a panel of white glitter card using the pop-up die to add to the card base to resemble snow.

The snowflakes and gingerbread men are from the Winter Charms die set.


I die cut a long strip of white glitter cardstock, using the Long Nature Edges 2 die set, it's hard to see this in the photos, but easy in real life as it has stitching and is popped up using foam tape. I also used the die to add the snow border along the back panel of my card.

The trees on the back panel are the centre portion of one of the tree dies from the Christmas Trees Pop Stand die set.

I added ovals using the Ovals Crosshatch die set for a place to add my stamped sentiment.


I kept the front of my card fairly simple, as the focus of this card is on the inside of the card.

I used the rectangle dies from the Rectangles and Labels die set to create the two rectangle panels on the front. The blue background was created the same way as the one on the inside of my card.

For the sentiment I used the Merry Christmas and Merry Christmas Shadow die sets.

To finish off my card, I added a few snowflakes and two gingerbread men.


Monday, September 4, 2023

Birthday Love


Hi Crafty Friends,

September down here in Australia is Spring, so today I am sharing a fun spring themed card using stamps and dies from Made To Surprise by Sam Calcott.


A while ago I purchased two of the Made To Surprise by Sam Calcott's Twist & Pop die sets from her Twist & Pop Collection. Not only do you get the dies to create a Twist & Pop style card, but you also get heaps of decorative dies to help decorate your card. 

For my card today I used the 6" x 6" Garden Delights Twist & Pop Card die set which includes the dies to create the card base, twist & pop mechanism and garden themed dies. After assembling my card, I then decorated my card using the garden themed dies included in the set.

For the birthday sentiment I used one of the sentiment dies included in the Textures Wildflower Collection Sentiments die set.


I kept the front of the card fairly simple, adding some blue cardstock for the sky and grass along the bottom of the card. I added more of the garden themed dies to the card. To finish off the front of the card, I added a birthday sentiment to the top right corner of the card.


Here you can see my card beginning to close. The twist panel is concertinaing together ready to twist towards the front of the card. 


Friday, September 1, 2023

A Crackin' Christmas


Hi Crafty Friends,

According to the Days of the Year website, tomorrow (2nd September} is World Beard Day!

I figured gnomes have beards, so I pulled out a gnome Christmas stamp set to make a Christmas card. This fun gnome is from the Nutcracker Gnome stamp set from Woodware Stamps.


For my card today I created a trifold card, using Made To Surprise by Sam Calcott's 6 x 6 Trifold Card from the Showstopper Collection.

I added a snowflake wax seal to the lower right side of the oval sentiment panel using a snowflake wax seal I purchased from Amazon. I also created some wax embellishments to use around the nutcracker gnome.


I added a panel to the back of the card, so that I could use another of the sentiments included in the Nutcracker Gnome stamp set and also have a place to write a personal greeting. I added a few green snowflakes which match the colour of the snowflakes on the pattern paper I used on the front of the card.