Tuesday, November 14, 2023

Swinging By


Hi Crafty Friends,

Today I am sharing a fun kinetic birthday card I created recently.

This card uses Made to Surprise by Sam Calcott's Swing Card die set, I have been after this die set for a while and it finally came back in stock so of course I grabbed it. 

I used Daisy Mae Designs Let's Get This Party Started stamp set for the image, I love how she swings from the ceiling and so perfect to use with this die set.


Here is a quick video to see my card in action.


Here is a side view of my card, so you can see the base of the card a little better.

I also added balloons to the left side of the card which are from My Creative Life.


On the back of the card, I added a panel for a place to add a sentiment and personal greeting.

The sentiment used on here is from Creative Craft Products "Funny Sentiments" stamp set. I have been wanting to use this sentiment for a while, and I finally found the perfect image to use it with.


Monday, November 13, 2023

Noel


Hi Crafty Friends,

Today I am sharing a Nativity themed card I have created using stamps from Daisy Mae Designs.


For my card base I created a Stepper Card using Creative Craft Products 4 Stepper Card die set from their Step On Up Collection. 

I used Daisy Mae Design's  No Room At This Inn stamp set to added the Nativity images to the card.

The "NOEL" is die cut using Lawn Fawn's Oliver's Stitched ABC's die set.

I added a glittered star above the manger image.


For the front of the card, I added Daisy Mae Design's While Shepherds Watched stamp set.


I added a white panel on the back of my card, as a place to add a sentiment and write a personal sentiment. The sentiment is from Divinity Designs.


Friday, November 10, 2023

Latte Christmas Wishes


Hi Crafty Friends,

Today I am sharing another Coffee themed Christmas card I created for the I created for the Fall/Winter Coffee Lovers Blog Hop.

I have used the Made To Surprise by Sam Calcott's Double Interlocking Concertina die set from the new Showstoppers 2 Collection. I am looking forward to exploring the different ways to use this die set.


To decorate my card, I used Spellbinders Merry Mugs and Festive Ornaments die sets from the Merry Mug & Circle Crew Collection.

On the left side of the card, I added the letters "LATTE" using Made To Surprise's Chunky Uppercase Alphabet and Numbers die set. I also added snow flakes to the empty squares, which is also included in the Merry Mugs die set.

To finish off the sentiment I added the "Christmas Wishes" sentiment which is from Chloe's Creative Cards Gingerbread Sentiments stamp set.


I decorate the panels which can be seen when the card is closed. This can fit into a 5 1/2 inch square envelope.


Here is a look at my card, from the back. I added another panel to the back for a place to add a sentiment and a personal greeting. The sentiment is digital stamp I got from Verve Stamps some years ago.


Thursday, November 9, 2023

Snowman Hugs


Hi Crafty Friends,

Welcome to my blog. For my card today I have created a Triple Oval Accordion card, using Made To Surprise by Sam Calcott's Triple Oval Accordion die set from her Showstoppers 2 Collection.

To decorate my card, I used Spellbinders/Stampendous' Snowman Hugs die set and coordinating stamp set. 


As I had some of the patterned paper I used on the front leftover, I added some to the two outer oval panels to add some interest to the card. One of these panels can be seen when the card is closed, so I thought this would make it look a little more attractive.

For the centre oval I added a Christmas sentiment from the Christmas Sentiments die set from Made to Surprise.

As you can see, I also added another large snowman to the panel on the right, this is the panel which will be on the top when the card is closed.


Here is a look at my card when it is closed ready to fit into an envelope. I kept this fairly simple as the focus of this card is when it is opened.


Wednesday, November 8, 2023

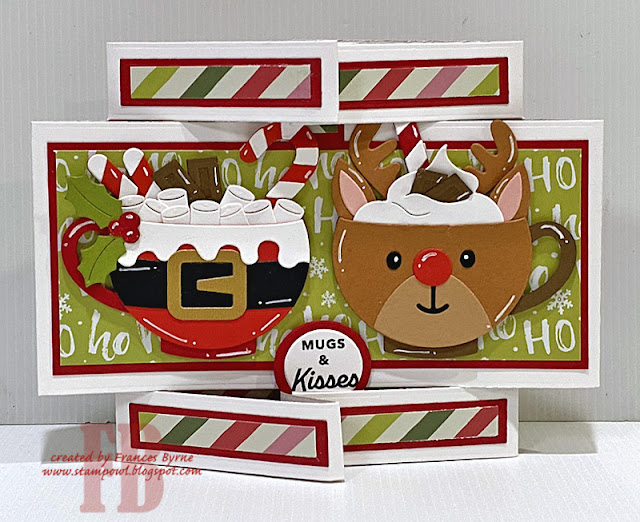
Mugs & Kisses


Hi Crafty Friends,

Today I am sharing a Christmas Coffee themed card I created for the Fall/Winter Coffee Lovers Blog Hop. The hop started on Friday 3rd November and goes until Friday 11th November.


As I had recently purchased the new Spellbinders Merry Mug & Circle Crew Collection, I decided to pull those out to use on my card today. I used the Merry Mug die set to create all of the mugs and the fillings for my coffee cups. I used the Festive Ornaments die set to decorate the Santa mug, and the Santa's Festive Circle Crew die set for the reindeer mug.

For the card, I created an Inside Out Stepper Card using  Creative Craft Products High Centre Stepper Card from the Step on Up 2 Collection. Sam Calcott, shared a tutorial on this style of card a few months ago, you can see her tutorial here


Here is another view of the front of the card, with the side flaps extended so you could see how I decorated the sides as well as the front.

The "Mugs & Kisses" sentiment is from Spellbinders Santa's Sippin' Sayings stamp set.


For the back of my card, I decorated all panels again, using the dies included in the High Centre Stepper Card die set. I die cut two more coffee mugs which I added to each side of the card.

For the centre of the card I added another sentiment using Spellbinders Santa's Sippin' Sayings stamp set.


Tuesday, November 7, 2023

November 2023 Karen Burniston Designer Challenge


 Hi Crafty Friends, 

Welcome to our November Karen Burniston Designer Challenge.

Check out Karen Burniston's blog on Wednesday (US Time) when you will be able to see what all the designers created for the challenge this month, plus Karen will have an amazing video tutorial to share with us all.

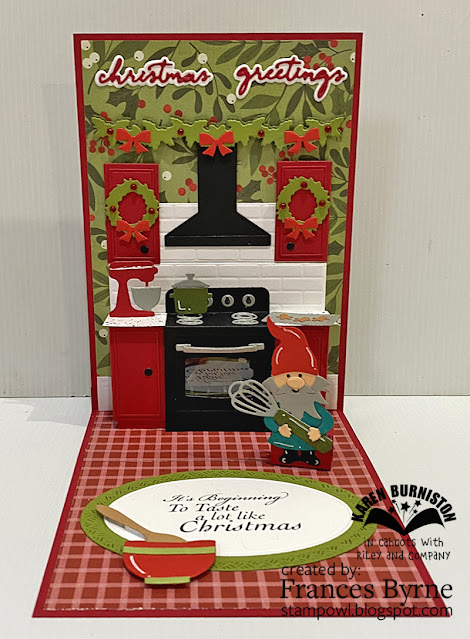
Our challenge theme this month is ... "WHAT'S COOKING?" - Use the Oven pop-up for a card of any theme.


For my card today I decided to make a 5 x 7 inch card, my last card I made using the Oven Pop-up card I made another 5 x 7 inch card which was a landscape version. This time I made a portrait style card.

As you can see I went with a Christmas theme for my card, using the traditional red and green colour combo. I die cut the oven from the Oven Pop-up die from black cardstock to make a black oven. 


The oven door opens to reveal a turkey that is cooking in the oven. For the turkey, mixer and pot on the stove I used the Oven Extras die set. The gingerbread men & tray are also from the Oven Pop-up die set.

I doubled up the white tiled backsplash which is also from the Oven Extras die set and then added my red cupboards and the range hood to the card.

I added the Christmas wreath and garland using the Street Lantern Pop-up (wreath) and the Fireplace Extras 1 die sets.

I used the Small Script Christmas die set to add the Christmas Greetings sentiment at the top of the card.


I added the gnome to the card using the Gnome and Santa die set, I added the whisk to the gnome using the Baking Charms die set. The gnome is attached to a small bam box from the Small Scenes Pop-up Bam Box die set.

I computer generated the sentiment on the oval panels which are die cut using the Ovals - Crosshatch die sets.

Finally I added the bowl and wooden spoon, also from the Baking Charms die set.


As the focus of this card is on the inside, I kept the front of the card fairly simple.

I added the sentiment using the Merry Christmas and Merry Christmas Shadow die sets.

I also added another gnome from the Gnome and Santa die set. The whisk, bowl and wooden spoon are from the Baking Charms die set.


Monday, November 6, 2023

Butterflies & Flowers


Hi Crafty Friends,

Today I have birthday card to share with you.

My card uses Crafter's Companion's Curved Border Edge'ables - Ditsy Butterflies die set. This die is designed to cut through two layers of cardstock, which is what I have done for this card. I placed the border die along the right edge of my card and die cut the two together. 

On the left side of the card I added a panel of patterned paper. 

I added the "Happy Birthday" sentiment from Waffle Flower Crafts which is hot foiled using black foil.

I added a butterfly to the card, using Made To Surprise by Sam Calcott's Butterflies Galore stamp/die set.


For the inside of the card I added a sentiment using Creative Craft Products Perfect Sentiments stamp set. 


Friday, November 3, 2023

Christmas Kids


Hi Crafty Friends,

A couple of weeks ago, I shared a birthday card which I created using the Kissing Frog technique. I enjoyed making it so much that I decided to make a Christmas version of the card. You can find a tutorial on this style of card on Sam Calcott's Youtube channel here.


To decorate my card I used Waffle Flower Crafts' Under the Tree stamp set. 


Here is the overhead shot of my card, it's a little bit harder to see in the single version of the card, but if you make a double it definitely does look like two fish or frogs kissing.


Here is a look at the back of my card. I made one panel white, so that I could add a stamped sentiment and have a place to write a personal greeting.


Thursday, November 2, 2023

Floral Thinking of You


Hi Crafty Friends,

Today I am sharing a floral 5 x 7 get well card I created recently.

For this card, I pulled out the floral Betterpress plate that is included in the Spellbinders Betterpress system. I positioned it onto my Betterpress cardstock so that I could press two of the floral images onto my card. There is a slight gap between the two flowers.

I used Creative Craft Products Notched Rectangles die set to die cut the floral panel and the green layering panel.

For the background panel of my card, I used Made To Surprise by Sam Calcott's Linen Embossing Folder.

I used the "thinking of you" sentiment from Picket Fence Studios' Ways To Say Get Well stamp set to and the sentiment panel in the centre of the card.


I used two sentiments from Simon Says Stamps' Healing Hugs stamp set, to add the sentiments to the inside of the card.


Other Supplies:

  • Ways To Say Get Well Stamp Sets- Picket Fence Studios