Tuesday, May 6, 2025

May 2025 Karen Burniston Designer Challenge


Hi Crafty Friends,

Welcome to our May Karen Burniston Designer Challenge.

Check out Karen Burniston's blog on Wednesday (US Time) when you will be able to see what all the designers created for the challenge this month, plus Karen will have an amazing video tutorial to share with us all.


Our challenge theme this month is ... "MAKE IT FLUFFY" - You decide what's fluffy - is it an animal? Clouds? Something in the Kitchen? Incorporate something fluffy into your design.


When I started thinking about what could be classed as fluffy, I decided to go with cupcakes ... you have the yummy fluffy batter the cupcakes are made from and of course the frosting! For the cupcakes I used the Cupcake Add-Ons die set. 

For the pop-up mechanism, I used the Triple Platform Pop-up die set. I used the labels that came in the die set to add to each of the platform panels, plus one for a signature. I also added a cupcake themed sentiment using the Sweet Treats Clear Stamp set.


I also added the "You're Sweet!" sentiment to the lower left hand corner of the card.

As the focus of the card is the inside, I kept the front of my card simple. Adding two sentiments to the oval panels which were die cut using the Crosshatch Ovals die set. and then adding two more cupcakes.

The Sentiments are from the Sweet Treats and the Birthday/Belated Clear Stamp sets.


Monday, May 5, 2025

Open Me For A Smile


Hi Crafty Friends, 

Today I am sharing another card using a few of the club kits from Spellbinders April 2025 Club Kits.

For the front of the card I used the Glimmer of the Month - Scattered Letters. I glimmered this piece twice on a 5 x 7 piece of white cardstock using black glimmer foil, I decorated the panel using the tulips & envelopes from the Large Die of the Month - Lock & Key Mailbox. 

The sentiment is from the Betterpress of the Month - Post Edges Expressions. 

For the card base I used a die from the 5 x 7 inch Diamond Fold Die set by Creative Craft Products/Craft Stash. I die add a layer between the patterned paper and base of the card which was fairly simple to do, even with the odd shape.


For the inside of the card I added a rectangle panel that I decorated using the script Betterpress plate included in the  Post Edges Expressions Betterpress set, which I repeated 4 times to cover the whole panel.
I added the odd shape panel over the top of this using the die used on the front, along the bottom I used the negative foiled piece using the left over foil from foiling the front panel. I also added another sentiment also from the Betterpress set. 


K


Friday, May 2, 2025

Wishing You A Day As Sweet As This Letter


Hi Crafty Friends,
Thanks for visiting my blog. Today I am sharing a 5 x 7 card I created using some of the club kits from Spellbinders April 2025 Caboodle Club kit. 

I was lucky for my parcel to arrive the afternoon before Good Friday, so I had an interrupted few days to create!

For this card I used the Lock & Key Mailbox from the April Large Die of the Month. I love all the details included in this set, which includes the large mailbox, letters & the tulips. 

For the background & the sentiment I used the Betterpress Kit of the Month. I betterpressed the word script four times on my background panel.


For the inside of this card I used the postage frame which is also included in the April Betterpress club. I added two sentiments inside the frame using the April Clear Stamp of the Month.

The snail mailman is from the April Small Doe of the Month.


Wednesday, April 30, 2025

Rebus - Creedence Clearwater Revival Songs


Hi Crafty Friends,

It's time to share another rebus swap with you. This month the theme is "Songs by Creedence Clearwater Revival"

If you would like to solve my rebus puzzle, why not post a comment on my blog post with your answers. I will let you know what the correct answers are next time I post a rebus card here.

How did you go solving my March Rebus which was "Famous Names from the Wild West either real or fictional"

 Here are the correct answers so you can check how you did.

  1. Wild Bill Hickox
  2. Sundance Kid
  3. Lone Ranger
  4. Black Bart
  5. Belle Starr
  6. Matt Dillon
  7. Doc Holliday


You can find all my past Rebus Cards here.


Monday, April 28, 2025

Mother's Day Flowers

Hi Crafty Friends,

Welcome to my blog! Today I am sharing a 5 x 7 Mother’s Day card I created using the March 2025 3D Embossing Folder of the Month. 

This is such a beautiful embossing folder. I have been wanting to try the blackout technique for some time, so I decided to do it for my card today. For this technique, after embossing the card panel, you colour the design on the back side and then rub black ink all over the design.

I layered the design onto a 5 x 7 card base, layering using various rectangle dies including the filigree rectangle from Craft Stash.

I added a sentiment using the Mother’s Day sentiment from the Let’s Celebrate Sentiments Betterpress plate which I foiled using black foil. The sentiment is actually the negative design created by using the leftover foil & a solid foil plate.


For the inside of the card, I added a stripe of the leftover embossed design used on the front of my card.

I added two sentiments, the first from the We Are All Family Glimmer Hot Foil Plate. The second from the Sending Love Betterpress Plate which is also glimmer foiled using black foil,

K


Friday, April 25, 2025

A Note Just For You


Hi Crafty Friends, 

Today I am sharing an Easel card I created using some of the club kits from Spellbinders April Club Kits. 

The snail, letterbox & tulips are from the Small Die of the month, Snail Mail Post. On the blue background I used the Embossing Folder of the Month, Perforated Post Edges.

I added to Betterpress sentiments to the card which is from the Post Edges Expressions the Betterpress kit of the month. 


The “hello” sentiment is from the large die of the month. 


Wednesday, April 23, 2025

Hey There, How Are You?


Hi Crafty Friends,

Today I created a 5 x 7 postal themed card using postal themed products from The Ton.

I used the Postage Party die set & the Postage Simple Sunflowers Layering Stencils. I used Spellbinders Lush Leaves Embossing Folder to add texture to my card background.

The sentiments used on my card are all from Waffle Flower Crafts, the ‘Hey There’ is a foil plate & was foiled using black foil,


For the inside of my card I used a Sentiment from Honet Bee Stamps. I added postage stamps that are cut apart using another panel like the one of the front of my card.


Monday, April 21, 2025

Floral Birthday


Hi Crafty Friends,

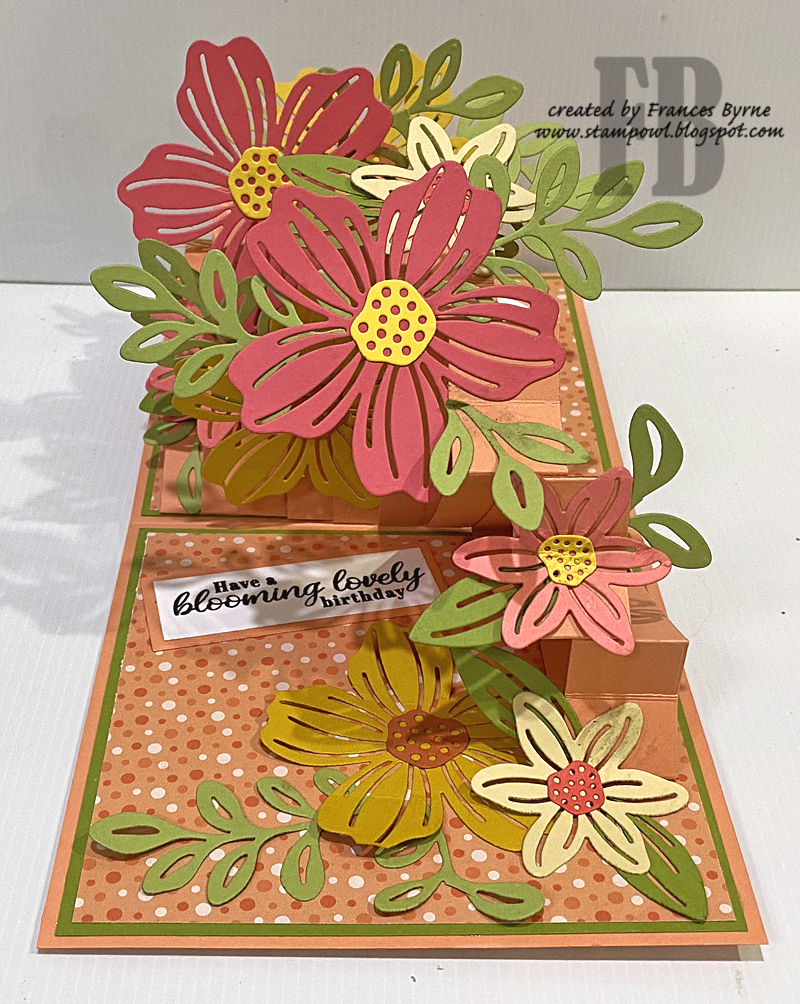
Welcome to my blog. Today I am sharing a birthday pop up card I created recently, using products from Made To Surprise by Sam Calcott.

Here is a quick video showing the card in action.


I have created a Stadium Wave Pop up card using one of the mechanism dies included in the Rock & Pop Mechanism die set from Made by Surprise. 


To decorate my card I used the flowers & leaves included in the new Bouquet Builder die set.

I added a sentiment using the Just Add Paper’s Butterfly Botanicals Sentiment stamp set.


Here is a look at my card looking at it from the back. I added a white oval to one side of the card, so I had a place to add a personal greeting. 


For the front of the card I let the pattern paper do most of the work, adding a birthday Sentiment from the Big Words die set.


Friday, April 18, 2025

Sunflower Birthday Wishes


Hi Crafty Friends,

Today I am sharing a Double Concertina Stepper Card that I created recently. As many of you know, I celebrated a birthday recently. One of my friends sent me a beautiful owl card using this style, as I really liked the card I went looking for a tutorial, which I found by Sam Calcott’s. You can find her tutorial here.

I also recently purchased some patterned paper pads designed by Iced Images, so I decided to pull out one of the pads to decorate my card. When I was cutting the panels for this card, I made sure to keep the pattern in sequence. Once I went to the trouble I didn’t want to hide the design with images or sentiments, so I kept that simple.


Here is a look at the back of my card. As you can see I decorated the back too. I kept the three centre panels white so that I could add a stamp sentiment and have a place to write a personal message. 


The concertina panels all fold to the front so that it fits in a 5 x 7 envelope.


Wednesday, April 16, 2025

Relax and Set Sail


Hi Crafty Friends,

Welcome to my blog! Today I am sharing a Nautical themed circle card I created recently. 

I received some new nautical themed products from two different companies that I was looking forward to playing with. As I couldn’t decide which to plsy with first, I ended up combining both to make one card.

For the porthole shaped portion of the card I used Made To Surprise by Sam Calcott’s It”s A-Boat Time die set. This is an add on set for the 3D Display & Stand Card, it contains the porthole frame & various nautical image dies. For this card I just used the porthole.

To decorate the card I used dies & stencils from Spellbinders Fair Winds Collection. The background is created using the Uncharted Waters stencil. I then used dies from the Set Sail; Oh Buoy & Guiding Light die sets.


On the inside of my card I added a sentiment using Karen Burniston’s Cruise Greeting stamp set. 

I added a few more images from the Oh Buoy die set. 


Monday, April 14, 2025

Hello Baby


Hi Crafty Friends,

Welcome to my blog, today I am sharing a fun baby themed Slimline card I created recently.

For my card base I have used the DL Diamond card using the Creative Craft Products die set,

 
To decorate my card I used Spellbinders Swinging Among the Stars die set. The elephant in the basket moves from side to side. 


For the background panel I used blue cardstock, I then used the Falling Stars Betterpress Plate & the Wishing Stars 3D Embossing Folder to create the sky. I also added clouds that are included in the die set. 


The sentiments on the inner panel are from the Little Smiles Sentiments Betterpress Plate set. 

The “baby” sentiment on the front diamond is from a Trinity Stamps stamp set called Simply Sentiments Baby.


I added a panel on the back to add another sentiment and a place to write a personal greeting to the recipient. I decorated this panel using various items from the products used on the front of the card.