This card is for this week's sketch challenge on SCS. This week we were instructed to make our cards tall, to keep the oval that was on the sketch and the front flap had to be folded back towards to front of the card to reveal the inside of the card on the right side.
My card is 22cm tall (approx 9 inches), I used some DP I got today while at a craft show ... they didn't have much there but I was glad I was able to get the DP. Once I had folded back my right side of the front of the card I attached another piece of card over it as I didn't like the same color pink on the flap and the inside of the card. I also attached pink brads on the flap to take off the plainness. I added ribbon to the bottom of the card and then adhered the flap to the card.
I cut my ovals with my oval nestabilities, the girl is stamped on white card, cut out and then attached onto the ovals so her legs dangle over the edge of the oval, this was then attached to the card with foam tape.
I also added the flower to the top left side of the card .... I remembered I had a sentiment that had the word "sittin' " in it so I also stamped that onto my card ... I think it goes well with the image.
Recipe:
Stamps: Girl - Magnolia Stamps; Sentiment - Impression Obsession
Paper: White; Pretty In Pink & Ruby Red - SU; DP - Fancy Pants Designs
Other: Black Ink; Pink Grosgrain Ribbon; Pink Flowers; Pink Brads; Oval Nestabilities; Foam Tape
Wednesday, April 30, 2008
Life's Simple Pleasures!
One of life's simple pleasures for me is to enough a barbie with some friends .... what could be better :)!
Today's card features another one of the stamp sets from Hanna Stamps which will be released this Friday 2nd May. This set is actually a mini set and is called "Patriotic Hanna" ready for the 4th July celebrations. Don't celebrate 4th July (well you know being an Aussie I don't) ... never fear because this stamp set is still useful for other occasions too. As you can see I didn't use Hanna in my card today, instead I decided to use the BBQ which is included in the set and create a card for a male. This is such a cute little BBQ and it fits perfectly onto the small tag punch from SU.
I used my distressed stripes cuttlebug embossing folder to create the texture to the bottom portion of my card. Once embossed I have sponged over the raised areas using black ink.
The sentiment used here is from Papertrey Ink.
Join us on the Hanna Stamps member forum of SCS for the release party Thursday 1st May at 9pm EST ....See some great preview peeks and participate in some fun prize challenges.
Recipe:
Stamps: Patriotic Hanna Mini Set - Hanna Stamps; Sentiment - Papertrey Ink
Paper: White; Black; Real Red & Basic Gray - SU
Other: Black Ink; Small & Large Tag Punches (SU); Red Brads; Distressed Stripes Cuttlebug Embossing Folder
Tuesday, April 29, 2008
From This Day Forward!
My card today is for this week's technique challenge on SCS. This week the challenge is to create a Two Way Open card if you want more info on how to create this particular card you can find our here.
As some of you know one of my daughters is getting married near the end of the year so any type of wedding stamps attract me at present so when Flourishes came out with these sets I just had to order them. As they arrived yesterday and I discovered this challenge this morning I decided to make use of these stamps. Whether this will actually be my daughters wedding card I have no idea .... I will probably make a few more throughout the year and then decide which one I like the best.
For the front of this card I stamped the bride and groom onto white card and layered onto card using my rectangle nestabilities. I actually cut 2 scallop rectangles and layered them together so that I could hide the ribbon between the layers. The flower which also helps hide the ribbon on the left side has a slight tint of blue in it which is hard to tell in this photo. I will probably add some clear stickles to the brides dress ... I meant to do that earlier but only just realised as I am typing this that I hadn't as yet.
The DP I used on the front triangle is also attached to the inner triangle. I used the flourish that came with the wedding essentials set to stamp the lakeshore blue panel using blue bayou SU ink.
The 'Mr' & the 'Mrs' are stamped in black with the '&' being stamped so it overlaps using Sea Breeze Versamagic Ink. Again rectangle nestabilites were used to create the layers.
I used my square nestabilities to create my white scallop panel I also embossed the edges for this one and then stamped the verse in the centre using black ink.
Recipe:
Stamps: Wedding Party & Wedding Essentials - Flourishes
Paper: White; Lakeshore & Jetstream Bazzill card; DP - Unknown
Other: Black Ink; Sea Breeze VersaMagic Ink; Blue Bayou SU Ink; Paper Piercing Mat & Tool; Square & Rectangle Nestabilities; Blue Bayou Grosgrain Ribbon; Flower
Hey Girlfriend!
As promised yesterday I am back to share with you a card using another of the 4 sets to be released this Friday 2nd May by Hanna Stamps.
This set is called 'Fun in the Sun' and has everything Hanna will need for a day at the beach. The towel stamp is actually separate from the Hanna stamp so that you can have more options on what Hanna is holding. The sun on my card isn't included in this set, but is in another set to be released called 'SPF 50' ... more on that set later in the week.
The colors used for this card are for a color challenge Cindy Haffner challenged us with using the new Prism card that Hanna Stamps will soon be selling ... the colors we had to use were Vibrant Teal, Rose Dark & Crabapple Light. If you would like to play along with this challenge check out the Hanna Stamps Member Forum on SCS as Cindy will be posting there. Don't have Prism card ... no problem Cindy will also be including the SU matches so you can.
It is hard to tell in the photo ... but I did stamp the sun lotion stamp all over the back of the pink card.
Join us on the Hanna Stamps member forum of SCS for the release party Thursday 1st May at 9pm EST ....See some great preview peeks and participate in some fun prize challenges.
Recipe:
Stamps: Fun in the Sun, SPF 50 & Words Hanna Would Say - Hanna Stamps
Paper: White; Vibrant Teal, Rose Dark & Crabapple Light - Prism Papers
Other: Black Ink; Pretty Ink Pink Grosgrain Ribbon; Pink Brads; Word Window Punch; Foam Tape
Monday, April 28, 2008
Gardeners Know the Best Dirt!
I have a lot to share with you this week as Hanna Stamps is releasing 4 new stamp sets this Friday 4th May. I can hardly wait to show you all the wonderful new stamp sets.
The first set I am sharing with you is "Garden Hanna" all the stamps included in this scene except for the grass & sentiment are from this new set ... these are just some of the stamps included in this stamp set ... there are actually 15 stamps in this set. I am sure this set would be great to create cards for males as well as females.
When my DH saw this card the other day while we were eating breakfast ... he asked me if this was the closest I would get to gardening ... for ages he has hoped I would join him out there to garden but alas I am still not convinced LOL ... I will stick to stamping gardens and let him to the real thing ... besides knowing me I would go out and weed and pull out the real plants and leave the weeds behind ;) .
To create my scene I started by stamping Hanna on my card, I created a mask for Hanna and then stamp my wheelbarrow so it looked like it was behind her. I also created a mask for the pot stamped the first one at an angle and then stamped the second one behind it upright. I carefully stamped that cute snail so it looked like it was sitting on the pot. The potatoes have also been masked ... as it is a single potato in the set ... I stamped my top potato and kept masking while I continued to stamp the others. The grass I stamped last and it is from "My Best Friend" set also by Hanna Stamps.
I received the sentiment a couple of years ago in a set from Club Scrap ... I thought this was perfect to add to my card esp as I had stamped the bag of dirt in my scene.
Come back tomorrow as I will have another card using another of the new sets.
Join us on the Hanna Stamps member forum of SCS for the release party Thursday 1st May at 9pm EST ....See some great preview peeks and participate in some fun prize challenges.
Recipe:
Stamps: Gardening Hanna & My Best Friend Sets - Hanna Stamps; Sentiment - Club Scrap
Paper: White; Black; Taken with Teal & Real Red - SU
Other: Black Ink; Black Brads; Foam Tape
Penguin's Sunny Day!
Happy Monday to you all ... Monday of course means another CCEE challenge I do with my goofball friends over on SCS. This week it was a supply challenge seeing that it is the last Monday of the month and it was my turn to send the supplies to everyone to use of their cards today.
I only just had a turn a couple of months back but when I saw these cute stamps a few months back I had decided this would make a good supply challenge especially as one of the other members of our group absolutely loves penguins ... at the time I had to send off my previous supplies these stamps etc hadn't arrived in Australia so I was unable to purchase them so picked something else for us to do ... but when the following month I found they had arrived I quickly purchased 8 of everything so that I could send them off to my CCEE friends. These little guys have travelled more then me hehe!
I kept it fairly simple this month with the supplies ... I sent everyone both penguin stamps and the DP .... the instructions was that we had to use at least one of the penguins ... bonus points if we used two (however there are no prizes so it doesn't really matter ... but my friend Cammie ... likes bonuses so there you go :) ). They also had to use some of the DP on their cards too ... other than that they could do whatever they wanted.
On Wednesday night after I had created my card for this week's sketch challenge on SCS ... it occurred to me that if I used a sentiment in the centre panel I could have the penguins on either side of it .... so I started stamping my card ... hoping against hope no one else thought of this idea with these images as I know a number of people have them as they are so darn cute!
The sentiment is stamped in black ink and then I used a sun image and stamped this randomly over the background using yellow ink. The penguins were stamped in black and then colored ... I masked the penguins to stamp the sand line which is actually a stamp and then colored my sand & sky. I discovered this cute tiny flower in my stash of prima flowers (I think this is thanks to my friend Kim) .... so I attached this over the flower that is stamped on the girl penguin. Her bikini top has been colored using spica markers to give it a glittery look which unfortunately you can't see online.
Recipe:
Stamps: Girl & Boy Penguins - Imaginisce
Paper: White; Black; Real Red & Sun Yellow - SU; Shore Thing DP - Imaginisce
Other: Black Ink; Sun Yellow SU Ink; Prima Flower; Red & Yellow Brads; Foam Tape
Charge!
I have another card to share with you today .... this card is for this week's MFT sketch challenge which you can find in the MFT Members Forum of SCS.
My colors are taken from my DP I selected for my card. I used my rectangle nestabilities to create the layers of my main image ...I did have to cut it down slightly and rejoin it so that it would fit the image.
I stamped the "charge" portion of the sentiment onto my red card and used my star punch to punch out the sentiment and place it to the top left section of my card ... I am really loving using my star punch for my sentiments (you may have already noticed LOL ;) )
Recipe:
Stamps: Say Charge - My Favorite Things
Paper: White; Real Red & Night of Navy - SU; DP - My Minds Eye
Other: Black Ink; Star Punch; Red Grosgrain Ribbon; Rectangle Nestabilities; Foam Tape
Sunday, April 27, 2008
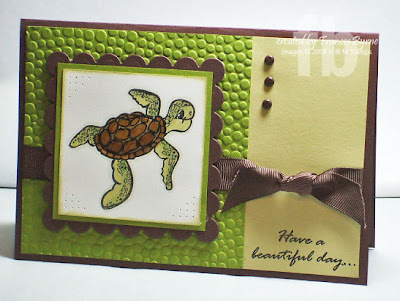
Turtley Beautiful Day!
I am back ... I thought I was finished for the day however then I discovered the SFYTT on Jen's I Heart 2 Stamps blog and I just had to make another card ... that is definitely it for me today haha!
I had to play again with some of the new stamps from H & M Stamps which are now available to purchase ... I just love this cute little turtle and also that sentiment from the Sealife set ... the sentiment is really in one long line however as I wanted it to fit on the river rock panel only I made it into a 2 line sentiment for this particular card.
I used my tiny bubbles cuttlebug embossing folder to create the background on the olive panel. The square scallop nestabilities was used for my layers to my turtle panel.
After coloring my turtle I added glossy accents to the shell portion of the turtle to give it a shiny effect making it look like a real shell. I also used my paper piercing mat and tool to paper pierce three of the corners on the turtle panel.
Recipe:
Stamps: Sealife - H and M Stamps
Papers: White; River Rock, Old Olive & Chocolate Chip - SU
Others: Black Ink; River Rock SU Ink; Tiny Bubbles Cuttlebug Embossing Folder; Square Nestabilities; Paper Piercing Mat & Tool; Chocolate Chip Grosgrain Ribbon; Brown Brads; Foam Tape
Friends 'Til Extinction!
Well it is Featured Stamper challenge day on SCS, and this week's featured stamper is Michelle aka as Sf9erfan on SCS. As I had some free time this afternoon I decided to play along. While I was browsing Michelle's gallery I noticed she had a few dinosaur cards using SU's 'Prehistoric Pals'. As this is one of the sets sitting untouched behind me I thought this was a great opportunity to get yet another set dirty :). You can see the card I decided to CASE here.
For the featured stamper challenge we have to change at least 2 things on the card we are CASEing, here are my changes:
Recipe:
Stamps: Prehistoric Pals - SU; Sentiment - Treehouse Stamps
Papers: White; River Rock, Old Olive & Chocolate Chip - SU
Other: Old Olive, Chocolate Chip & River Rock SU Inks; Brown Brads; Corner Rounder; Foam Tape
For the featured stamper challenge we have to change at least 2 things on the card we are CASEing, here are my changes:
- Changed the colors
- Used a different sentiment
- Added an additional stamped image to my main panel
- Changed the brads
- Sponged the edges of my white card
Recipe:
Stamps: Prehistoric Pals - SU; Sentiment - Treehouse Stamps
Papers: White; River Rock, Old Olive & Chocolate Chip - SU
Other: Old Olive, Chocolate Chip & River Rock SU Inks; Brown Brads; Corner Rounder; Foam Tape
Fishing for Birthday Wishes!
Riley is back again :) .... for this week's Hanna Stamps challenge over at the Hanna Stamps Member Forums of SCS. This week the challenge was to create a card for a male. Fishing Riley would be suitable for just about any male out there young or old ... isn't he cute!
I used my square nestabilities to create my scallop layer to my main image. I cuttlebugged the mustard panel using my tiny bubbles cuttlebug embossing folder and then sponged over the raised areas using mustard ink. My colors I used here are unusual for me ... garden green, more mustard & basic grey. I didn't have grey ribbon (I will fix that soon ;) ) .... so I colored my white grosgrain ribbon using my alcohol markers.
I stamped my sentiment onto green card and then punched out the star shape using my star punch .... I am so glad I ordered this punch as it is just great for sentiments for something different.
Recipe:
Stamps: Fishing Riley - Hanna Stamps; Sentiment - Papertrey Ink
Paper: White; Garden Green, Basic Grey & More Mustard - SU
Other: Black Ink; More Mustard SU Ink; Star Punch; Square Nestabilities; Tiny Bubbles Cuttlebug Embossing Folder; White Grosgrain Ribbon; Foam Tape
Saturday, April 26, 2008
Turning the Heat Up!
I thought it was about time I used one of the newer SU sets I have purchased recently which up until today have been sitting on the table behind me unused. I have soooo many other things I have had to stamp esp for DT work that these have been neglected!
This card is for Beate's weekend sketch challenge, it has taken me a little longer to create and post my card today as I ended up going out with my DH. I almost flipped the sketch because I normally like an image to face towards the end of the card but I resisted that temptation for this one.
It is a fairly simple card, I used my long rectangle nestabilities to create the scallop layer .... I did cut it down a little as it was too long. The cocoa strip I paper pierced and then attached the olive ribbon around before attaching it to my card. The sentiment underneath the cocoa strip says " did someone turn the heat up in here ...." Inside the card I stamped "or is it just the candles on your cake? Happy Birthday". I might possibly save this to give to my sister for her birthday later on in the year .... only thing is she is younger ... I will think about that hehe.
Recipe:
Stamps: Sassy Suzy - Stampin' Up
Paper: White; Close to Cocoa, Old Olive & Fall Flowers DP - SU
Other: Black Ink; Paper Piercing Mat & Tool; Long Rectangles Nestabilities; Olive Grosgrain Ribbon; Aqua Brads; Foam Tape
Blog Candy Winner!
Friday, April 25, 2008
Dolphin Beautiful Day!
A few weeks ago Mercy Kerin of Lord Have Mercy's blog posted a sketch challenge, which is the sketch I used for this particular card today. The stamps used are more of the new stamps from H & M Stamps which will be released Friday 25th April, not too long to wait now everyone :).
I stamped the dolphin onto white card and then cut it out and attached to the white panel using foam tape for a more 3D effect. The folded cool caribbean card is stamped all over using a water ripples stamp I have had for some time. I wanted to include this sentiment, however it was too long to go across the card so I decided to stamp it up the card instead. I used my paper piercing mat & tool to pierce the top left and bottom right corners on the dolphin panel.
Don't forget you have the opportunity to save money when you order your H & M Stamps this Friday 25th April. It's easy!!!!!!!!! All you have to do is be one of the 1st 200 customers to use the following code when you place your order of $25 or more and you will get to save $5. The code you will need to use is: HMDT42508
Recipe:
Stamps: Sealife Set - H&M Stamps; Water Ripples - Print Blocks
Paper: White; Cool Caribbean, More Mustard, Turquoise & East Coast Prep DP - SU
Other: Black Ink; Cool Caribbean SU Ink; Paper Piercing Mat & Tool; Blue Brads; Foam Tape
Thursday, April 24, 2008
A Window Card!
This week's challenge with my fab/sassy friends on SCS was to make a window card .... this could be a type of construction card ... it could be a card that simply has a stamped window on it ... or even a punched hole that forms a window.
As I recently received my Long Rectangle Nestabilities dies I decided to use those to create my window card. First of all I covered the front of my folded white card with my DP. I then cut out my scallop long rectangle from pink card and attached it where it needed to go. Next I placed my classic long rectangle die over the pink scalloped card and cut out my hole.
I used the same classic long rectangle die to cut out my white card that I had stamped my magnolia image onto and layered this to the pink card.
To finish the card I added white dots to each of the scallops and my ribbon to the left side of my card. I also added stickles to the wings and crystal effects to the balloons.
Recipe:
Stamps: Tilda with Balloons - Magnolia Stamps; Sentiment - Papertrey Ink
Paper: White; Pink Passion - SU; Birthday Candles DP - Around the Block
Other: Black Ink; Long Rectangle Nestabilities; White Gel Pen; Crystal Stickles; Crystal Effects; Orange Ribbon
Wednesday, April 23, 2008
G'day Mate!
Hi everyone .... my card today has an Aussie feel to it! This is for this week's sketch challenge on SCS, Roxie's sample today had her scene extend over to the panel behind the main image .. I really liked the look so I decided to do the same thing with my card.
To create my card I stamped 'Walkabout Wally' onto my white panel, I masked my image and also covered the top portion of the card with a piece of torn scrap paper and stamped the 'Jungle Background', I did this because I didn't want all the jungle leaves behind him just some grass.
I cut my background panel and used the same 'Jungle Background' to stamp on each side of the panel ... I didn't use the whole stamp just the same portion of the stamp on both sides of the panel ... I used tape to make the tree in the stamp as again I didn't want that part of the stamp appearing on my background. I stamped my sentiment on the right side of the background panel.
I also stamped the sentiment 'G'day Mate' all over the river rock panel using river rock ink.
Recipe:
Stamps: Walkabout Wally, Jungle Background & G'day Mate - High Hopes Stamps
Paper: White; Close to Cocoa; Wild Wasabi & River Rock - SU
Other: Black Ink; Celeste Blue Impress Ink; River Rock SU Ink; Olive Brads; Foam Tape
A Gift Card Holder
This week's 'Try a New Technique" on SCS was to make a gift card holder. It has been a while since I have played along with this particular challenge but I thought it would be fun to create one of these fun holders. If you want to know how to make one for yourself ... check out the link above where you will find a number of very good tutorials.
I decided to use another stamp in the Wild Birthday Wishes set that I used for a card I posted yesterday. These stamps are by H & M Stamps and will be released this Friday 25th April. I used the same DP & colours so I kind of have a set going here ... maybe I will even expand on it ... only time will tell ;)
Here is the inside view of the gift card holder .... as you can see the lion image is attached to a belly band .... this helps keep the gift card holder closed.
Recipe:
Stamps: Wild Birthday Wishes Set - H & M Stamps
Paper: White; Turquoise, Real Red & East Coast Prep DP - SU
Other: Black Ink; Oval Nestabilities; Word Window Punch; Circle Punch; White Gel Pen.
Ok yesterday I mentioned that I would tell you how you can save money when you order your H & M Stamps this Friday 25th April. It's easy!!!!!!!!! All you have to do is be one of the 1st 200 customers to use the following code when you place your order of $25 or more and you will get to save $5. The code you will need to use is: HMDT42508
Don't forget you still have an opportunity to win one of the new H & M Stamps set that will be released in May ..... if you want a chance to win this don't forget to leave a comment on the post found here.
Tuesday, April 22, 2008
Birdie Birthday Wishes & Blog Candy
I have another card to share with you today this one is using one of the new stamps from H & M Stamps which will be released this Friday 25th April. Isn't this bird just the cutest!!!!!! These stamps are from the 'Wild Birthday Wishes' set and it contains a cute lion, monkey, bird & crocodile/alligator all in birthday/party mode.
I used my oval nestabilities to create the layers for my bird image. The scallops on the red card was created using my corner rounder punch which I then layered the East Coast Prep DP to. I added 3 rows of paper piercing to the bottom of my card.
Ok I mentioned in my title blog candy!!!!!!!! Heather from H & M Stamps is giving all the design team members who have blogs stamp sets to use as blog candy .... what will you win??? You get your choice of one of the new stamp sets to be released in May .... now if you win please be aware it may take two or three weeks for this blog candy to get to you as the release for these stamps isn't until the 25th May but you will get your prize a little earlier than this.
To win this blog candy all you have to do is leave a comment on this post ...... as my card today is a birthday card how about telling me what month your birthday is (I don't need your date) ... mine was in March! You have until Friday 25th April 12.01am to enter for this prize. Once I have posted the winner you will have 24 hours to claim your prize, if it isn't claimed by then I will do a redraw.
Come back tomorrow when I will have some info on how you can get to save some money when you order your new stamps this Friday.
Recipe:
Stamps: Wild Birthday Wishes Set - H & M Stamps
Paper: White; Turquoise, Real Read, Wasabi & East Coast Prep DP - SU
Other: Black Ink; Oval Nestabilities; Corner Rounder; Word Window Punch; Paper Piercing Mat & Tool; Wasabi Grosgrain Ribbon; Red Brads; Foam Tape
A Couple of Challenge Cards
I have a couple more cards to share with you today .... both cards use the new Gina K stamps which were released yesterday.
My first card uses the "King of the Grill" stamp set ... this is a great set for the men in your life. I decided to use it for the sketch challenge that my friend Cammie is hosting for the Gina K release party.
I used the BBQ, tools & one of the sentiments from this set to create my card. The BBQ is layered using my circle nestabilities. The top portion of this card has been embossed using my distress stripes cuttlebug embossing folder ... after embossing it I sponged over some weathered wood distress ink to highlight the raised areas. The screw brads also help give this card a masculine feel ... these are also available through Gina K. Finally the BBQ tools are stamped and cut out and attach to the top right side of my card.
Recipe:
Stamps: King of the Grill Set - Gina K Designs
Paper: White; Basic Gray, Real Red & Night of Navy - SU
Other: Black Ink; Weathered Wood Distress Ink; Circle Nestabilities; Distress Stripes Cuttlebug Embossing Folder; Screw Brads; Foam Tape.
The featured stamper this week on SCS is sparklegirl ... I looked through her gallery on Sunday but as I didn't have time right then to create a card I bookmarked one I thought I would try to CASE when I had some more time..... you can find her card here.
As per the rules of the featured stamper challenge I had to change at least two things on my card. Here are the changes I made:
- Changed the stamps used
- Changed the colors
- Used a different ribbon
- Used different brads
Recipe:
Stamps: Comfort & Peace - Gina K Designs
Paper: White; Regal Rose & Old Olive
Other: Black Ink; Pink & Olive Marvy Markers; Regal Rose Grosgrain Ribbon; Pink Brads; Rectangle Nestabilities; Foam Tape.
Monday, April 21, 2008
Yee Ha Little Cowboy!
Yee Ha!!!!!!!!!! It's Monday which means another challenge with my goofball CCEE friends on SCS. This week our challenge was to create a card using either a cowgirl or cowboy .... we also had to include a star on our card.
As I recently received this cute cowboy stamp named Billy from Pink Cats Studio I decided I would use that for my challenge card. I used last week's SFYTT sketch challenge from Jen's I Heart 2 Stamp's blog. The background on the 3 panels is from a background set that co-ordinates with the images in the Billy set.
I also had to include a star on my card ... I actually added 4, 3 star brads in the top left hand corner and then one on the right of the billy image. I also used my photo corner punch to create the corner in the top right hand side of this card.
Recipe:
Stamps: Billy & Boy Backgrounds - Pink Cat Studio
Paper: White; Creamy Caramel, Chocolate Chip, Really Rust & Blue Bayou - SU
Other: Black Ink; Creamy Caramel SU Ink; Star Brads; Brown Grosgrain Ribbon; Star Punch; Photo Corner Punch; Micro Brads; Foam Tape
Baby Congratulations!
Hi again! This card is for this week's MFT sketch challenge in the MFT Member Forum of SCS. It is also for this months "Celebrate MFT" which is the 20th of every month. I flipped the sketch for my card as I preferred my image to be on the left side of my card rather than the right. I am thinking now maybe I should have used my rectangle nestabilities to layer my image .... but I didn't and it is too late now. I am not pulling this one apart!
I used my swiss dots cuttlebug embossing folder to add texture to the top portion of my card. I stamped the main image 3 times .. twice on white card and once on DP so I could paper piece the dress portion of the image.
Using my paper piercing mat & tool I paper pierce the top & bottom of the blue strip going across my card. The "baby" sentiment was stamped on blue card and then punched out using my star punch and attached to the card with foam tape.
BTW did you see my new MFT watermark .... this was created my Sara Williams for all the MFT design team members .... how cool is that!
Recipe:
Stamps: She's Having A Baby Set - MFT Stamps
Paper: White; Barely Banana, Certainly Celery, Bashful Blue, Brocade Blue - SU; DP - Unknown
Other: Black Ink; Swiss Dots Cuttlebug Embossing Folder; Paper Piercing Mat & Tool; Certainly Celery Grosgrain Ribbon; Star Punch; Foam Tape
Owl Happy Birthday!
Here is another card using the "Owl Always Love You" set which is to being released tonight by Gina K Designs. Why not come join us for the release party 7 - 10 pm central time in the Gina K Member Forums of SCS.
One of the challenges to be held at the release party tonight is a color challenge, to use so saffron; old olive & vanilla. I don't have any vanilla card so I used a flower that I thought would be vanilla color.
While I was making this card and hadn't decided what layout to use for my card ... the SFYTT sketch that Jen from I Heart 2 Stamp's blog posts each week appeared in my google reader. This looked like it would work well with my image so I decided to use that sketch for my card.
I used my distressed stripes cuttlebug embossing folder to add texture to my so saffron panel. I cut 2 scallop rectangles using my rectangle nestabilities and joined these so I could use it for layer my owl image. I cut my sentiment out and round my corners using my word window punch and attached it to the lower right hand side of my card. Adding 3 rows of paper piercing to the remainder of this bottom panel.
Recipe:
Stamps: Owl Always Love You Set - Gina K Designs
Paper: White; Black; So Saffron & Old Olive - SU
Other: Black Ink; So Saffron SU Ink; Yellow & Vanilla Brads; Flowers; Olive Grosgrain Ribbon; Paper Piercing Mat & Tool; Distressed Stripes Cuttlebug Embossing Folder; Word Window Punch; Foam Tape.
Sunday, April 20, 2008
How Egg-citing!
I am 'egg-cited' today to give you a sneak peek at one of the new sets that Gina K will be releasing tonight. This set is called "Owl Always Love You".
I was almost jumping out of my chair when Gina emailed the Design Team with the pics of the new sets to be released this time round, I scrolled down to the end of the email and wow!!!! Gina has designed this fabulous Owl set .... that I am totally in love with! Anyone who knows me knows how much I love owls so it is really cool that Gina has created this set. The set is suitable for many different occasions and had two owl images and 6 sentiments.
My card today is another long card. For many years when I colored animal images I would always color them pretty much true to life ... as you can see I have past that now and enjoyed making my owl blue! I used my paper piercing mat & tool to pierce 3 of the corners of my owl image. I also used my nestabilities to create my scallop layer for this card.
If you would like to see some more sneak peeks using this set, go visit Gina K's blog. Gina will have her sample and some links to the other Design Team members who are also showcasing this set today.
Don't forget Gina K's release party tonight (Sunday) 7 - 10 pm central time in the Gina K Member Forum of Splitcoaststampers.
Recipe:
Stamps: Owl Always Love You - Gina K Designs
Paper: White; Black; Cool Caribbean, Turquoise & Cameo Coral - SU; DP - Unknown
Other: Black Ink; Rectangle Nestabilities; Paper Piercing Mat & Tool; Blue Grosgrain Ribbon; Blue & Pink Brads
Saturday, April 19, 2008
Celebrate Today!
I have one more card to share with you all today. This one is for this week's Hanna Stamps Challenge on the Members Forum of SCS. This week the challenge was hosted by Cambria and she decided that we had to use polka dots and flowers ... bonus points if you used pink too. As you can see I have my polka dots, flowers & of course it is pink as well ;).
I also managed to get this week's Monday Mojo sketch done from Julee's Poetic Artistry's blog. I followed her measurements for this one (after adapting to Aust conversion of course). I also wanted to play again with my new basic grey card so I made my color scheme pink & grey.
I used my pink spica pen to color the heart on top of the cake.
Recipe:
Stamps: Cake Riley - Hanna Stamps; Sentiments - Papertrey Ink
Paper: White; Pretty In Pink; Basic Grey; Pretty In Pink DP - SU
Other: Black Ink; Pink Flowers; Pink Grosgrain Ribbon; Pink Brad; Paper Piercing Mat & Tool; Pink Spica Pen
Top Banana!
It is Saturday here so for me that means time for another Beate's weekend sketch challenge, which is good cause everyone else has gone out so I can play undisturbed all day :). It too me a while to first decide what stamp I wanted to use today ... in the end I left the decision to a friend who said monkey as we had been talking about monkeys the day before .... so that is what I went with.
Another friend last night told me what the limited supply challenge was this week ... to make a tall or long card. When I saw Beate's sketch I decided that I could make the sketch longer so enabling me to do 2 challenges on one card. I am pretty sure the LSC challenge also required no DP ... which is fine as I had already decided to create my own for this particular card. I tend to have gotten lazier with all the fabulous DP's out there so it was nice to do my own for a change. After stamping and coloring my banana's & jungle leaves I used a sponge to sponge all over as I didn't want the stark white in the background.
I used my rectangle nestabilities to create the scallop layer for the monkey .... as it wasn't quite long enough I had to cut 2 rectangles and join them.
Recipe:
Stamps: Banana, Monkey Mike, Sentiment & Jungle Leaves - High Hopes
Paper: White; Chocolate Chip & Wild Wasabi
Other: Black Ink; Creamy Caramel SU Ink; Brown Brads; Brown Grosgrain Ribbon; Rectangle Nestabilities; Foam Tape
Friday, April 18, 2008
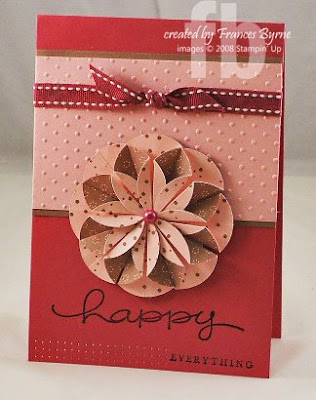
Happy Everything!
Just a quick one today .... it was my turn to provide a make n take at a club I go to recently so as someone had mentioned the month before she wanted to try out dahlia folding, I thought that was a good thing to do for my make n take.
I used the new berry blaze DP which I just love .... I cut my circles at 1 3/8inch and folded them as per the dahlia instructions I found here. I used my swiss dots cuttlebug embossing folder to emboss my pink panel .... I am sure I will wear this one out hehe! I am not 100% happy with the ribbon I used but it was the closest I had at the time ... I am waiting on some new ribbon arriving and when it does I will probably replace this. I also paper pierced along the bottom edge of the card.
Recipe:
Stamps: Happy Everything - SU
Paper: Rose Red; Pretty In Pink; Close to Cocoa & Berry Blaze DP - all SU
Other: Black Ink; Swiss Dots Cuttlebug Embossing Folder; Burgundy Grosgrain Ribbon; Paper Piercing Mat & Tool; Pearl for Centre.
Thursday, April 17, 2008
Crocodile Birthday Wishes
Hope you are all having a great day! Today's card is for a challenge I do with my fab/sassy friends over on SCS. This week we had to CASE a card from our sassy friend Amber's gallery. One of our other sassies selected the card we were to CASE which you can find here. This was originally a Beate sketch challenge which I had also previously done.
For my card I used my birthday crocodile image from H & M Stamps which is to be released next Friday 25th April. Doesn't he look like he is having lots of fun eating that chocolate cake ;). This image is part of the Wild Birthday Wishes set which also includes a cute monkey, lion & little bird ... all ready for a party!
Recipe: Stamps: Wild Birthday Wishes Set - H & M Stamps
Papers: White; Black; Vienna Lake - Coreinations; DP - Unknown
Other: Black Ink; Brown Ink; Black Brads; Black/White Stripe Ribbon; Word Window Punch; Foam Tape
Wednesday, April 16, 2008
Aww - Nuts!
Hi everyone ... I have 2 cards to share with you all today. The first card is for this week's sketch challenge on SCS. This card is pretty self explanatory .... the best friends forever image is layered using the rectangle nestabilities. I also added 6 brads the top right corner ... in 2 columns.
Recipe:
Stamps: Best Friends Forever - Stamping Bella; Sentiment - MFT
Paper: White; Cool Caribbean, Wasabi, East Coast Prep DP - SU
Other: Black Ink; Rectangle Nestabilities; Blue Brads; Wasabi Grosgrain Ribbon; Foam Tape
This 2nd card is for this week's color challenge also on SCS. The colors to use this week are Groovy Guava, Blush Blossom & Basic Grey. As I have recently just received my basic grey card I decided I had to play in this challenge. I chose one of my High Hopes Elephants .... as I knew that would work well with the grey color. I also used my new long rectangle nestabilities set which I received this week ... I cut the scallop rectangle twice and joined it width wise but did cut some off the length to get it to the size I needed.
The image is stamped twice .. the second image I have cut out the head only and layered this over the other elephant using foam tape. It is hard to see by this photo ... the background of the blush blossom base card has the peanut stamp stamped all over it.
Recipe:
Stamps: Elepahant, Peanut & Sentiment - High Hopes Stamps
Paper: White; Blush Blossom, Groovy Guava & Basic Grey - SU
Other: Black Ink; Guava Grosgrain Ribbon; Long Rectangles Nestabilities; Foam Tape
Recipe:
Stamps: Best Friends Forever - Stamping Bella; Sentiment - MFT
Paper: White; Cool Caribbean, Wasabi, East Coast Prep DP - SU
Other: Black Ink; Rectangle Nestabilities; Blue Brads; Wasabi Grosgrain Ribbon; Foam Tape
This 2nd card is for this week's color challenge also on SCS. The colors to use this week are Groovy Guava, Blush Blossom & Basic Grey. As I have recently just received my basic grey card I decided I had to play in this challenge. I chose one of my High Hopes Elephants .... as I knew that would work well with the grey color. I also used my new long rectangle nestabilities set which I received this week ... I cut the scallop rectangle twice and joined it width wise but did cut some off the length to get it to the size I needed.
The image is stamped twice .. the second image I have cut out the head only and layered this over the other elephant using foam tape. It is hard to see by this photo ... the background of the blush blossom base card has the peanut stamp stamped all over it.
Recipe:
Stamps: Elepahant, Peanut & Sentiment - High Hopes Stamps
Paper: White; Blush Blossom, Groovy Guava & Basic Grey - SU
Other: Black Ink; Guava Grosgrain Ribbon; Long Rectangles Nestabilities; Foam Tape
Rebus Famous Explorers
I have been pretty slack with my rebus swap this past few months. I finally remembered that I should be getting them organised and posted.
So here at last in one I did for February with the theme Famous Explorers. See how you go solving it ... don't forget to leave a comment so I know you have played.
Here are the solutions of the last rebus I posted on my blog which was things found in a church, you can find it here:
So here at last in one I did for February with the theme Famous Explorers. See how you go solving it ... don't forget to leave a comment so I know you have played.
Here are the solutions of the last rebus I posted on my blog which was things found in a church, you can find it here:
- Pews
- Organ
- Bibles
- Hymn Books
- Statues
- Minister
- Altar
Tuesday, April 15, 2008
A Very Special Sale!
Hi all .... sorry I didn't post anything yesterday ... it wasn't because I didn't have anything or that I didn't want to but rather because I couldn't as there were a few technical issues I had which I had to wait till blogger could fix it up for me ... fortunately it didn't take the 4 business days they quoted when I sent in my request ... I would have been in very serious withdrawals if that was the case ... it was bad enough not being able to blog as it is .... I did still blog ... just couldn't post which is why you might see a few posts from me today.
This morning I received an email from Kim of My Favorite Things telling us of her friend Trish who unfortunately passed away last Tuesday after battling a rare form of ovarian cancer. Trish left behind her husband and two young children.
Starting tomorrow (Tuesday 15th April), Kim will be offering a 10% discount on ALL stamps on her site. Use the coupon code Tish at checkout to receive 10% off all all the stamps in your shopping cart. (It won’t discount your other merchandise, just stamps.) The coupon code will run from Tuesday, April 15th-Friday, April 18th. 2) Kim will donate 10% of ALL proceeds (including money spent on other items on the site) to the family at their April 26th benefit.
You can read on about this on Kim's blog.
Monday, April 14, 2008
Always!
Each week I try to use a different MFT set for my MFT sketch challenge, this way I get to use some of the older sets not just the newer sets which we are often drawn to being that they are so new. For this week's card I decided to create a wedding card using the "Going to the Chapel" set.
You will probably get to see a few wedding cards from me this year as my daughter is getting married later in the year .... of course she won't get them all but she will get at least 2 as my other DD will want one to give to her too.
I used the oval nestabilities to great the layers to my main image ... I colored the wedding dress using a clear spica pen so that it looks a little glittery .... unfortunately you can't see that in the photo. I also used my swiss dots cuttlebug embossing folder to texturise the blue squares and the white background.
Recipe:
Stamps: Going to the Chapel - MFT
Paper: White; Silver; Lakeshore & Starmist Bazzill Card
Other: Black Ink; Swiss Dots Cuttlebug Embossing Folder; Oval Nestabilities; Blue Brads; Clear Spica Pen; Blue Bayou Grosgrain Ribbon; Oval Punches; Foam Tape
Butterfly Ears!
It's time for another Goofy Name Featured Stamper challenge with my goofy CCEE friends on SCS ... each month we pick a name that appeals to us on SCS and create a card around that name and then send them all our cards. This month the name we are featuring is "Butterfly Ears".
It is always interesting to discover why people pick the names they do to use in places like SCS ... my friend asked Butterfly Ears about her name sometime ago and it is because her dog that she uses in her avatar has ears that look like butterflies.
So the brief for our card this month was to create a card with 2 butterflies because most people have two ears, and we had to also include 4 paw prints cause most dogs have 4 legs. I decided to go for a dog theme rather than a butterfly theme as it is much easier to include 2 butterflies in with a dog theme then it is to include 4 paw prints with a butterfly theme.
To create my card I selected a dog that you could see it's 4 paws .. not all dog images you can ... often it is only 2 or 3 you can see. Now as Cindy stated paw prints not paws ... I have covered my bases by using my paw print roller wheel on the background of my card. I will probably get the buzzer (as my friend Cindy calls it) for this lol cause there are way more then 4 paw prints there ... but that is ok ;). Adding the 2 butterflies was easy for this card!
I used my script cuttlebug embossing folder on the red panel on the left side of my card .... I layered this to a brown piece that I used my corner rounder on to create the scallops. And added my brown ribbon to the top of the card.
I used Beate's weekend sketch challenge again for the layout for this card.
Recipe: Stamps: Dog - Rubbernecker; Butterflies & Paw Roller Wheel - SU; Sentiment - Hanna Stamps
Paper: White; Creamy Caramel, Chocolate Chip & Real Red - SU
Other: Black Ink; Creamy Caramel SU Ink; Script Cuttlebug Embossing Folder; Word Window Punch; Corner Rounder; Brown Grosgrain Ribbon; Foam Tape
Sunday, April 13, 2008
Life's A Beach ... Tee-rific!
Well today I have a couple of cards to share with you all. These cards are for the Hanna Stamps challenge this week on the Hanna Stamps member forums of SCS which is to create a shaped card. I have been wanting to make a circle card using my nestabilities for sometime now so I decided to do one of these for this particular swap. And the Riley Moose stamps from Hanna Stamps are the perfect size for these cards. I used the larger of my circle nestabilities to create my various layers for my "Life's a Beach" card.
This was a fairly simple card to create .... after cutting my shapes .... I stamped my image onto the white card and colored using my copic markers. I also used my yellow spica pen on the sand area to give it a glitter look. Doesn't Riley look like he is having fun!
Oh btw how did I make this into a card when I used my cuttlebug .... I cut two scallop circles ... on the back circle I measured down from the top approx 2cm ... scored & folded along this mark and then applied tape to the top portion and attached it to the front scallop ... viola!!!!! I now have a card that will open ... I use this method a lot esp if I only have a short supply of card I want to use as the base of my card.
Here is another card I made for this challenge ... actually I made this one first but wasn't 100% sure if I liked it so decided to make the other ... but I came back to it this morning and added the sentiment and now I don't mind it quite so much which is why I am posting it. It probably could still have a few improvements done to it, but you get the idea anyway.
For this one I cut the circles again using my nestabilities and then I ran the white circle through again using my bubbles cuttlebug embossing folder.
Riley was stamped twice and cut out ... the 2nd image I only cut out his head and attached it over the other image using foam tape. The grass is cut using the cricut ... it is leftovers I have had sitting here for about 12 months ... it finally had a use! And finally my sentiment.
Recipes:
Life's A Beach:
Stamps: Hammock Riley - Hanna Stamps; Sentiment - Impression Obsession
Paper: White; Pumpkin Pie - SU; Lakeshore - Bazzill
Other: Black Ink; Circle Nestabilities; Yellow Spica Pen; Copics
Tee-rific Day!
Stamps: Golf Riley - Hanna Stamps; Sentiment - Hambo Stamps
Paper: White; Black; Green
Other: Black Ink; Circle Nestabilities; Tiny Bubbles Cuttlebug Embossing Folder; Foam Tape; Cricut
This was a fairly simple card to create .... after cutting my shapes .... I stamped my image onto the white card and colored using my copic markers. I also used my yellow spica pen on the sand area to give it a glitter look. Doesn't Riley look like he is having fun!
Oh btw how did I make this into a card when I used my cuttlebug .... I cut two scallop circles ... on the back circle I measured down from the top approx 2cm ... scored & folded along this mark and then applied tape to the top portion and attached it to the front scallop ... viola!!!!! I now have a card that will open ... I use this method a lot esp if I only have a short supply of card I want to use as the base of my card.
Here is another card I made for this challenge ... actually I made this one first but wasn't 100% sure if I liked it so decided to make the other ... but I came back to it this morning and added the sentiment and now I don't mind it quite so much which is why I am posting it. It probably could still have a few improvements done to it, but you get the idea anyway.
For this one I cut the circles again using my nestabilities and then I ran the white circle through again using my bubbles cuttlebug embossing folder.
Riley was stamped twice and cut out ... the 2nd image I only cut out his head and attached it over the other image using foam tape. The grass is cut using the cricut ... it is leftovers I have had sitting here for about 12 months ... it finally had a use! And finally my sentiment.
Recipes:
Life's A Beach:
Stamps: Hammock Riley - Hanna Stamps; Sentiment - Impression Obsession
Paper: White; Pumpkin Pie - SU; Lakeshore - Bazzill
Other: Black Ink; Circle Nestabilities; Yellow Spica Pen; Copics
Tee-rific Day!
Stamps: Golf Riley - Hanna Stamps; Sentiment - Hambo Stamps
Paper: White; Black; Green
Other: Black Ink; Circle Nestabilities; Tiny Bubbles Cuttlebug Embossing Folder; Foam Tape; Cricut
Subscribe to:
Posts (Atom)
My birthday is the very last day of this month!!! Great Card as always Frances.