Friday, June 9, 2017

Father's Day Wishes


Hi everyone,

Have you heard the news???? Karen Burniston is back with brand new pop up card dies and a new company to boot ... you can now all things Karen at Karen Burniston in Cahoots with Riley and Company. To start off Karen has just released 12 brand new die sets.

Today I am sharing a card I created using the new Charm Accordion die set. the die creates a two page card or you can die cut multiple pages to create longer cards depending on what look you want. As you can see I have only die cut the main die once to create my card which I have turned in to a Father's Day card as I always need a stack of those. 

To decorate my card I have used the cute fox from the new Woodland Animals die set .... you get to create three different animals from this one die set.


Here is a look at the front of the card when it is closed ready to be placed in an envelope. I added a sentiment from Karen's Words Set 2 - Birthday die set.

I am looking forward to experimenting more with this fun die set ... stay tuned!

Stamps: Happy Happy Happy - Lawn Fawn
Paper: White; Brown; Green; Silver; Gold; DP
Dies: Charm Accordion; Woodland Animals - Karen Burniston
Other: Black Ink; Stars; Foam Tape


Thursday, June 8, 2017

Waving Hello


Hi everyone,

It's challenge time with my friends over on the CCEE Stampers challenge blog. I continue to issue the challenge for the month of June.

Today is World Oceans Day, so for our challenge this week I asked the team to create something that reminds them of the ocean.


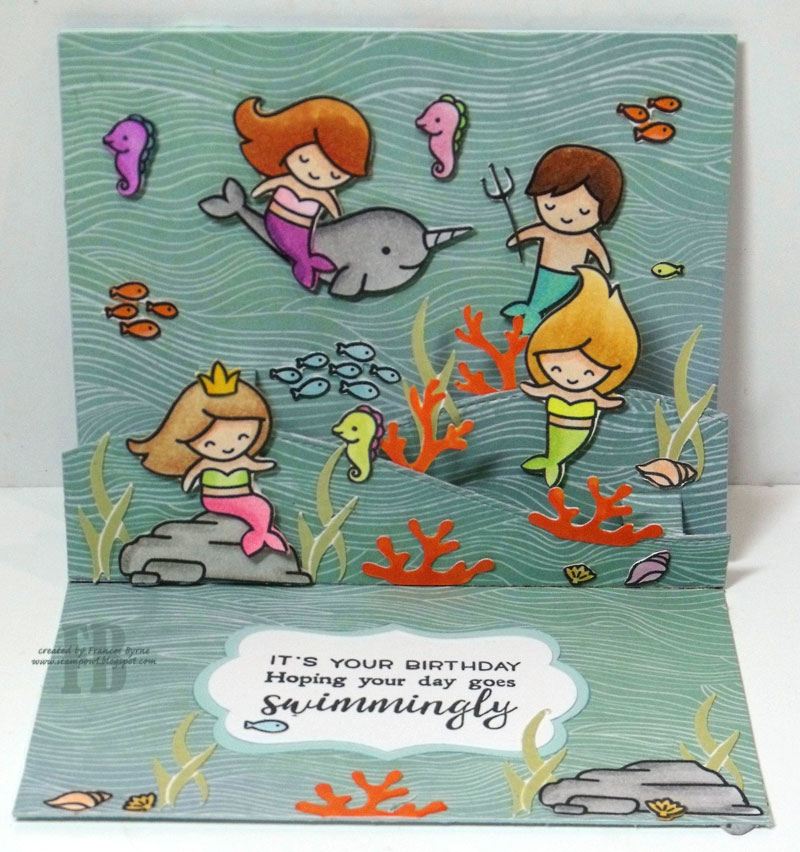
I had hoped to have had the new Lawn Fawn Waves add on that fits onto the Stitched Hillside Pop-Up die which is what I used to create my card. But as I couldn't use the waves I decided to use it anyway. 

I decorated my card using the Lawn Fawn Mermaid for You stamp set. I used my Scan N Cut to cut out all the images which made cutting so many images a breeze. Especially since I think I stamped almost every image in the set twice.


Here is a side view of my card so you can see the pop up part of the card a little better. I also found the sentiment in a freebie stamp set I received in a magazine recently.


For the front of the card I used the Stitched Hillside Pop Up die again to create the waves of my card. I hid the cut lines from the tab by placing some coral and weeds over them. The designer paper on the front of the card is a little bluer than that on the inside as the designer paper has an ombre look to it.

Don't forget to check out the CCEE Stampers blog (goes live 12 AM EST) to see the rest of the creations the CCEE Stampers created this week. You can also see more details of their creations on their individual blogs:


Vicky Gould


Stamps: Mermaid for You; Jump for Joy - Lawn Fawn; Sea View Collection - Sheena Douglas
Paper: White; Blue; Ripples DP - Kaisercraft
Dies: Stitched Hillside Pop-Ups - Lawn Fawn; Pop It Ups Katie Label Pivot Card; ModaScrap Stitched Fishtail Banners - Elizabeth Craft Designs
Other: Black Ink; Carved Pumpkin Distress Ink; Shabby Shutters Distress Ink; Scan N Cut; Wink of Stella Clear Glitter Pen; Foam Tape; Copics


Wednesday, June 7, 2017

ECD June Die Cut Designer Challenge


Hi everyone,

It's time for our June Die Cut Design Team Designer challenge. Check out the Elizabeth Craft Designs blog today to see what our talented designed created for the challenge.

 Anything but a Card - for our challenge this month let's create a project that is anything but a card. Think along the lines of a home décor item; journaling etc.

For my project today I decided to create a piece of home décor by creating some artwork that can be hung on the wall using a photo frame I purchased a few years ago. There are so many fun frames out there which can be used to display the art we create.

**************************

For today's challenge Elizabeth Craft Designs are giving away .... two sizes of the Clear Double Sided Adhesive which will include: a pack of the 5” x 12” sheets and a 10 mm roll of tape, in addition we will also give away a pack of the new ModaScrap 12” x 12” Viaggi Vintage Patterned Paper Pack to 3 winners. 

To enter simply leave a comment on the Elizabeth Craft Designs Challenge post and tell us "Besides the classic card, what are some project ideas you like to play around with?

We will select 3 lucky winners in a random drawing 

The winners will be announced on Friday, June 9 on the Elizabeth Craft Designs blog.


************************


To create my art pieces to place into my frame I first cut out 6 pieces of White Soft Finish Cardstock which measure 2 5/8 inches x 3 5/8 inches.

I used distress oxides direct onto my craft sheet to add color to each of the cards using Broken China, Faded Jeans and Cracked Pistachio. 

On the artwork about I added the A Way with Words - Live to the card using black cardstock.


I decorated three of the panels using the ModaScrap Lacy Poppies die set, die cutting the poppies from White Soft Finish Cardstock and then coloring using red and green Copic Markers. 


In the centre of the full poppies I added black prills. 


I also used stencils to add a little more interest to my background on each of the panels. The "Stitched Lines" use the Behind the Scenes Mountains & Split Rail Fence using Vintage Photo Distress Ink.


I also used A Way with Stencils - Butterflies and Stars & A Way with Stencils Dotty on each of the backgrounds.


I hope you enjoyed my project today. Don't forget to check out the Elizabeth Craft Designs blog to see all the wonderful creations by our talented designers and for a change to win the giveaway.


Other:

Inks - Broken China Distress Inks; Faded Jeans Distress Inks; Cracked PistachioDistress Inks; Iced SpruceDistress Inks; Vintage Photo Distress Inks
Copics
3D Photo Frame

Tuesday, June 6, 2017

Tickled Pink


Hi everyone,

Today I am sharing another animated card using stamps from Uchi's Design ... I am just loving playing with these stamps to create these fun cards.

Simon Says Stamp! May card kit included this fun Uchi's Design Animated Stamp set which was exclusive to Simon Says Stamp! I have never purchased a card kit before, but as it contained this set which had a few images I really likes (including the flamingo above) I decided to order the kit!

These cards are so much fun to make and even my husband commented on how fun they are which he doesn't often do as he sees so many cards I make lol!


I love how the flamingo moves as you move the sentiment back and forward. check out the video to see the card in action.

To create my card I used an idea show by the owner of Uchi's Designs showed on a video using one of her Animation Card Die Sets. I don't have the die but I was able to do something similar using dies I had in my stash. I also trimmed the sides down to create a narrower card.

I added two pink flamingos to my card using MFT Stamps Flamingos die set. The designer paper used on the card is one that came in the Simon Says Stamp card kit.

I decided not to put a frame around the oval window as it would have covered up too much of the designer paper.


For the inside of the card I used the oval panel that came out when I cut the window for the front of the card. I then added a sentiment onto a fishtail banner.


Stamps: Simon Says Stamp Animation Stamps - Uchi's Design; Tickled Pink - MFT Stamps
Paper: White; Pink;  Peach; Black; Illustrated Faith Designer Paper
Dies: Stitched Ovals - Elizabeth Craft Designs; Accent It Flags & Tags; Blue Prints 2; Flamingos - MFT Stamps
Other: Black Ink; Animation Grid - Uchi's Designs; Foam Tape; Copics


Monday, June 5, 2017

Hoot Hoot Hooray!


Hi everyone,

I have another Animation card to share with you today, using the Uchi's Design Flying Owls Animation Stamp set.

To create my card I followed a video created by the owner of Uchi's Designs to make a envelope type slider card.

By sliding the sentiment back and forth you can see the owl moving.

I added flowers and leaves from ModaScrap to the top right hand corner of my card.


Here is a short video showing my card in action.


For the inside of the card I added a cute little owl and a sentiment.


Stamps: Flying Owls Animation Stamps ; Owls - Uchi's Design; Birthday Owl - Dare 2B Artzy; Hoot Hoot Hooray - Taylored Expressions
Paper: White; Rust; Morning Light DP - Kaisercraft
Dies: Stitched Circles; Dotted Scallop Circles; ModaScrap Stitched Fishtail Banners - Elizabeth Craft Designs; Accent It Flags & Tags - MFT Stamps
Other: Black Ink; Animation Grid - Uchi's Designs; Foam Tape


Sunday, June 4, 2017

Hello Friend Owl


Hi everyone,

Today I am sharing a card I created using Uchi's Design Small Animation Card die set. This die set comes with the animation grid and one animation owl stamp.

This is my first try  at creating this type of card, so this card isn't perfect, but it is still fun!

Here is a quick video which shows my card in action.


Here is the card when it is opened. By opening and closing the card, the owl starts moving around.

This card measures 3 inches x 4 inches when it is closed so it is fairly small.

Even my husband was impressed with these stamps, he may admire my cards but I don't see him looking through my stamps. Well when I showed him these stamps he asked what else I had and when he saw told me I need more haha! 


Stamps: Small Animation Card DC102 - Uchi's Design
Paper: White; Red; Julie Nutting Blush DP - Prima
Dies: Small Animation Card DC102 - Uchi's Design
Other: Black Ink; Animation Grids - Uchi's Design


Saturday, June 3, 2017

Happy Happy Happy


Hi everyone,

It’s challenge time with the “Crazies” over on the Crazy 4 Challenges blog. Being a brand new month it is time to introduce our new challenge hostess which is Joanne Grzelak.

Today is Repeat Day! On your creations this week, you are to repeat some part of your design at least three times. Could mean three same sized circles, three of the same flower.......three of something on your card.


I recently received the Concord & 9th Party Pop Up Card die set and of course I wanted to play with it, so I used it for  todays challenge. I have 5 presents along the bottom of the pop up and 5 bows!


Here is another look at the inside of my card this time taken at a different angle so you can see the pop up part a little better.


I kept the front of the card simple as the focus is on the inside. I repeated the word "Happy" three times to make sure I had this challenge covered 😉. 

Don't forget to check out the rest of the “Crazies” cards over on the Crazy 4 Challenges blog and also their individual blogs for more details.


Stamps: Happy Happy Happy  - Lawn Fawn
Paper: White; Pink; Green; Blue; The Birthday Wishes DP - DCWV
Dies: Party Pop Up - Concord & 9th; Happy Happy Happy - Lawn Fawn; ModaScrap Stitched Fishtail Banners
Other: Black Ink; VersaMark Ink; White Embossing Powder; Copics


Friday, June 2, 2017

Lovebirds Lace Corner Birthday


Hi everyone,

It's my turn to post a tutorial today for the Die Cut Design Team over on the Elizabeth Craft Designs blog. Today I decided to play with some of the new ModaScrap products, the Lace Corner and the  Color of Puppies Girl Papers, I just love this new range of papers.

Here is how I created my card:


Step 1 - 
Cut a piece of pink cardstock that measures 11 inches x 5 1/2 inches. Score along the 11 inch side at 5 1/2 inches to create a top folding card.
  • Using the largest square from the Stitched Squares die set die cut a square from brown cardstock.
  • Using the largest square from the Fitted Squares die set die cut a square from patterned paper.
  • Die cut the ModaScrap Lace Corner die from dark pink cardstock. Fold along score lines and attach to the lower right hand corner of the card.
  • Adhere the layers to the pink card base.

Step 2 -
Die cut the Lovebirds using White Soft Finish Cardstock. Color the image using Copic markers.
  • Use the second smallest oval from the Stitched Ovals die set to die cut an oval from White Soft Finish Cardstock.
  • Use the third smallest oval from the Dotted Scallop Ovals die set to die cut an oval from Brown Cardstock.
  • Layer the lovebirds to the oval layers using foam tape.
  • Adhere a black prill to the lovebirds eyes.
  • Adhere to the left side of the card using photo below as a guide.


Step 3 - 
Use the middle circle from the Entwined Circles die set, die cut two circles from brown cardstock.
  • Cut the circles in half and arrange around the oval. One half circle on the left side and three half circles on the right side of the oval. (Trim circles as necessary so that they are at varying sizes.)
  • Add Pink/Silver Glitter Dots Peel Off Stickers to the circles.
Step 4 - 
Using the "Happy Birthday" sentiment from the General Sentiments Clear Stamp set, stamp onto a piece of brown cardstock using VersaMark ink, cover with white embossing powder. Emboss using heat gun.
  • Die cut sentiment using the smallest fishtail banner from the Stitched Fishtail Banners die set.

Step 5 - The Inside of the Card:

  • Using the largest square from the Stitched Squares die set die cut a square from brown cardstock.
  • Using the largest square from the Fitted Squares die set die cut a square from White Soft Finish Cardstock.
  • Die cut the ModaScrap Lace Corner die from dark pink cardstock. Fold along score lines and attach to the lower right hand corner of the card.
  • Adhere the layers to the inside of the card.
Step 6 -
Die cut the A Way with Words - Happy Birthday 2 sentiment using brown cardstock. Adhere to the upper part of the card using photo above as a guide.

Step 7 -
Die cut the Lovebirds using White Soft Finish Cardstock. Trim off the top lovebird/branches and color using Copic markers.
  • Adhere the lovebird to card using photo above as a guide.
  • Adhere a black prill to the lovebirds eye.
Thanks for stopping by today, I hope you enjoyed my tutorial.

Supplies:
Elizabeth Craft Designs - 


Other: 

Cardstock - Pink; Dark Pink; Brown
VersaMark Ink
White Embossing Powder
Heat Gun
Copics

Foam Tape


Thursday, June 1, 2017

I Donut Know


Hi everyone,

It's challenge time with my friends over on the CCEE Stampers challenge blog. Being a brand new month it is time to introduce our new challenge hostess which is Me!!!!!!

Apparently the 2nd June is Doughnut Day so for our challenge today create something that has some type of "hole" in it. It could be a doughnut, cheese, fancy fold card with a hole ... anything!


I decided I needed to add a doughnut stamp/die set to my collection for this challenge so I purchased this one from Reverse Confetti.

As I just received the new Concord & 9th Triangle Turnabout stamp, I had to try that out for my background ..... love love love this stamp. I used colors on the background that are in my  doughnuts. This background stamps works so well in the MISTI.


I created a Gatefold Shutter card using the Nellie Snellen Magic Card Round die set. When you open the card, the circle at the centre top opens up.


Here you can see the card started to reveal the hidden message behind the shutters.


Here is my card fully opened.


Here is a quick video showing my card in action as it opens and closes.


One final photo of my card when it is closed laying on my desk.


Don't forget to check out the CCEE Stampers blog (goes live 12 AM EST) to see the rest of the creations the CCEE Stampers created this week. You can also see more details of their creations on their individual blogs:


Stamps: Donut You Know - Reverse Confetti; Triangle Turnabout - Concord & 9th
Paper:White; Brown; Pink
Dies: Magic Card Die Round - Nellie Snellen; Donut You Know Confetti Cuts - Reverse Confetti
Other: Black Ink; Worn Lipstick Distress Oxide; Vintage Photo Distress Oxide; Brilliance Pearlescent Beige; Brilliance Pearlescent Coral; Foam Tape; Copics