Monday, March 20, 2017

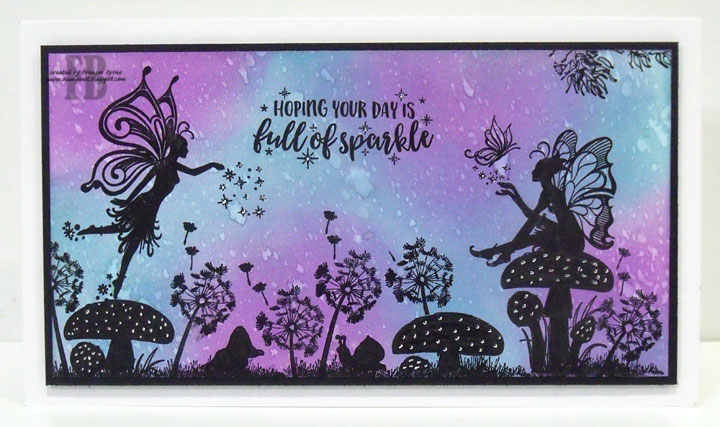
Full of Sparkle


Hi everyone,

A couple of weeks ago when I was looking through the Papercraft magazines at the newsagent, I found a copy of Papercraft Essentials which included a free set of stamps/embossing folder called Fairy Wishes. As you can see I added that stamp set to my collection 😀.


For the background of my card I blended Broken China Distress Oxide and Wilted Violet Distress Oxide inks onto white watercolour cardstock. I also spritzed the cardstock with water after apply the ink to get the distress look to the card.

I created the scene to my card stamping all of the images with black ink. I coloured used a black marker to add color to the mushrooms and snail to give them a silhouette look.


For the inside of the card I added two sentiments and the two fairies from the Fairy Wishes stamp set.

Stamps: Fairy  Wishes - Freebie from Papercraft Essentials Magazine; Beach Grass - Hero Arts; Mushrooms (small) - Stampendous
Paper: White; Black
Other: Black Ink; Broken China Distress Oxide; Wilted Violet Distress Oxide; Fun Foam


Sunday, March 19, 2017

Hoppy Easter


Hi everyone,

Earlier in the week I shared an Easter Card I created for my Grandson using the Art Impressions Honey Buns stamp set that uses an action wobble on the bunnies tail to make the tail wobble. Today I have a girl version to give to my Granddaughter.

As you can see I still have some backgrounds left over from the play day I had a week or two ago when I first received my Distress Oxide ink pads. For this one I applied the ink pad my craft mat and then used a brush to apply the ink directly to the cardstock, love how this one turned out. I did spritz the card after the ink had been applied. 

I added the bunny onto a stitched circle from Elizabeth Craft Designs which is partially off two edges of the card.


For the inside of the card I added an Easter Egg and grass using the Easter Egg die set from Elizabeth Craft Designs. The background on the egg is also been done using distress oxide ink pads. 

Stamps: Honey Buns Set - Art Impressions; One Big Hoppy Family - Sugar Pea Designs; Easter "Egg"specially Good! - Rubbernecker Stamps
Paper: White; Green; Pink
Dies: Stitched Circles; Fitted Fishtails; Easter Eggs - Elizabeth Craft Designs
Other: Black Ink; Peeled Paint Distress Oxide; Fossilized Amber Distress Oxide; Worn Lipstick Distress Oxide; Action Wobble; Clear Double Sided Adhesive Tape - ECD; Foam Tape; Copics


Saturday, March 18, 2017

Tall Cake


Hi everyone,

It’s challenge time with the “Crazies” over on the Crazy 4 Challenges blog. As I am the challenge hostess for the month, I continue to issue the challenges. 

Being the third Saturday of the month it is time for a sketch challenge.


For my card today I used Penny Black's Tall Cake stamp set, I have been wanting this stamp for a while and finally got around to add it to my collection 😀.


For the inside of my card I used the Pop It Ups Happy Birthday Pop Up Card die set and added a sentiment to the base of the card.


Here is another view of my card taken at a different angle so you can see the pop up part of the card a little easier.


Don't forget to check out the rest of the “Crazies” cards over on the Crazy 4 Challenges blog and also their individual blogs for more details.
Birgit Norton (March Guest Designer)


Stamps: Tall Cake - Penny Black; Square Sayings 4 x 5 3/4 - Simon Says Stamp!;   Best Birthday Wishes - C.C. Designs
Paper: White; Red; Pink; Blue; Yellow; Fairy Bread DP; True Love DP - Kaisercraft
Dies: Pop It Ups Happy Birthday Pop Up Card; Pop it Ups Circles and Labels; Pop it Ups Fancy Seasons Frame Edges; Fitted Circles; Stitched Circles - Elizabeth Craft Designs
Other: Black Ink; Clear Double Sided Adhesive Tape - ECD; Sprinkled Sugar Stickles; Glossy Accents;  Foam Tape; Copics


Friday, March 17, 2017

Welcome Little One


Hi everyone,

Today I am sharing a baby card I made recently using products from Elizabeth Craft Designs. This was inspired by the inside of a card I created last year and came across recently when I was looking for something else.

I used White; Rosebud and Perfect Pink Soft Finish Cardstock to create my card. To decorate the card I used the tiny dot background stamp which is included in the Krista Schneider Jungle Cuties stamp set to decorate the white panel. 

I used the Stitched Squares to create the two pink squares and added Pink/Silver Glitter Dots Peel Off Stickers to each square for extra decoration.

On the lower right hand corner I added a sentiment from the Pop it Ups Baby Clear Stamp set.


For the elephant layer I used the Stitched Squares for the white panel and the Dotted Scallop Squares die set for the scallop layer. As it was going to be sitting above two different colored pink squares I die cut two Dotted Scallop Squares in two colors and then cut them in half diagonally and pieced them together of I could have light and dark pinks together.


For the inside of the card I added the A Way with Words - Baby Love die set for the sentiment and stamped the "Girl" which is from the Pop it Ups Baby Clear Stamp set.  To finish off the inside I added the Stitched Fishtail Banners and Pink/Silver Glitter Dots Peel Off Stickers.

Stamps: Jungle Cuties; Baby - Elizabeth Craft Designs
Paper: White; Rosebud & Perfect Pink Soft Finish Cardstock - Elizabeth Craft Designs
Dies: Jungle Cuties; Stitched Squares; Dotted Scallop Squares; ModaScrap Stitched Fishtail Banners; A Way with Words Baby Love - Elizabeth Craft Designs
Other: Black Ink; Worn Lipstick Distress Oxide; Pink/Silver Glitter Dots Peel Off Stickers - ECD; Foam Tape; Copics


Thursday, March 16, 2017

Sweet Fun


Hi everyone,

It's challenge time with my friends over on the CCEE Stampers challenge blog. Lynn McAuley our challenge hostess for the month continues to issue the challenges.


National Button week is coming up, so make use of buttons or faux buttons on your project or creation. Perhaps that might a specially made box or jar in which to keep some of your favorite buttons. 

For my card today I decided to create a tent card using the Pop it Ups Oval Accordion Card die set, you can see a tutorial I wrote a couple of years ago on how to make this style of card on the Elizabeth Craft Designs blog here.

To decorate my card I used the cupcake and macarons from the Krista Schneider Tea Time stamp set. I added a button to cover the cherry in the cupcake for the challenge part of this card. 

For the sentiment I used the 'sweet' from the A Way with Words - Sweet  Smiles and the 'fun' from the A Way with Words - Fun Play die sets covering the sentiments with Soft Green Silk Microfine Glitter.


Here is another photo of my card taken at a different angle, so you can see the folds in the card a little better.

Don't forget to check out the CCEE Stampers blog (goes live 12 AM EST) to see the rest of the creations the CCEE Stampers created this week. You can also see more details of their creations on their individual blogs:


Vicky Gould


Stamps: Tea Time - Elizabeth Craft Designs
Paper: White; Pink; Sugar & Spice Baby Bunting DP - Doodlebug Inc.
Dies: Pop It Ups Oval Accordion; Tea Time; A Way with Words Sweet Smiles; A Way with Words Fun Play - Elizabeth Craft Designs
Other ECD Products: Clear Double Sided Adhesive Tape; Soft Green Silk Microfine Glitter; Pink/Silver Glitter Dots Peel Off Stickers
Other: Black Ink; Pink Button; Foam Tape; Copics


Wednesday, March 15, 2017

It's all about π (Pie)


Hi everyone,

Welcome to our Paper Pros challenge for March. This time round our challenge is hosted by me!!!!

This month the date of our challenge in the USA is March 14 (3.14) which also happens to be Pi (Ï€) Day! Pi (Greek letter "Ï€") is the symbol used in mathematics to represent a constant - the ratio of the circumference of a circle to its diameter - which is approximately 3.14159.  So the theme for our challenge is Pi Day - think pie or circles or both with a little green thrown in for Patrick's Day which is on the 17th. 


As you can see I was thinking "pies" when I made my card for our challenge. I received the oven from Lawn Fawn for a Christmas gift so I knew I wanted to use that with a pie inside. After search for someone holding a pie, I discovered this cute digital stamp from Imagine That of Gertie Goose which also comes with the gooseberry pie sentiment.

I created a kitchen scene using the Pop it Ups Lots of Pops Pop Up Card die behind the oven. I also used the pop up die included in the Hot Air Balloon die set behind the goose, so it looks like the goose is just in front of the oven.

When I created my card I forgot all about the second part of the challenge which was to include green in my card. Fortunately because of the designer paper I selected for the background of my pop up I used a fair bit of green. Phew!!!!!


Here is a look at the pop up card taken at a different angle so you can see the pop up part of the card a little better.


For the front of my card I used a larger pie from a Hero Arts stamp I have in my stash. The sentiment and π symbol are computer generated.

You can see what the other "Paper Pros" created for this challenge on there blogs:


Stamps: Sprinkled with Joy - Lawn Fawn; Gertie Goose Pie Digital Stamps - Imagine That; What's the Scoop - Hero Arts
Paper: White; Farmers' Market DP - Graphic 45; Bumper Lane DP - Imaginisce
Dies: Pop it Ups Lots of Pops Pop Up Card; Pop it Ups Hot Air Balloon; Stitched Circles; Dotted Scallop Circles - Elizabeth Craft Designs
Other: Black Ink; Foam Tape; Copics


Tuesday, March 14, 2017

Happy Easter Penny Slider


Hi everyone,

It's my turn to post a tutorial on the Elizabeth Craft Designs blog today for the Coloring Design Team. With Easter only a month away I thought it would be fun to create an Easter Card using the Krista Schneider Woodland Pals stamp set and coordinating dies, there is a cute little rabbit in this set which makes it perfect for Easter.

As you can see I decided to create a Penny Slider card using Joset Designs Sliders and Spinners die set.  It is optional as to whether you use pennies or cardboard circles for the spinner mechanism, however the weight of the pennies does make the image spin and slide better. If you don't have access to pennies, try metal washers that is covered with card.


Here is a video of my card showing how the rabbit slides and spins along the sliding track to reach the basket of Easter Eggs.

Here's how I created my card:


Step 1 - 
  • Cut a piece of blue cardstock that measures 5 inches x 5 1/8 inches.
  • Cut a piece of green polka dot designer paper the same size as the blue cardstock. Place the cloud die from the CountryScapes Cloud & Grass die set in the centre of the designer paper and die cut.
  • Adhere the die cut cloud designer paper to the bottom of the blue card to create grass.
  • Using the middle sized curvy slider from the Sliders and Spinners die set, die cut approximately 3/4 inches up from the bottom of the card as per bottom photo above.

Step 2 - 
  • Use the second largest fishtail banner from the Stitched Fishtail Banners die set to cut a banner from white cardstock.
  • Using the "happy" from the A Way with Words - Happy Birthday 2 die set, die cut the sentiment from black cardstock that has Clear Double Sided Adhesive Tape on the back. Adhere the sentiment to the fishtail banner so the end of the word is close to the fishtail part of the die.
  • Using the "Easter" sentiment from the Happy Easter Peel Off Stickers adhere under the "happy" die cut as per photo above.
  • Adhere banner to the top left section of the card.


Step 3 -
  • Using the Props 7 die set, die cut the following:
  • (1) Basket from White Soft Finish Cardstock
  • (1) Basket Detail pieces from White Soft Finish Cardstock
  • (1) Grass piece from White Soft Finish Cardstock
  • (5) Easter Eggs
  • Color basket pieces, grass and eggs. Assemble the basket (refer to Karen Burniston's photo above on how to do this).
  • Add the grass piece and 5 eggs to each basket.
  • Add the basket to the card on the left side of the slider track. (See photo below)

Step 4- 

  • Using the Woodland Pals stamp set, stamp the rabbit; tree; bird and two rows of flowers on White Soft Finish Cardstock using black ink.
  • Using the Woodland Pals coordinating die set, die cut all the images.
  • Color as desired.
  • Adhere the tree, flowers and bird to card as per photo above.
Step 5 - 
  • Optional - die cut two circles from designer paper to match the grass using the Circles Background die. 
  • Cover two pennies with the designer paper circles. (if you don't mind seeing the penny through the slider you can just use the pennies without the added designer paper on top).
  • Adhere a piece of Clear Double Sided Adhesive Tape to the back of some white fun foam and use the 4 circles die included in the Sliders and Spinners die set to die cut the fun foam.
  • Adhere two of the fun foam circles onto one of the pennies so that the fun foam circles are on top of each other.
  • Place the penny to the back of the card so that that fun foam circle goes through the hole in the slider track.  (See photo above on left)
  • Attach the second penny over the top of the first penny as per photo above right.

Step 6 -

  • Turn the card over so that the front of the card faces the table and apply two layers of foam tape to the back of the card.  (I forgot to take a photo of my card at this step, but you can get the idea of where to apply it using the photo above as a guide). Be careful to keep the tape well away from where the pennies will be travelling up and down the slider track.


Step 7 - 
  • Cut a piece of blue cardstock that measures 5 inches x 5 1/8 inches.
  • Adhere the off cut designer paper that was left over when you die cut the cloud and adhere to the bottom of the card. 
  •  Adhere the front of the card to this piece, so that the designer paper on the piece above can be seen through the slit in the slider track.

Step 8 - 
  •   Cut a piece of  White Soft Finish Cardstock that measures 5 1/2 inches x 11 1/4 inches. Score at 5 5/8 inches to create a top folding card.
  • Adhere front of card to card base.
  • Adhere the bunny to the top penny.


 Step 9 - Inside of the card:

  • Cut a piece of designer paper that measures 5 1/2 inches x approximately 2 inches. Place cloud die at top of designer paper and die cut. Adhere the cloud designer paper to bottom of card.

  • Using the Woodland Pals stamp set, stamp the rabbit;  wide tree; bird and long row of flowers and small row of flowers on White Soft Finish Cardstock using black ink.
  • Using the Woodland Pals coordinating die set, die cut all the images.
  • Color as desired.
  • Adhere the all images to card as per photo above.
Step 10 -
  • Stamp the "Thinking of You" sentiment from the General Sentiments stamp set to the card as per photo above.
 Thanks for stopping by today, I hope you enjoy my tutorial.

Supplies:


Elizabeth Craft Designs:

Woodland Pals Stamp Set
Woodland Pals Dies
General Sentiments
Sliders and Spinners
A Way with Words - Happy Birthday 2
ModaScrap Stitched Fishtail Banners
CountryScapes Clouds & Grass
Circles Background (optional)
White Soft Finish Cardstock
Happy Easter Peel Off Stickers
Clear Double Sided Adhesive Tape 64mm

Other:
Cardstock - Blue
Designer Paper - Kaisercraft Pop! Collection Lollipop 12 x 12 paper
Inks - Black
Pennies
Fun Foam
Foam Tape
Copics


Monday, March 13, 2017

Hoppy Easter


Hi everyone,

Easter is only about a month away now, so I thought I should start making a couple of cards to give to my Grandchildren when I give them their Easter gift. Last year I purchased this cute Honey Buns stamp set from Art Impressions that uses an action wobble to make the bunnies tail wobble when you touch it. I figured the kids would enjoy playing with the tail and making it wobble so that is what I used for both cards.

Today I am sharing the card I created for my Grandson. The background piece was created using Distress Oxide ink pads in Faded Jeans, Broken China & Peeled Paint. I went direct to paper with the ink pads and then used a paint brush across the card. 

I used the Diamond Background die from Elizabeth Craft Designs over the top of the Distress Oxide panel.

I added a sentiment to the top of the card which is layered using the ModaScrap Stitched Fishtail Banners.


For the inside of the card I added an Easter sentiment and border both of which I have had in my stash for years.

Stamps: Honey Buns Set - Art Impressions; One Big Hoppy Family - Sugar Pea Designs; Easter Egg Garden - Hero Arts; Easter "Egg"specially Good! - Rubbernecker Stamps
Paper: White; Green; Blue
Dies: Diamond Background; ModaScrap Stitched Fishtail Banners - Elizabeth Craft Designs
Other: Black Ink; Faded Jeans Distress Oxide; Broken China Distress Oxide; Peeled Paint Distress Oxide; Action Wobble; Foam Tape; Copics


Sunday, March 12, 2017

Lantern Box


Hi everyone,

Today I am sharing a box I created using the ModaScrap Lantern Box die.


The actual die creats a flower cut out into the box as you can see on the packaging photo included above. I decided to change the box up a little by adding a flower from the Bunch of Flowers 4 die set and the ModaScrap Leafy Branch 2 to each side of the box.


On the top of the box I added a ribbon which helps keep the box closed.


Paper: Dark Pink; Orchid DP - Kaisercraft
Dies: ModaScrap Lantern Box; ModaScrap Leafy Branch 2; Bunch of Flowers 4 - Elizabeth Craft Designs
Other ECD Products: All Metal Tool Kit; Kids Choice Glue; Clear Double Sided Adhesive Tape 6mm; Ribbon


Saturday, March 11, 2017

Butterflies


Hi everyone,

It’s challenge time with the “Crazies” over on the Crazy 4 Challenges blog. As I am the challenge hostess for the month, I continue to issue the challenges. 


Tuesday 14th March is both Moth-er Day (focusing on Moths) and Learn About Butterflies Day. So for our challenge this week include a Butterfly or Moth on your card. Bonus points if you include a flower on your card to celebrate Plant a Flower Day tomorrow (12th March)


For my card this week I decided to create a Pull card using the Pop it Ups Oval Pull Card die set designed by Karen Burniston for Elizabeth Craft Designs. To decorate my card I used a flower from the Krista Schneider Spring Blooms stamp set and also the ModaScrap Dancing Butterflies.


For the inside of my card I added a sentiment and another butterfly.

Don't forget to check out the rest of the “Crazies” cards over on the Crazy 4 Challenges blog and also their individual blogs for more details.
Birgit Norton (March Guest Designer)

Stamps: Spring Blooms - Elizabeth Craft Designs; Birthday Joy Calligraphy - Paper Inspirations
Paper: White Soft Finish Cardstock - ECD; Dark Pink; Orchid DP - Kaisercraft
Dies: Spring Blooms; Pop it Ups Oval Pull Card; Pop it Ups Rectangle Pull Card; ModaScrap Dancing Butterflies - Elizabeth Craft Designs
Other ECD Products: Pink/Silver Glitter Dots Peel Off Stickers; Gold Lines Peel Off Stickers
Other: Black Ink; Foam Tape; Copics