Thursday, August 17, 2023

Whale Hello There


Hi Crafty Friends,

Today I am sharing a whale themed Slide and Lock Box Card I created recently.

Sam Calcott recently shared a tutorial on this style of card. The oval panel on the front of the card is designed to slide onto the card to keep the card shut. You can see Sam's tutorial here.


I used one of the ovals from the Supersized Nestables Ric Rat die set for the oval which slides onto the front of the card. I splattered ink over the oval.

To decorate my card I used the whale from Text{ures} Layering Sea Creatures die set from the Deep Blue Collection. The sentiment is from the Sea and Sentiments stamp set.


This basically is a gatefold card, but I scored the centre of the back of the card so that the back folds which means the whale oval panel card be on the card when displayed. 


For the white panels on the centre of the card, I added the sea creatures which are also from the Sea and Sentiments stamp set. I added the "Whale-ly" birthday sentiment from Trinity Stamps, stamp part of the sentiment on each of the panels.


Here is a closer look at the oval panel. I cut two ovals, and added two score lines at the centre of one of the ovals and then adhered this to the front oval. The front of the gatefold card then slides in between the two ovals.


Wednesday, August 16, 2023

Magnolia Birthday


Hi Crafty Friends,

Welcome to my blog, today I am sharing a floral 5 x 7 birthday card with you.

A couple of months ago  I shared Slimline card using Text{ures} Magnolia Washi Tape from the Magnolia Drive Collection. At that time the Magnolia Half Tone Stamp/Die set was out of stock. It finally came back in, so of course I had to get it. I love the dotty effect the stamp gives to the flower.

I used the magnolia stamp to stamp onto my white rectangle panel, I then splattered gold paint over the white areas of the card. I used the outline die included in the set and die cut from gold mirror cardstock and adhered this over the stamped magnolia.

I added the Happy Birthday sentiment using the Creative Craft Products Modern Sentiments die set.


For the inside of my card I added a birthday sentiment and added part of the flower to the lower right hand corner.


Tuesday, August 15, 2023

Purrrfectly Wonderful Day


Hi Crafty Friends, 

Today I am sharing a Cat themed 5 x 7 card. 

For the background of my card I used Creative Craft Products' Triangles 5 x 7 Cover Plate die. I die cut it from white and black cardstock and then layered the two together, offsetting slightly. I then layered the background onto a rainbow patterned paper I have had in my stash for years.

To decorate my card, I used the Stampendous Kitty Hugs die set and coordinating stamp set.


For the inside of the card I added two sentiments and three cat faces from the Kitty Hugs stamp set.


Monday, August 14, 2023

Birthday Happy Mail


Hi Crafty Friends,

Thanks for visiting my blog. Today I am sharing a 5 x 7 card featuring Faux Post.

About a month or two ago, Waffle Flower Crafts released a series of Faux Postage stamps, dies and stencils. It's been years since I have done anything faux post related and I loved the products that were released, so of course I ordered some.

I used the Postage Collage die set which I die cut from white cardstock. I then used the Postage Collage Everyday Stencil set to add the various images to the panel. To add the stamp prices and cancellation marks I used the Postage Collage stamp set.

I layered the panel to a black card panel and then onto a 5 x 7 card base to which I added the pink gingham patterned paper.

To finish off the front of my card I added the "Birthday" sentiment using a die set from Spellbinders. I also added the "Happy Mail" wax seal using the Made To Surprise by Sam Calcott's Wax Seal Kit.


For the inside of the card, I added sentiment using Honey Bee Stamps Pick Up Lines stamp set.

I also added some more of the faux postage stamps which I cut up from the Postage Collage die set.


Friday, August 11, 2023

Water You Doing?


Hi Crafty Friends,

Today I am sharing an underwater themed Accordion Card that I created recently.

For the base of the card I used Creative Craft Products Accordion Stepper card from the Supersize Step On Up Collection. This is the larger of the two Accordion Stepper cards that have dies available from Creative Craft Products. This card measures slightly over 6 3/4 inches square when folded and will fit into a 7 inch square envelope.


To decorate my card I used stamps and dies from La-La Land Crafts June 2023 Card Kit.

My Wax Seal Kit from Made To Surprise by Sam Calcott, finally arrived so of course I had to add a wax seal to my card. You can see the Happy Birthday Wax Seal just above Marci.


I decorate the two larger squares on the back of my card, one to add a sentiment, and the other for a place to write a personal greeting.


Thursday, August 10, 2023

Dog Coffee Mug


Hi Crafty Friends,

Today I am sharing a dog & coffee themed card that I made recently. This card uses Trinity Stamps Bear Mug die set for the mug shape and the Cat & Dog Mug Add-on die set to decorate the mug and turn it into a dog mug.


To decorate the edge on the right side of my card, I used Crafter's Companions Dainty Daisies Border Edgeables die set.

The birthday sentiment is one from a Creative Craft Products stamp set.


For the inside of the card, I added a sentiment using stamps from Lawn Fawn's Critter Chatter stamp set.


Wednesday, August 9, 2023

Dragons and Fairy Tales


Hi Crafty Friends,

According to the Days of the Year website, today (9th August) is National Book Lovers Day. As I have been wanting to make an easel card using the Made To Surprise by Sam Calcott's Pop Up Wiper Book die set, I thought it was the perfect time to pull the die out and play.

To decorate my card, I used two dragon themed stamp sets from MFT Stamps to create my dragon themed fairy tale book.


I used Creative Craft Products Birthday Card Inside Out Sentiments die set to add the stopper to the base of my card. I also used a sentiment from an older Hero Arts Monthly kit to add the stamped sentiment underneath the stopper.


Here is a look at my card when it is folded. There is a fair bit of bulk to this card, approximately 3/4 - 1 inch depth, so it would need to either be hand delivered or placed in a box for mailing.


Here is a look at the base of my card, when the top portion is lifted up. There is plenty of room on the white area to write a personal greeting. 


On the back portion of the card, I added a panel so I could add another sentiment. This sentiment is from a stamp set from Scrappy Tails Craft.


Tuesday, August 8, 2023

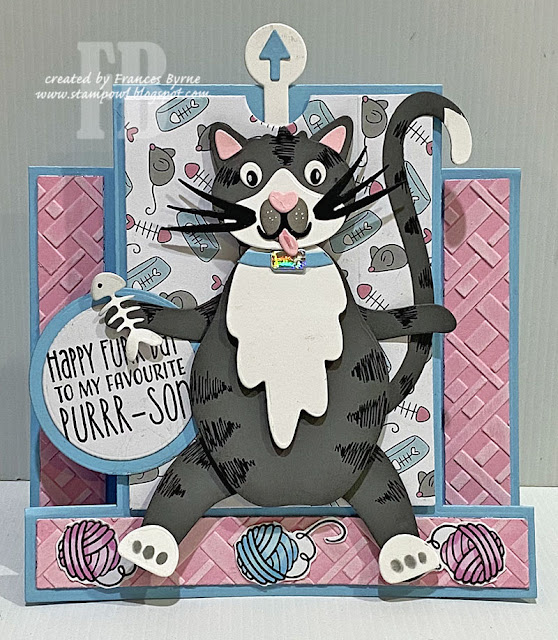
Happy Furr Day


 Hi Crafty Friends,

According to the Day of the Year Website, today (8th August) is International Cat Day. So I pulled out the Made To Surprise Cute Cat Die set from the It's Only More Puppets Collection to create a card.

Here is a quick video to see my card in action.


For this card, I pulled out an older Centre Step Card die set from Cherry Lynn Designs. This die set isn't available anymore, however I will link to one that is very similar.

I used papers from the My Pets at Home Paper Pad to add the background to the centre panel.


I die cut the cat from dark grey cardstock and added squiggles around the body, arms, legs and face to make it a tabby cat.

The sentiment and balls of wool are from the coordinating stamp set included it the set.


Here is a side view of my card, so you can see the folds a little better. I used the A2 It's Only More Puppets Mechanism die set to add the interactive portion of the card. I wasn't sure I would use this particular die when I purchased the collection and have already used it twice.


For the inside of the card, I used some more of the stamps included in the set.


Monday, August 7, 2023

On Your Wedding Day

Hi Crafty Friends,

Today I am sharing a Wedding card I created recently using the colours white and silver.

This card uses Chloe's Creative Card Wedding Heart die set. This die is larger than I was expecting, so my finished card measures approximately 6 3/4 inches square and will fit in a 7 inch square envelope. Lucky I had purchased a few envelopes of this size last year. I die cut the sentiment part of the Wedding Heart die set from Silver Holographic cardstock and then layered this onto a white pearl cardstock. 


I used Made To Surprise's Linen Embossing Folder to emboss the texture into the background panel. I also used Creative Craft Products Filigree Nested Squares for my layers.

I used flowers from Made To Surprise's Flowers and Foliage Stamp set, white embossing the flowers onto vellum. I added silver glittered embellishments to the centre of the three flowers and added pearls to the centre of the flowers on the holographic heart.


I kept the inside fairly simple, silver embossing the sentiment which is an older Paper Inspirations stamp. I also added to silver hearts to the top left section of my card.


I don't normally decorate the envelopes, but I did for this one. I added the Bride & Groom die cut sentiment to the centre of the front of the card and also added wedding rings to the lower left hand corner of the card.


I have recently purchased a few wax seals and seeing I was making a wedding card and was able to find a heart wax seal stamp from a local stationery shop, I decided to add a wax seal to the back of the envelope. This is the first wax seal I have done so far, but I am looking forward to making many more once my supplies arrive.