 While I was checking out Cindy Haffner's gallery (SCS featured stamper), I noticed she had a number of card created using sassy stems. Sassy Stems was one of the stamp sets I had delivered on Saturday so I just had to make another card casing one of Cindy's cards. Here is Cindy's card.
I changed the colors for my card using cool caribbean, lavender lace and so saffron. I have heard a lot of talk over recent months about cool caribbean and was looking forward to it getting here - however I must say after all the excitement I am a little disappointed (only a little LOL) as when I checked it up against another card I own it is really exactly the same and I have had it for years - wish I had known that earlier I might have used it more.
I am not too happy with my white gel pen, I think it is time to get another, I had to keep shaking it while I was doing my stitching - it still appears to have ink in it but I guess this one has lasted longer than most others I have had.
I used the bottom of the other flower vase (pictured) to create the background on the lavender panel. My other change to this card was using an embossing folder for the base card, I used my new dots & spots.
Recipe:
Stamps - Sassy Stems, Circle of Friendship - Stampin' Up; Verse - EK Success
Paper: Cool Caribbean, Lavender Lace, So Saffron - SU
Other: Dots & Spots Cuttlebug embossing folder; Slider Cuttlebug Die; circle punch; word window punch; paper piercing tool; paper piercing mat pack; black ink; lavender fluid chalk, thatched straw versamagic ink (to color ribbon); white grosgrain ribbon; brads; foam tape
 As you can see I am still playing with my "Best of Cluck" stamp set! The featured stamper on SCS for this week is Cindy Haffner. I have admired Cindy's work for a very long time and it is not hard to find something in her gallery you would want to case. Actually it is hard because you want to case it all LOL. I decided to settle on this particular layout as it is one I have been wanting to recreate ever since Cindy posted her first card using it.
The only thing I kept was the layout, I used a completely different stamp set. The colors I used are this weeks color challenge of pumpkin pie & bravo burgundy; as I hadn't done that challenge as yet and I loved the cards I had seen with this combo I had to give it a go. And it does suit the stamp set I used quite well. Cindy's card that I used as inspiration can be found here. Recipe:
Stamps: Best of Cluck, Rivetting - Stampin' Up
Paper: Bravo Burgundy, Pumpkin Pie - Stampin' Up; White
Other: Ticket Corner Punch, Bravo Burgundy Grosgrain Ribbon, Creamy Caramel Ink - Stampin' Up; Burnt Sienna Fluid Chalk; Black Ink; Circle punches
 I had another book club book I had to create a page in sitting on my desk so I figured I would get that one done too while I was working on book club books. The theme for this one was tags, which had to be layered onto a card. I wanted to continue playing with some of my new stamps sets, so picked the Best of Cluck set for this one.
Recipe:
Stamps: Best of Cluck - Stampin' Up; Chicken wire - alota rubber stamps
Paper: Pumpkin Pie, Bravo Burgundy - Stampin' Up; White
Other: Creamy Caramel Ink - Stampin' Up; Celeste Blue Impress Ink; Stone Gray Ancient Page Ink; Black Ink; threads
 I am in a book club with a group of stampers from Australia & New Zealand, in this club we send around a book about the size of a card and ask people to create a page for the book using a particular theme. Here is a page I just completed for one such book, the theme was art dolls. Art dolls aren't something I do very often, but fortunately I had this stamp I purchased some years back which is perfect for this particular theme, so it was fun to get it out and have a play. I guess it is a bit of a change of pace to everything else I have on this blog to date, but I want to be able to put what I do here as a record for myself.
Recipe: Lady Luck & Scratches (on red card) - Stampers Anonymous; Game Collage - Treasure Cay; Art - Collections
Paper: White, Black, Red
Other: Black Brads; foam tape; black ink; Amber Clay & Charcoal Fluid Chalks. Tria markers
 I am still playing with my stampbord, I am loving playing with this . See my post from yesterday for more information on this product. I created this card for the limited supply challenge. The theme this week was Masculine Cards, the catch was we were to use stamps which we wouldn't usually consider masculine and turn it into a masculine card - I hope I have achieved that here. I decided using the stampbord would help with the masculine look, not that stampbord is only suitable for male type cards, far from it. I colored the stampbord by inking with 3 different shades of green fluid chalks starting with the lightest and building up the colors around the edge till I had the color I wanted. After stamping my image on the stampbord I used my scratch tool to remove areas of ink to get the white effect seen here.
I decided I wanted to use a bird image so selected the one from Garden Collage that I have had for some time and of course I just had to play with at least one of my new stamps I received yesterday - so well worn words was selected for the background, I really like this background and can see me using it often. The birthday greeting is also from a new set - and was selected for no other reason other than that is was really the only suitable verse stamp I had in my new sets and as they were sitting behind me it was easier than looking for something else. It fitted where I wanted it to go so why not use it. I wanted something different on the bottom right hand side of the card for the greeting and I have been seeing a few other people using the tab punch unfolded for this purpose so I selected that punch and my oval punch I have (slightly bigger than the SU one), I am happy with the look and use this option again.
Recipe:
Stamps: Garden Collage, Well Worn Words, Canvas, Eat Cake - Stampin' Up
Paper: Always Artichoke - Stamping Up; White
Other: Lime Pastel, Olive Pastel & Warm Green Fluid Chalks; Black Ink; Olive Brads; Tab Punch - Stampin' Up; Oval Punch - Emaginations; Stampbord; Scratch Tool
 A couple of months ago when I was at a local stamp convention I purchased a product called stampbord. For those asking what on earth is stampbord, it is has a clay covered surface, that you can cover will any type of ink, paint etc. You then stamp your image onto the stampbord and using a special scratch tool you then scratch off areas that you wish to be highlighted. I didn't purchase the scratch tool at the time so hadn't gotten round to playing, but I did finally get the scratch tool this week so thought it was time to play! BTW that is a piece of undecorated stampbord lying at the bottom of the photo. For this piece I colored my stampbord using 3 different colors of fluid chalks, I started with french blue all over and then azurite around the edge leaving the middle uninked and finally blue iris just around the very edge. I used the colorbox stylus kit to help blend my colors. I then stamped my image by placing my stamp upside down and placing my stampbord on the part of the stamp I wanted. Allow this to dry and then scratch away at the areas I wanted highlighted. I was quite happy with my first attempt. I decided to use this piece like a spotlight. My background papers underneath were created using the same color inks using the dtp (direct to paper) method and then over stamping my wave stamp using my darkest color over the top. I love this wave stamp I use it soooo often for backgrounds when I am doing beach themes. By the way, if you want more info on stampboard you can find it on this site. Recipe:
Stamps: Coast to Coast - Stampin' Up; Waves - Print Blocks (Aust)
Paper: White; Black; Brocade Blue - Stampin' Up
Other: French Blue, Azurite & Blue Iris Fluid Chalks; Black Ink; Stampbord, Scratch tool; blue brads
 I am just in 7th heaven right now, my Stampin' Up demo has just left after delivering all my goodies from my Stampin' Up party I had just over a week ago. Hmmm it will be hard to decide what to use first. And I finally have the "in colors". Yes there is a couple of other things there too - 2 of the new cuttlebug embossing folders which I have been hoping would arrive and they did. I guess I will be busy mounting stamps this weekend now!
 Last night I checked out the latest theme for the Ways to use it Challenge, this week we were asked to include the color "Opulent Orchid" in our card some how. I haven't purchased any of the SU bright colors as yet as they seem to be very similar to any range I had so I went with one I do have that looks similar called Juni Purple. I do use colors in the purple family fairly often when I create a card, but looking back at my samples it seems I don't use this particular color that often - so it was a good challenge. I wanted to make another of those tent topper cards, they are soooo fun to make and so easy (I have included a side on photo this time round for you too). I remembered I had this striped paper which has a couple of purples in it including the one we needed to use plus a teal color so it was easy to work out what colors I was going to use for this one. The shadow is again a handmade stamp I created using fun foam.
Recipe:
Stamps: Hip Girl: Penny Black; Verse - Stampin' Up
Papers: Juni Purple; Teal; White; Beach towel Bikini DP by Making Memories
Other: Lavender grosgrain ribbon; black ink
 I haven't done any stamping today, however it is just about time for me to sort out the rebus swaps for this month so I thought I would show you mine. The theme this month is "Name of a Cigarette Brand". It's not a theme I would have particularly selected, someone else in our swap did and at first I wasn't going to include it in the list of swaps this year. But in the end I did, none of us smoke so it isn't for that reason it was included - it was just a case of finding something different we hadn't already rebused in past years.
In case anyone out there is following along with this, I will include the solutions to last months rebus (Name of a constellation or star) here:
1. Aries
2. Virgo
3. Taurus
4. Ursa Minor
5. Scorpio
6. Cancer
7. Pegasus
8. Orion
9. Andromeda
10. Canis Major
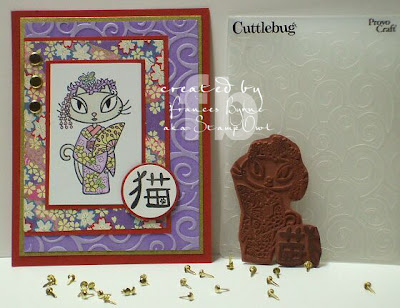 Here is another card for this weeks sketch challenge at SCS, on this one I used my Oriental Kitty by Pink Cat Studio. I am a big fan of Pink Cat Studio's stamps. I picked my background paper first which is an oriental paper and from there I chose my colors. I love the cute little paw print inside the oriental writing, I am not sure if that means anything or just something made up. I sponged white ink over the raised swirls on the violet layer.
Recipe:
Stamps: Pink Cat Studio
Paper: Oriental Paper; Red; Pale Violet Prisma Card; Gold; White
Other: Black ink; white ink; gold brads; D'vine swirl cuttlebug embossing folder, tria markers
I was tagged again today! This time by Stefanie, her blog is called Nutmeg Stamping. I hadn't come across this blog before today, that is the great thing about the tag games you do get to see blogs you would otherwise not know where around. This tag game was the one where you had to list 5 other blogs, as I have already done this I am not going to pass this tag on however if you haven't already done so I do have some great blogs under blogs I browse which you might want to check out.
 I have been wanting to make this type of a card for a while now. I should have taken another photo of it side on, sorry. Basically the main image is attached to the card so that part of it is sitting above the folded card. The part that is folded is 4.5inches square (11.5cm), you might want to cut that down to 4.25inches (11cm) so it will fit in a normal envelope - mine just fits in one, but I wanted the wider white border. I used my stamp positioner to stamp my greeting, which was no mean feat as I had to work around Mickey who is attached to the card using foam tape - it does help to decide you want to stamp a verse before you attach Mickey hehehe.
This is the last of my Mickeys that I cut out from my Mickey & Friends cartridge, so this is more than likely the last Mickey card for now, next time I play with that cartridge I might have to cut out something different.
Recipe:
Stamps: Happy Everything & Polka Dots and Paisley - Stampin' Up
Paper: White, sun yellow & red
Other: Mickey & Friends Cricut Cartridge; Happy Birthday Cuttlebug Embossing Folder; red grosgrain ribbon; black brads; black ink
I have been tagged again for a new blog tagging game, this time from Susan Blue Robot. This time I am supposed to tell you 7 things about myself, that should be a little easier.
1. I was born in England, but have spent most of my life in Australia - I am Australian!
2. I met my husband when my mothers car broke down in a garage - she rang my dh's fathers garage for help and he turned up (and no he isn't a mechanic LOL)
3. I have been stamping for approx 18 to 20 years, before that I used to create my cards using calligraphy & quilling.
4. I was a Brownie Leader for approx 14 years.
5. My favorite color is blue - that's why I picked this particular template for my blog LOL!
6. alota Rubber Stamps created some stamps in their alota bug line and named them after me and my family members (the scuba diving and some beach ones)
7. My favorite actor is Gordon McRae & my favorite singer is John Denver
Phew! that's done. I received my email last night and had my answers in my head but when it came to actually typing them here I hadn't forgotten what I had thought of.
Well anyway I think I have to tag 7 bloggers now - so bloggers beware LOL!
 Yesterday I posted my Happy Harmony Accordion book that I learnt how to make from Craft TV Weekly. Last night I decided to have a go at making the box. I wanted my box to look fairly similar to my book, trying to match up my SU card I used was a little difficult but I did discover a pack of plain scrapbook paper I purchased ages ago and hadn't used, I knew they would come in handy one day. I can tell you the box wasn't as easy to create as the book was, for this box the lid and the bottom are each folded a different way, I think because then you can still use the same size paper but you get your different sizes so the lid fits easily over the bottom. Being able to watch the webisode was of some help, but I did still keep getting stuck at that last fold to create the corner, whether it was that I was also chatting with friends online I am not sure. Anyway not one for giving up, I found some more paper to make my bottom and set to to follow those instructions, they were much easier to follow and easier to create my corner I needed. With that success I went back to try the lid and this time "got" it! I think making the bottom first helped to work out what I was doing wrong on the lid. The flower on the top of the box was made using the cuttlebug flower die, I was given this for Easter and this was the first time I used it. I wanted it to look something like the flower on the front of the book, which is why I stuck to the one color, I also scrunched up the flower before assembling it.
 Recipe:Stamps: Happy Harmony - Stampin' Up
Papers: Patterned - Me & My Big Ideas; Bordering Blue - Stampin' Up; White; Typhoon Bazzill card
Other: Marvy Brush Markers #17 & 96; blue grosgrain ribbon; flower cuttlebug die; blue brad
 I didn't think I would do any stamping today, this is my first day at home on my own for about 5 weeks as my husband has just returned to work after his annual holidays. I should be doing housework which I have neglected a little while he has been home, but I just couldn't help myself LOL! Every week I go visit Craft TV Weekly to watch their webisode of the week. Some of the programs can be more geared to scrapbooking (which I don't do), but often there is something that can be adapted for those of us who stamp. Some of the names who appear on this program include Trish from Club Scrap; Judy from Judikins and Karen from Yasomoto. This week Karen Thomas demonstrated her accordian book in a book, basically the book is made using 6 pieces of scrapbook papers 15cm square (6 inches for my US friends); and with a little folding etc you can create this beautiful accordion book. I had lots of fun making mine. As you can see I kept the stamping to a minimum on this one. So far I haven't made the box that was also shown on the same program, I am still deciding whether I will make that or not. If you want to find out how to create this head over to Craft TV Weekly (link above) and look for the webisode called Accordion Book in a Box. If you register you will be notified each week as each new webisode comes out and you can also download instructions for each individual program if you so wish.
Oh one thing to note if you are planning to make this item, in the instructions it explains how to do the hinges which is easy to do, but then it goes on about placing the ribbon on the back - I had already stuck this area down while doing the hinges so had to carefully untape it, next time I will know to put the ribbon in first while doing that particular hinge.
 Recipe:
Stamps: Happy Harmony - Stampin' Up
Papers: Patterned - Me & My Big Ideas; Bordering Blue - Stampin' Up; White
Other: Marvy Brush Markers #17 & 96; blue grosgrain ribbon
 This card is based on the same layout as my previous post I made yesterday, however this one does not have all the layers that the other one did. After posting my cards to the SCS gallery yesterday afternoon I found a card posted by Tashers who had based her card on the same card I had of Julie's. I liked the uncluttered look of her card so much that I decided I had to make one too. I still had some pink and burgundy card lying in my scraps of my card making effort that day so just picked that up to use as well as another of my new stamps in my Paper Inspirations acrylic stamp set. I wasn't happy with my oval in my Mickey card; I like the idea of the ovals but as I don't have two ovals that fit into each other I decided to stick with a circle this time. I am sure I will be ordering those oval punches very soon. I hadn't used my slot punch for doing the scallop borders until yesterday but I must say I love it and it is pretty easy to do, the good thing is my slot punch is also getting used a lot more - that has to be a good thing. I ended up making a few more of these for a swap I am in.
Recipe:
Stamps: Flower - Paper Inspirations; HB Verse - Hero Arts; Circle of Friendship - Stampin' Up
Paper: Pink, Burgundy & White
Other: Warm Violet Fluid chalk, black ink, circle punches, slot punch, foam tape
 I thought I was finished for today but I had to try another of Julie's cards, I just loved this layout she used: CUTIE PA-TOOTIE Birthday
.
I wasn't planning on using any Mickey's on this card but one was sitting behind me already made up and it just ended up on my stamping desk and then on this card - they seem very persistent! I ended up using a background stamp on the large panel as I thought it needed something, Julie's card has a striped strip down the bottom while mine is black so mine needed something to take some of the plainness of it. Julie has also convinced me that I need to buy both of the SU oval punches - I only have one of another brand and it may be a bit large, I had to cut my smaller over down by hand so it is not perfect.
Anyway that is definitely it for today.
Recipe:
Stamps: Greeting - Hero Arts; letters - Karen Foster Snap Stamps
Card: White, red, black, yellow, peach
Other: Word Window Punch, Slit Punch - Stampin' Up; Oval Punch, Mickey & Friends Cricut Cartridge, red and black brads
 This week's featured stamper on SCS is Julie Buhler aka ReneeJul1 on SCS. Julie is a talented stamper and I have enjoyed here creations on both SCS and her blog for a long time. My card is inspired by one of Julie's cards found here: Luggage Card - Julie has a few cards in her gallery that are of a similar style, but have just a different twist to each one. I wanted to use one of my acrylic stamp that I purchased yesterday which is why I decided to go with a flower theme - I also changed my background and the color I used for my card.
Recipe:
Stamps: Flower - Paper Inspirations; polka dots & paisley - Stampin' Up; Crackle B'ground - Montarga Rubber Stamps (NZ)
Papers: Pink & Burgundy
Other: Marvy Brush Markers # 96 & 93, burgundy brads, warm violet fluid chalk
I was tagged again today this time by Karrie, her blog is called Creative Happenings - take a look at her site if you haven't already as she has some interesting thing on there.
While I am on about tagging, I should also thank Dini from Mama Dini's Stamperia - Dini didn't actually email or pm me to tag me but she did list my site in one of her 5 recommended sites to visit when she was tagged and I do appreciate that. I have been admiring Dini's work for a long time.
I am not going to list another 5 great sites, I have already done that in a previous post if you want to check that out. Otherwise check out the links in my "blogs I browse" at the right hand side of this page.
 I decided I had to make another card for the ways to use it challenge, I liked the other one I made but as I said in my earlier post, I had another idea in my head when I first saw the challenge and I wanted to get that done too. I am still going with that music theme, I know the challenge isn't about music but I have the stamps so I figured it was still a reason to use them and I hadn't used my Rockabella yet. The shadow I used here isn't a stamp - I made my own shadow stamp using a sizzix bookplate die and fun foam - it works well. It may be hard to see in the photo, the brads on the image are actually tiny screw brads. I used silver card and my swirl cuttlebug embossing folder to create a metallic look. I based this card on a card sketch I saw recently on Poetic Artistry's blog which you can find here.
Recipe:
Stamps: Rockabella - Stamping Bella; On the Spot - Stampin' Up; Rock On- Karen Foster Snap Stamps
Paper: White, Black, Burgundy; Silver
Other: D'vine Swirl Cuttlebug embossing folder; Slider Cuttlebug die; circle punch; black grosgrain ribbon; tiny screw brads - Karen Foster; black ink; tria markers
 When I first saw the Ways to Use it Challenge this week, this card was the furtherest thing on my mind that I would do. The challenge was: Heavy Metal - not the music, just to use metal products on the card - it could be eyelets, clips, hardware, washers...if it is metal..it's fair game! Today I sat down to make a start on a card for this challenge and I remembered this cute Bugawamps stamp I got a few years back. My daughter quickly told me that they don't look like a heavy metal band, but they insisted on being on the card so what is a girl to do! I figure they are just "heavy metal wanna bees!" - hehehe. If you look close you might see I almost did it again, the bugs are yellow and there is a tiny touch of red there, but I did resist that and found this background paper I like and used that instead - I think it turned out okay. My metal on the card is of course the eyelets, and I also had some metal alphabet ribbon charm things which I threaded onto black ribbon and attached to my card.
Recipe:
Stamps: The Band - Bugawamps; words - Karen Foster Snap Stamps
Paper: White, black, teal, b'ground paper unknown
Other: orange brads; Metal letters; black ink, black embroidery floss, tria markers
 I went out with my husband today to do some shopping for both our hobbies. I think I did very well, I first went to a stamp shop and found an acrylic stamp set and a Paper Inspirations stamp for a Marriage verse - I love there long verses they have and have quite a collection - I thought this one would be good as I do make a few wedding cards now and then especially for my eldest daughter. I then went to one of my favorite stationery shops to get some card I like - apparently the company has discontinued my favorite colors in the range which is tobacco & olive - I used to use them a lot - arghhhhhhh. Anyway I did find a few sheets of tobacco and the owner of the shop is going to try another place for old stock so fingers crossed. I also wanted a reinker for my tria pens and while I was selecting the color I wanted I discovered a couple of others at half price wow! reinkers are normally way expensive so I would have been silly to pass them up - there was another on that shelf without the half price sticker on it so I asked if that was on special too or not - it wasn't (didn't think it was), but she then started going through the drawers and pulling out others she would mark down so of course I had to have them. When we were packing up my purchases we discovered a crack in one of the lids, so she replaced this for another and then gave me the faulty one too - what a bargain!!! Of course I am a very happy girl!
 Do you ever have those times when most of the cards you make end up using very similar or the same colors??? Arghhh!!!!! Looking back at the cards I have made this week, many of them are made using the colors yellow, red and black - It all started with my Mickey Mouse Card for the sketch challenge. Now Mickey himself is those colors so it suited the card I made to continue along the same color theme. Then the next day I was using up scraps of things I had played around with while I was creating all my Mickey's so they also ended up being made in those colors. And while my Mickey card I made and posted yesterday is mainly yellow and black there is also red in that one as well.
This afternoon I went to the SCS forums to see if the Limited Supply Challenge had been posted, it had. Jen who hosts this challenge every week is celebrating her birthday (happy birthday Jen!!!); and as Emily celebrated her birthday using her fav color combo's for the color challenge this week, Jen wanted to also go with something that was her favorite. So the challenge was to make a birthday card with animals, bugs, and/or creepy crawly creatures, a fairly simple challenge - yes? Ah but there is a catch, there is always a catch on this challenge. The catch today was we could on take 45 mins to create it - yeah I did it!!!!!! Anyway I guess the first thing I think of when I read bugs if my favorite bugs of all - the alota bugs! I picked one of the party bugs for my card and look what happened - I used yellow, red and black! I think I might have to hide those colors for a while and start playing some some others - I do have lots of other card here I can assure you LOL.
Recipe:
Stamps: Bug - alota rubberstamps; Greeting - Hero Arts
Paper: yellow, red and black
Other: Happy Birthday cuttlebug embossing folder; red brads; black brads; tab punch & ticket corner punch - SU.
I've just been tagged by Chris Smith, her blog is From my Ink Pad to Yours. Having only had my blog for a few weeks this is my first time at being tagged, apparently I have to select 5 of my favorite blogs to share with you all. Wow is it hard to pick 5 blogs when there are soooo many out there. I have lots of favorites these are just 5 of them, go have a look.
Ink Something - Kristine was the first person to have my gallery on her site, way before I even thought of starting a blog. I remember the first time I saw it there I was quite excited. She was also the first person to give me some advise when I set up my blog.
Dairies of a Stamper - Kelly has some great samples on her site, have you seen all her nugget animals she made. She even made an owl one!
My Stamping Smiles - Check out Vicki's polished stone tutorial which is her most recent posting at the time of me writing this.
Blogabella - Discover the last info about those fantastic Bella's did you know they now also have some Fella's
Rhonda's Design Haven - another great site with lots of great samples
 I still have a few Mickey Mouse images left over from my play day I had with my cricut earlier in the week. Yesterday a friend was over and she showed me a fun new product (new for us anyway), that she had discovered when she had purchased something for another technique she wanted to try. Some of you may have discovered this already, it is created really for kids but hey if it works for stampers why not us it. The product I am talking about is called "Color Explosion" and is made by Crayola ® , basically it consists of a pad of black glossy type card (it has some sort of special coating on it) and you also get a special pen and my pack also contained a stencil as well. The idea is for kids to draw on the card with the special pen and it reveals a multi color effect. Well we decided to try the pen on our stamps and wow! If you want to see more info on this product, you can find it here. Check out the panel that Mickey is sitting on, that was created using the cheesecloth background stamp and the pen stamped onto the black color explosion card and this is what I got - very different background. When I got mine today while I was out shopping I noticed a couple of different choices "Rainbow" or "Neon" - the card above is done using the rainbow one. I only got the one pack for now as I wanted to make sure it was something I could use before wasting money. There is also a white version of this product which I wasn't sure whether would be of use to us or not, but after playing with this one and checking out the web site I think it would be good too, guess I need to go shopping again LOL!
Click on the image for a better view of this background
For this card I cut Mickey at 4 inches using the Mickey & Friends Cricut cartridge, basically it is cut at the same size as my previous Mickey card found here, however it does look much smaller compared to the other one, cut the base first in black and then it is easy to add all those other colors over the top. This was attached to my color explosion background piece I explained in the previous paragraph. The yellow piece I cut out a bunch of Mickey's heads from the Mickey font cartridge at 1 inch and attached randomly over the yellow card to create the background and then layered onto a folded black card. The brads weren't really red enough for me so I used my red tria marker to make them a nicer red.
Recipe:
Papers: Black color explosion card by Crayola ®; Yellow, Red & Black
Other: Mickey & Friends Cricut Cartridge; Mickey Font Cricut Cartridge; Red Brads; Color Explosion Pen by Crayola®
 Finally I am able to upload my pictures to blogger so I can update my blog for the day, due to maintenance issues today by blogger I haven't been able to upload anything - arghhhhhhh! I have only been doing this for a few weeks, but I am already getting withdrawals when I can't update my blog when I want to.
I made these two cards this morning, the name parts of these cards were from my play day I had on Tuesday when my Mickey & Friends and Mickey Font cartridges arrived for my cricut. The Mickey font cartridge has a feature that none of the previous font cartridges have had. That is that you can type in a name and it will cut it out in one piece; you have the option of 3 different looks, ticket, license plate or bone. The cards here are made using the ticket open and were made using the colors I had one my desk at the time as I wanted to see how it worked. You can also use the letters that you remove from the frames if you want to, I ended up giving them to my daughter to take to her kindy for the kids there to play with when they are creating art. Anyway as you can see I decided to turn these name frame things into cards - I just used my simply circles stamp set and red and yellow ink. This is a fairly quick card to make and has a personal touch to it as well.
 Recipe:
Stamps: Simply Circles - Stampin' Up
Papers: White, red, yellow & black
Other: Mickey Font Cricut Cartridge
 Here is another card for this weeks sketch challenge on SCS. I didn't do it in girly pinks as I wanted it to also fit into one of the Color challenge combos for this week: Cool Caribbean, Black & White. I don't have my cool caribbean yet, I ordered it today - but this is fairly close to it.
Recipe:
Stamps: Babs - Rubber Romance; Verse - Stampin' Up
Paper: Aqua; black & white
Other: aqua grosgrain ribbon; black brads; circle punch; cuttlebug slider die; tiny bubbles cuttlebug embossing folder; black ink
 Hey it's Mickey!!!!!!!! I am sooo lucky that I had a great friend who was willing to send me the Disney cricut cartridges (thank you thank you thank you) - they arrived yesterday and I had a great afternoon just playing with my machine and making various sizes of Mickeys - I think this one is my favorite so far. I only made up the Mickey's I hadn't really decided what I was going to do with any of them yet - make them into cards yes but what cards was to be decided later. Then this afternoon once all my friends had left from my Stampin' Up party and little club day I have here each month - I went to check out this weeks sketch challenge on SCS and it is for a large panel - perfect for Mickey. It is funny as I have had this large background stamp since late last year and hadn't used it and now I have used it twice in a week, hopefully I will use it lots more now, I do like adding the other background to it.
Recipe:
Stamps: Simply Circles; Word by Word; Canvas - Stampin' Up
Paper: White, red, yellow, black, flesh
Other: Mickey & Friends Cricut Cartridge - Provocraft; black brads - bazzill. black ink, lipstick red & yellow citrus fluid chalk
 Today has been a fun day, I had my very first Stampin' Up party. Obviously this isn't my first time buying SU products and I have had a few catalog parties but I have never had a party with real people and a demo. I haven't even been to any type of stamp party before other than a few very early on when I started my stamp business but later decided stamp parties were not my thing - to demo anyway. I did have lots of fun at my party today and thanks to all my friends who attended will end up getting the hostess set I have been wanting (the one with the bucket) - I NEED that bucket LOL, if I had been given just the bucket I would have been happy. Can't wait till my order gets here so I can play with all my new sets and I also ordered lots of card as I am enjoying using that - I also ordered the "in colors" which may be being phased out in the US but have just been released here. Anyway here is a card I got to make today for a make & take, it is a set I don't have as yet so guess what, yes I had to order it - hehehehe! Of course everyone used to make this card is from SU.
 I just couldn't resist this little guy when I saw him recently at a stamp convention and I have finally gotten around to making something with him! He is designed by the same people who do the House Mouse images, I did think I was going to resist buying any of the rabbits, but obviously I had to have at least one. I made this for this weeks technique challenge on SCS - Triangle Trifold, I actually call this particular style of card a twist a flex card - this is what it was called some years back when I first learnt how to make one and I prefer that name as it is less confusing as there are sooooo many different trifolds out there already. If you think about it when you open your card you are actually twisting it to view the inside the right way up. I used my snap stamps to create the "spit happens" saying which I thought suited this image soooo well. The thanks a melon on the inside of the card is a stamp I have had for years and haven't used in a long time, so was great to be able to get it out and ink it.
Recipe:
Stamps: Rabbit - Stampabilities; Thanks a Melon - Alias Smith & Rowe; Spit Happens - Karen Foster Snap Stamps
Paper: Lime; Pink; White; background by Heidi Grace
Other: Black ink; lime grosgrain ribbon; paper piercing took & guide
 I went a little overboard today creating cards for the "Featured Stamper" challenge on SCS. The featured stamper for this week is Rohla / Amy. She has some fantastic cards in her gallery, so as usual it was pretty hard to decide which ones to try and case for the challenge. I ended up creating 3 cards inspired by cards in her gallery.
The first card was inspired by Amy's card found here. When I first saw this card it reminded me of the fleur de lis stamp I purchased last year and had not really used as yet. I wanted some texture on my background, so I went with the textile cuttlebug embossing folder, it has a similar look to the fleur de lis stamp, I highlight it with black ink. In Amy's description of her card she mentioned something about paper piercing, she had decided against it - so of course I decided I would do it on the black portion of the card as I felt it needed something.
 The second card I created I chose because it featured the word by word background stamp and again I hadn't used it either - so this was another good card to make so I finally used a stamp. Amy's version is here. I did change the colors for this one and also I ended up cutting 2 of the larger flowers to make the flower fuller.
 My 3rd card was picked for no particular reason - although again I did end up using a stamp I hadn't used before - which wasn't the one Amy had used in her original card found here. I also changed the colors of this one.
Recipe for Cards:My final card I created for this challenge,
Fleur De Lis:
Stamps: Fleur De Lis - Stamp It (Aust)
Paper: Pink, Black, WhiteOther: Black ink, clear ep, textile cuttlebug embossing folder, black brads, black grosgrain ribbon, paper piercing tool
Friendship Flower:
Stamps: Word by Word b'ground; Looks like Spring - SU
Paper: Pink, white, black, pale violet prisma.Other: Wisteria, Pink Pastel & Rouge Fluid Chalks, Black ink, black brads, purple grosgrain ribbon, slot punch, flower punch
So Very:
Stamps: Petal Prints, Looks Like Spring, Polka Dots & Paisley, So Very
Paper: White, yellow, red, orange
Other: Yellow Citrus, Tangerine, Amber Clay, Lipstick Red Fluid Chalk, Black Ink, Yellow brads
 Ok this one is just for fun, I happened to check out the limited supply challenge this afternoon. The challenge this week is centered around Mother's Day; to make a card for Grandma (from the kids but made by us), the theme is to be kid friendly and NO FLOWERS. Well first up my kids are adults, so there wasn't much point making that type of card to give to their grandmother's; the closest I am to being a grandmother at this stage is that I do have 2 grandpuppies so I decided to go with that idea instead for this one. I also wanted to play with an idea I found on another blog during the week "Tied Circles", you can find the tutorial for this type of card at Chris' blog "From my Inkpad to Yours" here
For my ties I decided to use the frayed ribbon technique which was another challenge recently on SCS, Chris has also got a tutorial on this on her site if you are interested. I figured the frayed ribbon suited the dog theme a lot better then other types of ribbon or string etc. I used my snap stamps to do the greeting - I didn't have enough "p's ", so I turned a "d" upside down - it worked just fine.Recipe:
Stamps: Dog - Art Impressions; Greeting - Karen Foster Snap Stamps: Paw Background - Stampin' Up
Paper: - Wheat & Walnut Bazzill; white
Other: Chestnut Roan Fluid Chalk; Black ink; tria markers; brown grosgrain ribbon; paw brads

 While I was checking out Cindy Haffner's gallery (SCS featured stamper), I noticed she had a number of card created using sassy stems. Sassy Stems was one of the stamp sets I had delivered on Saturday so I just had to make another card casing one of Cindy's cards. Here is Cindy's card.


