Friday, January 10, 2025
Slimline Sympathy
Wednesday, March 1, 2023
The One I Love
- Mr. & Mrs. Wedding Cake Die Set - Spellbinders Paper Crafts (discontinued)
- Marriage Calligraphy Wood Mounted Stamp - Paper Inspirations (discontinued)
Wednesday, April 6, 2022
Mr & Mr Wedding Accordion Card
Hi Crafty Friends,
I was recently asked if I would make a Mr & Mr Wedding Card, which I was happy to do.
One of my favourite styles of cards for weddings is Accordion Cards, and as I wanted to fit the long sentiment and the two Tuxedo Jackets onto my card, I opted to pull out an older Accordion Card die set designed by Karen Burniston for Elizabeth Craft Designs. This die set has long been discontinued, but it is still a favourite of mine. I used the Oval Accordion and Oval Flourish Frame Edges die sets to create the base for this card.
If in doubt of what colours to use on my wedding card, you can never go wrong with black & white and I thought it would work very well for this card.
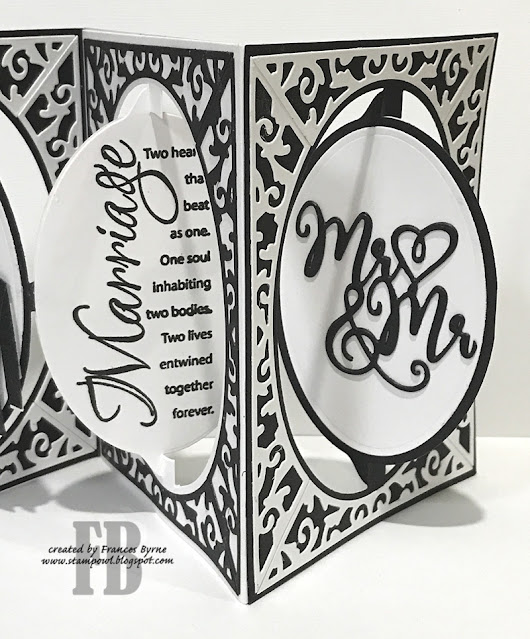
The first oval panel of my card can be view from the front and also when the card was opened. I used Spellbinders Paper Arts Wedding Dress & Tux die set to create the Tuxedo jackets.
The sentiment on the centre oval is an older sentiment which I love and is from Paper Inspirations, called Marriage Calligraphy.
For the last oval I added the "Mr & Mr" die cut sentiment which is from another Spellbinders die set called Mr. & Mrs. Wedding Cake, this set seems to be discontinued even though it was only released a few years ago.
I don't normally decorate the back of an accordion card, as there is enough happening on the front of the card, however for weddings I often do.
On the far left oval I added the "Congratulations" sentiment from The Rabbit Hole Designs Happily Ever After stamp set.
The "love" die cut on the centre oval is from the True Love die set designed by ModaScrap for Elizabeth Craft Designs, this is also another older die set from my stash.
Finally I used the "Wishing You A Lifetime" sentiment from Craft Desert Divas' Hitched stamped set, this company closed a few years ago.
Here is the front of my card when it is closed ready to be placed in an envelope.
Other Supplies:
- Oval Accordion Card Die Set - Karen Burniston for Elizabeth Craft Designs (discontinued)
- Oval Flourish Frame Edges Die Set - Karen Burniston for Elizabeth Craft Designs (discontinued)
- True Love Die Set - ModaScrap for Elizabeth Craft Designs (discontinued)
- Mr. & Mrs. Wedding Cake Die Set - Spellbinders Paper Arts (discontinued)
- Marriage Calligraphy Stamp - Paper Inspiration (discontinued)
- Hitched Stamp Set - Crafty Desert Divas (discontinued)
Tuesday, October 13, 2020
Sympathy Slimline
Sympathy Calligraphy Rubber Stamp - Paper Inspirations (no longer available)
Wednesday, August 12, 2020
Celebrate Rainbow Slimline
Monday, October 9, 2017
Brushstroke Birthday Wishes
|
Stamps:
Abstract Art - MFT Stamps; Birthday Joy Calligraphy - Paper Inspirations; Hip
Hip - Kaisercraft
|
|
Paper:
White; Blue; Dark Blue; A Boy's Life Paper Pad - Echo Park
|
|
Dies: Figure 8 Knot - Couture Creations
|
|
Other:
Black Ink; Clear Embossing Powder; Broken China Distress Oxide; Faded Jeans
Distress Oxide; Salty Ocean Distress Oxide; Foam Tape
|
Sunday, June 12, 2016
Tons of Fun
|
Stamps:
Elephant Stacker - Art Impressions; Birthday Joy Calligraphy - Paper
Inspiration
|
|
Paper:
White; Black; Pink; Save our Rhino DP - FabScraps
|
|
Dies:
Fishtail Flags - MFT Stamps
|
|
Other:
Black Ink; Scan N Cut; Black Ribbon; Foam Tape; Copics
|
Thursday, January 17, 2013
Sympathy
Hi everyone,
It’s challenge time with my friends over on the CCEE Stampers challenge blog. Joanne Grzelak who is our challenge hostess for the month has another challenge for us.
This week’s challenge is to make a CAS sympathy card.
Joanne says she struggles with CAS cards, well I know I definitely do, they often take longer for me to make then cards with all the layers and extra stuff on … crazy I know, but it’s true. I have made a couple of sympathy cards in the past using these two stamps … the Sympathy sentiment from Paper Inspirations and the Rose from Penny Black. As I love the look of these two together I decided to use them for my card today and as you can see I definitely kept it CAS. This one didn’t take me hours either hehe!
Don’t forget to check out the CCEE Stampers blog (goes live 12 AM EST) to see the rest of the creations the CCEE Stampers created this week. You can also see more details of their creations on their individual blogs:
| Stamps: Sympathy Calligraphy – Paper Inspirations; The Look of Love (Rose) – Penny Black |
| Paper: White; Green |
| Other: Black Ink; Peeled Paint & Worn Lipstick Distress Markers; Foam Tape |
Saturday, May 23, 2009
OCC – Sentiments!
Happy Saturday everyone, it is time for another OCC challenge over on the Our Creative Corner Blog. This week we had to use a sentiment as the focal point of our card and also to include ribbon on our card.
I love these sentiments from Paper Inspirations, they have quite a number of sentiments for all sorts of occasions using the same format. I have at least 5 different ones, they are perfect for fronts of cards and also for the inside too. I also like using this Rose from Penny Black or any solid flower over the top of the sentiment. So of course that is what I did for my card today.
I stamped the sentiment and then used my labels 4 nestabilities to cut it out. While the die was still in place I stamped on my rose using my stamp positioner so that the rose was exactly where I wanted it. I cut two more label 4 pieces this time using kiwi kiss card cut them each in half and then attached them behind my white card.
The ribbon was a fluke, I had actually forgotten about that part of the challenge until I started writing this post …. phew just as well I added it ha *giggle*
Don't forget to check out the rest of the OCC Designers cards over on the OCC Blog.
- Cindy Haffner
- Jennifer Meyer
- Jenny Gropp
- Joycelyn Turner
- Loretta Lock
- Lori Boyd
- Silke Ledlow
- Vicki Garrett
Recipe:
Stamps: Sentiment – Paper Inspirations; Rose – Penny Black
Paper: White; Kiwi Kiss, Riding Hood Red & Bella Rosa DP – SU
Other: Black Ink; Kiwi Kiss & Riding Hood Red SU Inks; Kiwi Kiss Grosgrain Ribbon; Lace Doily Border Punch; Labels 4 Nestabilities; Foam Tape; Copics
Wednesday, November 28, 2007
Birthday Flowers!
Todays card is for this weeks sketch challenge on SCS. I had a little bit of the DP that I used for my CCEE challenge card leftover so I decided to use some of that to create this card today. The colors do match a lot better in real life ... unfortunately sometimes the camera doesn't show the true colors of the card.Recipe:
Stamps: Pick a Petal - Stampin' Up; Verse - Paper Inspirations; Snowflake - Hanna Stamps
Paper: Brocade Blue & Night of Navy - SU; White; DP - Memory Makers
Other: Night of Navy DP; Not Quite Navy; Bordering Blue; Blue Brads
Friday, September 7, 2007
Guava Sympathy
Today's limited supply challenge was to create a sympathy card, I wasn't sure if I wanted to stamp today but in the end decided I did and I do enjoy doing the challenges so I ended up doing this one. With the limited supply challenges we have limits of what we are allowed to do. Here is what we were instructed we could or couldn't use.Here is the challenge directions:
- Main Image Stamps: Flowers
- Background Stamp: one (It can be a big background, a little background, or just another image turned into a background. But just use one.)
- Sentiment Stamp: one
- Cardstock & Ink: any colors
- NO Designer Paper
- NO Cuttlebug or similar tools
- Embellishments: Limit Depends on the Stamper
For my card I decided to also combine the limited supply challenge with the color challenge which I hadn't done as yet this week. The colors for the color challenge were Groovy Guava & Always Artichoke.
For my card I stamped the verse onto my white card using black ink. I inked my rose up using groovy guava ink and marvy marker #96 and overstamped this over the verse .... I used my stamp positioner so I got my rose exactly where I wanted it ....... I then cut my card down to size. I used my ticket corner punch to round the corners and layered this to always artichoke card. I found some brads from making memories that were a pretty good match to the guava card!
If you look close at the layout of this card ........ it will look familiar as it is the same one as what I used for my elephant card yesterday .... it looks slightly different because my main image is large then the centre piece but otherwise it is the same. This was based on a sketch I found on CPS's blog.
I used my lattice background stamp and my guava ink to stamp the guava card which was then cut into 3 pieces and layered onto the artichoke card. This was then layered to the folded guava card. The main image was attached to the front of the card using foam tape.
Recipe:
Stamps: Sympathy - Paper Inspirations; Rose - Penny Black; Lattice B/G - Cornish Heritage Farms
Paper: Groovy Guava & Always Artichoke - Stampin' Up; White
Other: Black Ink; Groovy Guava SU Ink; Marvy Brush Marker #96; Ticket Corner Punch; Brads; Foam Tape
Sunday, May 20, 2007
VSN - Day 2
This flower pot full of flower lollies was made for the Yummy flower challenge. This was fun to do and also fun to eat, it doesn't look exactly like this anymore as people have been eating my flowers LOL. The flowers were created using my cricut and then stamped using the Canvas Background. I then scrunched them up and attached to the lollipop stick.
Set Sail was the 2nd challenge today and our challenge was to create something 3D with a nautical feel using one sheet of paper/card to create the item. I have been wanting to make one of those one sheet boxes that Beate wrote a tutorial on so I did that. How does this relate to May Flowers???, again a clever interpretation of the theme and that famous ship the Mayflower! Of course the lighthouse is from Coast to Coast soon to be discontinued in the states (but not Australia for now anyway)
A meadow full of color was our next theme, and this time we had to create something using the baby wipe technique - this is a fun technique and can be found in the resource section of SCS if you haven't done it yet. I used the technique on my dragonflies and also the background which I then also used my spots and dots cuttlebug embossing folder. Dragonflies are by Stylish Images (Aust)
A smashing background was our next challenge, we had to pound flowers to create the background of a card. I was able to use my wizard die cutter to pound my flowers so took just a second to do. I have no idea if this will work in the cuttlebug, and might create a big mess, so if you try it don't blame me I warned ya. The wizard die cutter can do some things other die cutters won't do. I did protect my mats by using wax paper. The flower stamp I used is by Paper Inspirations and the verse is Sugarloaf.
The challenge for the next card was "Sharing the light" and it was about highlight a verse of some sort. The background paper here is by Stamp It (Aust) as is the tiny flower. The verse is Wordsworth.
April Showers bring May Batik was the next challenge which is what we did for the yellow card. I used stamps from Natural Beauty and also the verse from Polka Dots and Paisley. I create my batik by using re-inkers in spray bottles, but these days I use the colorwash sprays which are already mix to the right proportions for you. This one I used butterscotch and lettuce, I did spritz my mulberry paper well with water before and after application of the colorwash sprays to get a more pastel effect.
The next challenge again had that Mayflower twist (the ship) , the challenge was Pilgrim Gratitude and we had to create a thank you card without actually using the word thank or thanks! I came up with "You Rock!" , the Rockabella image is by Stamping Bella; verse by Sugarloaf and the records a very old PSX set which I don't think is avail anymore. If you know of a company that sells a record that could be used can you please let me know so I can let someone who has asked me know.
This flower card was created using the carrot stamp by alota rubberstamps. The challenge of Not-Flowers was to create a flower card without using an actual flower stamp!
wm.jpg)
The 3 pocket cards above were my samples for the challenge I hosted: A pocketful of posies. The challenge was to create some form of pocket card using either a pocket stamp, a pocket shape or some form of pocket card (there are a few versions around).
Captivating Color was our next challenge - to create a monochromatic card. I enjoy creating monochromatic cards so this was pretty easy. I love the Wild about You set and continued the spot theme in the card by using the spots and dots cuttlebug embossing folder and the mustard card I punched out circles in various sizes.
Spring Cleaning was our second last challenge - to create a card using recycled materials of some sort. This one started with the lollipop stick (from the lolly flowers in the first picture in this post) and grew from there. The pot I cut from a coaster I was going to use for the coaster box I created earlier in the week but I punched my holes to join it before checking which way the stripes went so had to put that one aside. I also saw how to create this ribbon flower online somewhere last week so it was great to be able to put it to use.
And finally, Turning over a new gold leaf. The challenge was to use gold leaf, mine is actually pot pourri leaf so has more copper in it then gold hence the copper layers and embellishments. Stamp is one I have had for years from Denami.