Thursday, September 10, 2015

"Paws"-itively


Hi everyone,

It's challenge time with my friends over on the CCEE Stampers challenge blog. Being the beginning of the month, it is time to introduce our new challenge hostess which is Lois Bak.

 SWAP IDEAS DAY – Make a card using a technique you’ve learned and want to share.  Either describe the details of the technique, or link to a tutorial on the web.


For my card today, I decided to create a side panel stand up or easel card. I made one of these late last year and thought it would be fun to use for this challenge.

Here is how I created my card:


1. Cut a piece of black card so it is 5 1/2 inches x 8 1/2 inches. Score at 4 1/4 inches along the 8 1/2 inch side and fold. You now have a card that is 5 1/2 inches x 4 1/4 inches.


2. On the front of your card measure in 1 3/4 inches from the right hand side. Use your trimmer to cut from the bottom of your card to the fold line so you have two separate pieces on the front only. Decorate the right hand panel with designer paper which measures 1 1/2 inches x 4 inches and the left hand panel with designer paper which measures 3 1/2 inches x 4 inches. Find the centre of the left hand panel, score and fold into a mountain fold.


3. Open the right hand panel of the card and measure up from the edge of the card 1 1/8 inches, position the Circle Stand Up Helper die so that the straight edge of the die is on the 1 1/8 inch mark, and approx 1/4 inches from the left edge of the card.  Secure die with removable tape so it doesn't move while die cut. Tip: Ensure both the left and right hand front panels are lifted up when die cutting the stand up helper. Remove the Circle Stand Up Helper die and position so it is approx 1/4 inches from the right side of the side panel and die cut again.


Die cut the Circle Stand Up Helper die again twice, this time from black card, trim along bottom edge and adhere to the the circles over the circles on the card. Fold the Circles up so it is standing upright.


4. Cut a piece of blue designer paper 3 3/4 inches x 3 inches. Adhere this to the inside of the card so it covers the hole from when we die cut the Circle Stand Up Helper. Make sure there is approx an 1/8 inch border on the right hand side and the top of the card. Cut a piece of designer paper 3 3/4 inches x 7/8 inches and adhere this to the right panel in front of the Circle Stand Up Helper die. (Note: a small amount of designer paper will be in the area under the left hand panel).


5. Glue the left hand panel to the back panel.


I decorated the inside side panel of my card using two paws from the Pop Up Kitties stamp set from Stampendous and added two sentiments from DRS Designs.

Here is my card when it is closed ready to be placed in an envelope. I decorate the front using one of the kitties from the Stampendous Pop Up Kitties and adding it to an oval panel which is only  attached to the bottom half of my card.


Don't forget to check out the CCEE Stampers blog (goes live 12 AM EST) to see the rest of the creations the CCEE Stampers created this week. You can also see more details of their creations on their individual blogs:


Stamps: Pop Up Kitties - Stampendous; "Paws"itively Fantastic Birthday; Cat Out of the Bag - DRS Designs
Paper: White; Black; Furry Friends DP - Kaisercraft
Dies: Stand Up Helpers 2 - Elizabeth Craft Designs; Pop Up Kitties - Stampendous;  Oval Stax - MFT Stamps
Other: Black Ink; Foam Tape; Copics


Friends


Hi everyone,

Today I am excited to share a card I created using stamps from Elizabeth Craft Designs brand new Designer Bianca Panfile Petroschi. Bianca has a collection of 14 new stamps available on the Elizabeth Craft Designs store now. The first collection released from the Petroschi Designs by Bianca line consists of cling-mounted deep etched red rubber stamps and some terrific clear stamp sets too.


For my card today I have used one of the hedgehog stamps from the Hedgehog Daisy All Seasons Clear Stamp set

For my card base I used the new Tags & More 9 - Sparkle Die set, I created this similar to the one I created for my ECD blog post last week. You can see the step by step of how I did this here

Once I had cut my card shape I added the wavy grass from Karen Burniston's Outdoor Edges die set and sponged on white clouds using Picket fence Distress Paint and the negative portion of the clouds from the All Season's Tree die set.

To finish the card front I added the Quietfire "Friends" die ... love these sentiments!!!!!!


For the inside of the card I added a part of a sentiment from the Farm Greetings stamp set and a border from the Ribbon & Jewels die set.

Stamps: Hedgehog on SeeSaw - designed by Bianca Petroschi for Elizabeth Craft Designs; Farm Greetings - designed by Karen Burniston for Elizabeth Craft Designs
Paper: White; Blue; Green; Pink
Dies: Outdoor Edges; All Seasons Tree (Cloud); Katie Label Pivot Card -  designed by Karen Burniston for Elizabeth Craft Designs; Tags & More 9 Sparkle; Ribbons & Jewels; Quietfire Friends - Elizabeth Craft Designs
Other ECD Products: Transparent Double Sided Adhesive Tape 64mm; Susan's Garden PanPastel  Coloring Kit 2
Other: Black Ink; Picket Fence Distress Paint; Foam Tape; Copics


Wednesday, September 9, 2015

Peek-a-Boo Birthday


Hi everyone,

Today I am sharing a Peek - a - Boo card I created. I have been wanting to try of these cards for ages, and recently I was checking my blog reader and saw someone else's card with link to instructions and as I didn't have anything else I needed to do I figured it was time to play.

If you want to learn how to create this style of card, you can find a tutorial on Splitcoast Stampers. 


For my card I used stamps from Kraftin' Kimmie Stamps .... Birthday Lulu.

When the card is closed you see the birthday girl in her pretty party dress.


Once you open the card another image covers the first one and reveals the birthday girl holding her presents.


Here is the card fully opened.


Here is an overhead view of the card so you can see how it works! I did end up putting a thin strip of tape to the very edge of the right side of the back layer which helps keep the back part of the card from flapping open.

Stamps: Birthday Lulu - Kraftin' Kimmie  Stamps; Happy Birthday - Lucy's Stamps
Paper: White; Purple; Embroidery DP - Kaisercraft
Dies: Oval Nestabilities; Labels 10 - Spellbinders; Celebration Season Header Fold Die - Tonic Studio
Other: Black Ink; Copics


Tuesday, September 8, 2015

Fisherman


Hi everyone,


It's our Cornish Heritage Farms Design Team challenge time again over on the Cornish Heritage Farms blog. This time round our challenge is hosted by Amber!


For our challenge this week Amber has challenged us to create

Masculine cards, "bonus points" for making it a masculine birthday card, as her son will turn 13 on the 9th of Sept!

For my card I used Cornish Heritage Farms Fisherman Digital Stamp to create an Easel or Stand Ups Card.


To create my card I used Sizzix Square Stand Ups Card Bigz die. I also added a die cut Happy Birthday to the base of my card.


Here is my card when it is closed ready to be placed in an envelope.


Don't forget to check out the rest of the Design Teams blogs today to see what they created for this challenge.


Stamps: Fisherman Digital Stamp - Cornish Heritage Farms
Paper: White; Navy; Classic DP - Authentique
Dies: Sizzix Square Stand-Ups Bigz Die; Happy Birthday - Creative Expressions
Other: Foam Tape; Copics


Monday, September 7, 2015

Merry Christmas


Hi everyone,

Recently I was thinking about Christmas Pop Ups as I was supposed to be working on a card sample for an upcoming card class. At the same time my friend and fellow DT member Karen Aicken posted a Rectangle Pull Card turned into an Easel type card onto our DT group page where we share our creations before they go live on our blogs. I have made a few of these cards previously ... thanks to Karen, but because I had pop up cards on my mind it made me start to wonder if I can incorporate a pop up into the rectangle pull card Easel. Of course I had to try it!


I guess you would call this a Rectangle Pull Easel Pop Up Card ... that is a mouthful right!
To create this I have used the Rectangle Pull Card and the Merry Christmas Pop Up Card die sets designed by Karen Burniston for Elizabeth Craft Designs.

I did find that with the added thickness the Pop Up Card creates inside the card, that the closure included on the Rectangle Pull card didn't help keep the card closed, so I covered that part up.

Also when the card was closed a small portion of the pop up could be seen beyond the rectangle portion of the card, so to hid that I added the decorative doily from the Paris Edges die set. I cut this in red and green and then adhered the two together, so that when the card was open you saw the red edge and green when it was closed.


Here is a side on view of my card when it is opened.


Here is my card when it is closed. I used the Seasons greetings stamps which is from the Merry & Bright Clear Stamp set also designed by Karen Burniston.


Stamps: Merry & Bright Clear Stamps - Elizabeth Craft Designs
Paper: White; Red; Green; Christmas Trees DP - Fabscraps
Dies: Rectangle Pull Card; Merry Christmas Pop Up Card; Katie Label Pivot Card - designed by Karen Burniston for Elizabeth Craft Designs
Other: Black Ink; Red/Gold Glitter Border Peel-Off Stickers - ECD; Foam Tape


Sunday, September 6, 2015

Poppylicious Gift Bag


Hi everyone,

Today I am sharing a gift bag I decorated for my friend who had a birthday recently. 

My friend loves poppies and I had already made her a poppy themed card which I posted here a week or so ago and then I discovered this cute Poppylicious Digital Stamp from Tiddly Inks which of course I HAD to buy so I could make a gift bag using it for her present.

One of the bonuses of digital stamps is you can size the image whatever you want, so I kept it fairly big, although it would still fit on a card. I pulled out my Grand Nestabilities dies to die cut and layer the image and colored with my copics. The set also comes with a poppy border so I printed that out twice and cut that out and attached that to the bottom of the bag.


Here is another look at my bag, this time at a different angle. Recently while at Costco, I found some fun wire-edged ribbon which of course I had to buy and as I had seen a video on how to make these bows a few days prior to buying the ribbon, I had to try it out. As the colors worked with this poppy themed gift bag, I added it to the top of the bag.


Stamps: Poppylicious Digital Stamp; Poppylicious Border Digital Stamp - Tiddly Inks
Paper: White; Red
Dies: Grand Circle Nestabilities; Grand Scallop Circle Nestabilities - Spellbinders
Other: Red Wire-Edged Ribbon; White Gift Bag; Foam Tape; Copics


Saturday, September 5, 2015

Grill Master


Hi everyone,


It’s challenge time with the “Crazies” over on the Crazy 4 Challenges blog. Being a brand new month, it's time to introduce our new challenge hostess which is Raquel Mason.

Labor Day is here!  Time to say goodbye to Summer, be it one last BBQ, dive in the pool, a parade or picnic.  How will you celebrate?  Show me on a card.

Of course living where I do down here in Australia, I am not saying goodbye to Summer, I am actually looking forward to saying hello to it in a few more months as Spring has just arrived down here. 

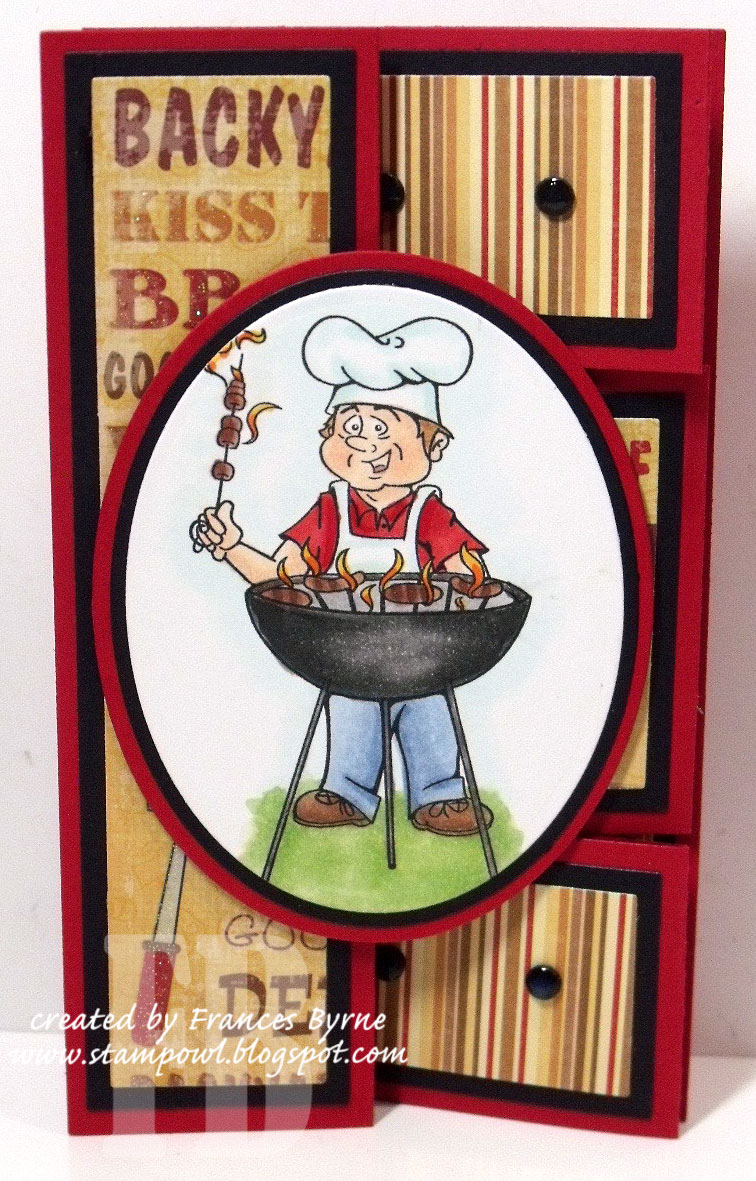
For my card today I have created a Tri Shutter card. As my DH's birthday is coming up shortly I figured I would use this to give to him, he loves Barbequing. 


Here is an overhead view of my card so you can see the different panels in action.


Here is the front of my card when it is closed ready to be placed in an envelope.

Don't forget to check out the rest of the “Crazies” cards over on the Crazy 4 Challenges blog and also their individual blogs for more details.

Stamps: Grilling Guy; Grill Master Birthday Greeting - DRS Designs
Paper: White; Black; Red; Yellow; Barbeque DP - Best Creations Inc.
Dies: Shutter Card - Tattered Lace; Oval Stax; Roughing It - MFT Stamps
Other: Black Ink; Foam Tape; Copics


Friday, September 4, 2015

Merry Christmas


Hi everyone,
It’s my turn to post a project on the Elizabeth Craft Designs blog today. Today I am sharing a Christmas card I created using the new Tags & More 9 – Sparkle die set along with one of the new Way with Words sentiment dies from Quietfire Designs. The width of the Tags & More 9 – Sparkle die set is 4 1/4 inches and of course can be any length, so it is perfect to use for creating cards.

The layout of this card can be adapted for any occasion just by changing the colors, sentiment die and dies used to decorate the card.
Here’s how I created my card:
1. Creating the base card –
  • Cut a piece of red card 4 1/4 inches x 11 inches. Score the card along the 11 inch side at 5 1/2 inches (do not fold yet).

  • Line up the main tag die from the Tags & More 9 – Sparkle at the top of the red card stock so that the edges of the die will line up on the edge of the card and die cut.
  • Place the swirls decorative overlay die from the same die set at the top of the tag so that the rounded shape of the overlay lines up with the rounded shape of the tag and die cut.
  • Fold the card along the score line we created early to create a side folded A2 card as per the photo above.
2. Cut a piece of Gold Shimmer Sheetz large enough to cut the A Way with Words Merry Christmas sentiment die. Adhere Transparent Double Sided Adhesive Tape to the back of the Shimmer Sheetz and die cut the sentiment. Make sure to use the metal adaptor plate when die cutting Shimmer Sheetz.
  • Adhere the Gold Shimmer Sheetz Merry Christmas word to the front of the card. The flourish at the bottom of the sentiment should be as close to the bottom of the card as possible.

3.  From green card die cut three holly leaves using the Holly Leaves & Berries die set. Shade the edges of the leaves using Bright Yellow Green & Turquoise Pan Pastels from the Susan’s Garden PanPastel Flower Coloring Kit 2.
  • Attach a piece of Transparent Double Sided Adhesive Tape to the front of a piece of red card large enough to die cut the four berry cluster from the Holly Leaves & Berries die set. Remove the protective backing from the adhesive and cover with True Red Silk Microfine Glitter. Polish the glitter with your finger.
  • Attach the Holly Leaves & Berries to the top of the card as per photo.

4. The inside of the card:
  • Cut a strip of green card 2 inches x 4 1/4 inches. Attach to the right hand edge of the inside of the card, so that the green with show through the die cut swirls when the card is closed.
  • Adhere a Gold/Silver Glitter Border Peel Off Sticker to the edge where the red and green card join.
  • Stamp the sentiments “Merry Christmas” and “and Happy New Year!” from the Merry & Bright Clear Stamp set using black ink to the red portion of the card.
  • Die cut two more holly leaves from green card using the Holly Leaves & Berries die set. Sponge the edges using the PanPastels as per the front of the card in step 3.
  • Attach a piece of Transparent Double Sided Adhesive Tape to the front of a piece of red card large enough to die cut the three berry cluster from the Holly Leaves & Berries die set. Remove the protective backing from the adhesive and cover with True Red Silk Microfine Glitter. Polish the glitter with your finger.
  • Adhere the Holly Leaves & Berries to the bottom of the inside of the card underneath the sentiment.
Thanks for stopping by today. I hope you have enjoyed my tutorial.
Supplies:
Elizabeth Craft Designs:
1056 Quietfire “Merry Christmas”
1077 Tags & More 9 – Sparkle
926 Holly Leaves & Berries
0212 Gold Metallic Shimmer Sheetz
509 Transparent Double Sided Tape 152mm
614 True Red Silk Microfine Glitter
30116 Susan’s Garden PanPastel Flower Coloring Kit 2
CS003 Merry & Bright Clear Stamp Set
7010 Gold/Silver Glitter Borders Peel Off Stickers
 
Other:
Cardstock: white, red, green
Foam Tape
Scoring Tool
Black Ink


Thursday, September 3, 2015

Housework can't kill you ....


Hi everyone,

It's challenge time with my friends over on the CCEE Stampers challenge blog. Being the beginning of the month, it is time to introduce our new challenge hostess which is Lois Bak.

 Apparently today is SKYSCRAPER DAY. In addition to being our challenge hostess Lois' birthday, it is also the birthday of Louis H. Sullivan (born Sept. 3, 1856), an architect credited with designing the first skyscraper.  Today’s challenge is a Word Play challenge.  Include on your card something that starts with each of the letters in CITY.

For the challenge part of my card I have used the following:

C - Crimson, Clothing  I- Iron; Ironing  T - Twine  Y - Yellow


I love how this image works for this challenge, as I had only just picked it up last month while shopping with a couple of friends. I figure this might be good for a Mother's Day card so will probably give it to my daughter ... that image looks more like her then me haha!

I have created a 4 Step Vertical Stair Card using Crealies Create a Card No 3 die.

Don't forget to check out the CCEE Stampers blog (goes live 12 AM EST) to see the rest of the creations the CCEE Stampers created this week. You can also see more details of their creations on their individual blogs:


Stamps: Lily Loves Laundry - Stamping Bella; Mop & Bucket; Cleaning Bucket - Darcies
Paper: White; Black; Out and About DP - We R Memory Keepers
Dies: Create a Card #3 - Crealies; Mum - Simon Says Stamp!
Other: Black Ink; Crimson Buttons; Twine; Foam Tape; Copics


Wednesday, September 2, 2015

Santa Says Nice!


Hi everyone,

I will be teaching how to create this Sleigh with Gift Card Slot Pop Up Card at ........

(formerly Photo Continental)

on Saturday 19th September
9.30am - 11.30am


If you would like to participate in the class you can do so by
booking 
In Store 
or by phoning Craft Giraffe (38494422)


Stamps: Merry & Bright Clear Stamps - Elizabeth Craft Designs
Paper: White; Red; Green; Gold; DP
Dies: Sleigh with Gift Slot Card; Rudy the Reindeer; Katie Label Pivot Card - designed by Karen Burniston for Elizabeth Craft Designs; Merry Christmas - designed by Quietfire for Elizabeth Craft Designs
Other ECD Products: Transparent Double Sided Adhesive Tape; Gold Border Peel Off Stickers; Red/Gold Glitter Dots Peel Off Stickers; Gold Silk Microfine Glitter
Other: Black Ink; Foam Tape


Tuesday, September 1, 2015

Thank You Teacher


Hi everyone,


It's our Riley and Company Design Team challenge time again over on the Riley and Company blog. This time round our challenge is hosted by Sandye!


For our challenge this week Sandye has challenged us to create a School related card or project.


For my card today, I have used Riley and Company's School Boy Riley to create a thank you card for a teacher.


I have created a Pull Card using the Spiral Circle Pull Card die set designed by Karen Burniston for Elizabeth Craft Designs.


Don't forget to check out the Riley and Company Design Team's cards on their blogs:


Heather Bolli
Jackie Rakoski-Diediker
Joy Stagg
Kelly Santi
Kendra DeCota
Monica Taylor
Sandye Curry


Stamps: School Boy Riley - Riley and Company
Paper: White; Black; Back to School DP - Doodlebug Design Inc.
Dies: Spiral Circle Pull Card - designed by Karen Burniston for Elizabeth Craft Designs; Wonderful Words - Teacher; Wonderful Words - Thank You - Papertrey Ink
Other: Black Ink; Black Candy Dots; Foam Tape; Copics