Thursday, October 12, 2023

Micey Nice Birthday


Hi Crafty Friends,

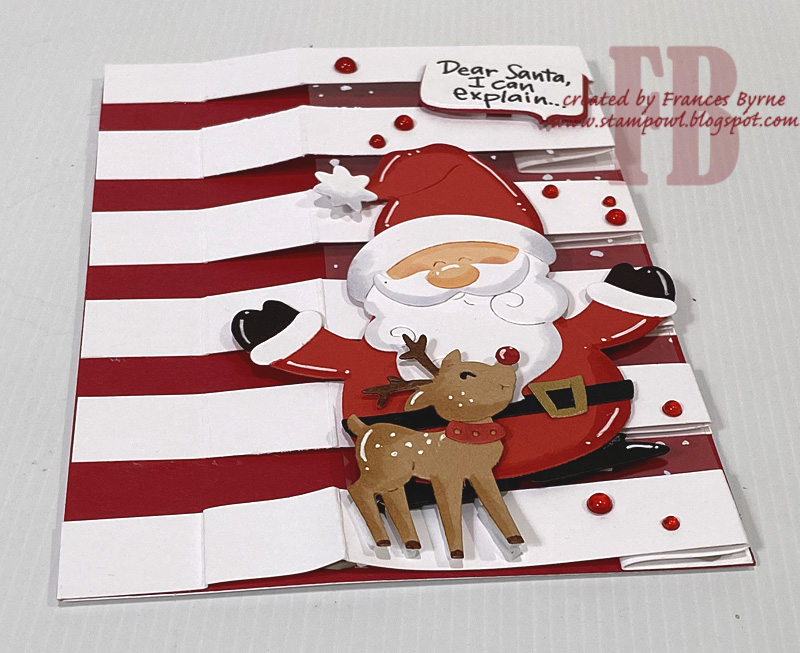
Thanks for stopping by my blog. Today I am sharing a Trifold Building Block Card I created recently, you can find a tutorial by Sam Calcott over on her Mixed Up Craft YouTube channel here.

To decorate my card, I used a cute mouse from Spellbinders called Dancin' and Giftin' Mouse which is part of their Dancin' Collection. The legs of the mouse move when you touch the legs or move the card.


To ground the mouse, I added snow to the base of my front panel using dies from Lawn Fawn.

The birthday sentiment at the top of the card is from Waffle Flower Crafts.


On the back of my card, I added a sentiment panel. I added a die cut sentiment using TEXT{ures} Floral Sentiment Panel die and an older mouse themed sentiment from Penny Black. 

Other Supplies:
  • "Micey" Nice Birthday Wood Mounted Stamp - Penny Black Inc.


Tuesday, October 10, 2023

Santa I Can Explain


Hi Crafty Friends,

Today I am sharing a Christmas themed Trellis Style Bridge Fold Card I created recently.

Sam Calcott shared a tutorial for this style of card back in September, as it looked like a fun style of card, I decided to give it a go. You can see her tutorial here


To decorate my card, I used the new Spellbinders/Stampendous Santa Hugs die set. This die set included the Santa image as well as the cute little reindeer.

I added the sentiment which is from the Holiday Hugs Sentiments stamp set. I die cut the sentiment using a speech bubble die. I die cut the speech bubble from white and red cardstock, offsetting the two together so I had a red shadow under the white speech bubble.

To finish off the front of the card I added some red dew drops.

I mounted the panel to a top folding white 5 x 7 card.


For the inside of the card I added a sentiment and the Santa image which are both from an Apple Blossom stamp set.  


The card folds flat, so that it will fit inside a 5 x 7 envelope.

Other Supplies:
  • Festive Globes Stamp Set - Apple Blossom


Monday, October 9, 2023

Witches Cat Halloween Gift Bag


Hi Crafty Friends,

Today I am sharing an Halloween themed interactive gift bag that I have made for my granddaughter for Halloween. 


Here is a quick video to see my card in action.


To decorate my bag I used papers from Made To Surprise by Sam Calcott's Spooktacular Collection. The paper pad included in this collection includes six different Halloween themed puppets. 

I don't normally make Halloween gifts for the grandkids ... but these were just too cute that I had to play. 


Here is another view of my gift bag, the sentiment under the cat says "Happy Halloween".


Friday, October 6, 2023

Thank You Very Much


Hi Crafty Friends,

I recently needed a male themed Thank You card in a hurry, so I pulled out my Thank You Very Much Glimmer Plate from Spellbinders to make this card. 


I used black foil to foil the sentiment and layered it to the card using the Notched Edge Nested Squares from Creative Craft Products. 


As you can see by the photo above, I created a Z Fold Card. I have added another of the notched squares for a place to write a hand written message.


Other Supplies:
Thank You Very Much Glimmer Plate - Spellbinders


Thursday, October 5, 2023

Merriest Christmas


Hi Crafty Friends,

Thanks for visiting my blog. Today I am sharing a Christmas themed Inside Out Stepper Card I created using  Creative Craft Products High Centre Stepper Card from the Step on Up 2 Collection. Sam Calcott, shared a tutorial on this style of card a few months ago, you can see her tutorial here

I shared a card using this style back in August, I decided to revisit it for my card today.

I pulled out my Spellbinders Betterpress system to make this card. I used the Spellbinders Merriest Christmas Betterpress plate to add the sentiment to my main panel. After pressing the sentiment into my cardstock, I then used Distress Oxide inks to add colour to the panel.

I added ephemera from two magazine freebie sets that I received last year. 


Here is a look at my card when it is folded ready to be placed in an envelope. When closed the card measures approximately 5 3/4 inches x 7 1/4 inches.


For the back of my card, I kept it fairly simple, just adding a large white panel to the centre panel and adding a sentiment and a few more of the ephemera pieces. The sentiment is from Made To Surprise's Christmas Sentiments stamp set from the Moving Scenes Collection.


Wednesday, October 4, 2023

Happy Birthday Hugs


Hi Crafty Friends,

Thanks for stopping by my blog, today I am sharing a Slimline Easel Card I created recently.

For my card, I used the Stampendous Bear Hugs stamp/die set which is part of the Hugs Collection that Spellbinders has been releasing. There were three different animals in the first collection ... bear, cat and dog. There is a Christmas collection also available now which includes Santa, Snowman & Gnome sets.


I used Lawn Fawn's Grassy Hillside Borders die set to create the grass areas of my card. Both bears and honey pot are included in the die set, and the bees are in the coordinating stamp set.

For the sentiment I used Alex Siberia's "It's Your Birthday" foil plate which I foiled using black foil.


Here is a look at my card, when it is closed ready to be placed in an envelope.


And finally a look at the bottom panel when it is opened up. I added the two bears on either side of the sentiment which acts as the stopper. The sentiment is from "Hugs Sentiments" stamp set.


Tuesday, October 3, 2023

October 2023 Karen Burniston Designer Challenge


 Hi Crafty Friends, 

Welcome to our October Karen Burniston Designer Challenge.

Check out Karen Burniston's blog on Wednesday (US Time) when you will be able to see what all the designers created for the challenge this month, plus Karen will have an amazing video tutorial to share with us all.

Our challenge theme this month is ... "JACK-O-LANTERN" - Make a Halloween card that features at least one Jack-o-lantern. 


For my card today I pulled out my Bitty Ball Pop-up and the Character Add-ons 1 die sets to make my Jack O Lantern Ball Character.


Here is a quick video to see my card in action.


My Jack O Lantern is removable from the card, so that the recipient can enjoy long after the card is on display. I mounted the Jack O Lantern onto an acetate oval which had been die cut using the Ovals Crosshatch die set. I didn't want to hid the patterned paper when the Jack O Lantern was in the card.


I used the pumpkin borders from the Halloween borders die set to add the jack o lantern border on either side of the large Jack O Lantern Ball.

On the back panel of the card, I used another Oval Crosshatch die to add the "Trick or Treat" sentiment which was die cut using the Small Script Halloween die set. 

I also added some bats which are from the Halloween Charms die set.


Here is a close up photo of my Jack O Lantern.


Here you can see the different side views of my Jack O Lantern.


I kept the front of my card simple, seeing the focus is on the inside of my card. I used the Long Flap and Closure die to add to my card, to help keep it closed.

The "Happy Halloween" sentiment is from the Halloween Charms die set, as is the spider.


Monday, October 2, 2023

It's Your Birthday


Hi Crafty Friends,

Thanks for stopping by my blog today. Today I am sharing a Slimline Pop-up card I created recently using stamps, dies and foil plates from various companies.


For the front of my card, I pulled out my Studio Katia Dotted Slimline 2 die set, to create all the layers of my card. I used a rainbow coloured patterned paper for the scallop layer.

The girl is die cut using Concord & 9th's Celebration Squad die set. I love all the different options you have in this die to create girl images.

I added a balloon to the girls hand, using a Lawn Fawn die set ... Outside In Stitched Balloon Stackables.

The sentiment is from Alex Syberia, a new company for me. It is a foil plate with a coordinating die to die cut out the sentiment. The sentiment was a little smaller than I was excepting, but I am more than happy with it. I foiled the sentiment with black foil and used a foiled foil plate so I could get the reverse image of the sentiment where the letters are white and the outline black.


For the inside of my card, I created a pop-up card, using Karen Burniston's new Stocking Pop-up die set. The pop-up mechanism in this die set, is generic and can be used with whatever you wish, in my case I added balloons using balloon dies from the same set that I used on the front. When you open the card, the balloons move up.

To finish off the card, I added a stamped sentiment using a Honey Bee Stamps Birthday Bliss stamp/die sets.


Friday, September 29, 2023

Rebus - Michael Jackson Songs


Hi Crafty Friends,


It's time to share another rebus puzzle swap with you! This month the theme is "Michael Jackson Songs".

If you would like to solve my rebus puzzle, why not post a comment on my blog post with your answers. I will let you know what the correct answers are next time I post a rebus card here.

How did you go solving my August Rebus which was "Books written by Jackie Collins"

 Here are the correct answers so you can check how you did.

  1. Deadly Embrace
  2. The Power Trip
  3. Lucky Boss
  4. Hollywood Wives
  5. Revenge
  6. The Bitch
  7. Thrill
  8. Rock Star
  9. Chances

You can find all my past Rebus Cards here.


Thursday, September 28, 2023

Snowman Christmas


Hi Crafty Friends,

Today I am playing with another of the dies from the Creative Craft Products Sweet Christmas Collection. These dies are designed to create a fun chocolate holder. I have been using them to make Christmas gift tags with a chocolate inside, but I am also trying to use them all as a stand alone die on a card. For my card today I am using the Frosty the Snowman die set.

To create the background of my card, I used the Flash 5 x 7 Background die which I die cut from teal cardstock, I then adhered the panel onto a panel of cardstock that had double sided adhesive on the front. I then covered the exposed adhesive with Warm Diamond Silk Microfine Glitter. This panel was adhered to a top folding 5 x 7 white card.

I used Lawn Fawn's Stitched Hillside Border dies to create the snow for the bottom of the card. 

I used pink and light green cardstock to add the hat and scarf to the snowman. As this set doesn't include arms, I used the antlers from the Rudolph the Reindeer die set to add the arms.

To cover the hole in the tummy where the chocolate would go it made as intend, I added a snowflake wax seal, using green wax beads and a snowflake wax seal I purchased from Amazon.

To finish off the front of the card, I added the "Merry Christmas" from the Made To Surprise Christmas Fun Sentiments stamp set.


For the inside of the card, I added layers using the Creative Craft Products Notched Rectangles die set. I then added a stamped sentiment using one of the sentiments from Made To Surprise's Christmas Sentiments stamp sets included in the Moving Scenes Collection.