Thursday, October 13, 2022

I Sea


Hi Crafty Friends,

It's challenge time with my friends over on the CCEE Stampers challenge blog. Lynn McAuley our challenge hostess for the month continues to issue the challenges.

Apparently today, October 13 is the birthday of the U.S. Navy. To celebrate the men and women who have served in the navy since its inception, create a card with a nautical theme.


For my card today, I have created a pull card using Made To Surprise by Sam Calcott's Everyday Pop Up die set. When I first planned this card, I was going to put the yacht in the lower portion of the card with a whale or dolphin popping up, but they were to big in relation to the yacht that I had to go to plan b.

For the sea creatures etc I used stamps and dies also from Made to Surprise, I have listed what I used in the supply list below. 


When you pull the tab at the top of the card, it reveals the yacht sailing on the waves. The yacht is an older die from Elizabeth Craft Designs. As the yacht is made of die cut pieces I decided to adhere it to a piece of acetate which I then cut around the outline of the yacht, this. gives the yacht some strength and prevents it from being caught when it is pulled up and down in the card.


For the inside of the card, I added a piece of blue card along the bottom of the card which has been die cut using the wave die included in the yacht die set. I then added the whale and another stamped sentiment, both of which are also from Made To Surprise.

Don't forget to check out the CCEE Stampers blog (goes live 12 AM EST) to see the rest of the creations the CCEE Stampers created this week. You can also see more details of their creations on their individual blogs:


Other Supplies:
Everyday Pop Ups die set - Made To Surprise


Wednesday, October 12, 2022

With Love At Christmas

Hi Crafty Friends,

I have another Christmas card to share with you today, using dies from Karen Burniston. I have gone with no traditional Christmas colours for my card, taking inspiration from a paper pad I recently received.


For my card today I have mixed some of the recently released products with some previously released, the great thing about Karen Burniston's dies is that everything works together.

For the front of my card I added the fireplace scene using the Fireplace Pop-up die set, this die set works well as either a pop-up on the inside or flat on the front as I have used on my card. I also used the Fireplace Extras 1 die set to add some of the additional images to may card.

The presents on the lower left side of my card were created using the gifts included in the Gift Pivot Panels die set.

I also added a stamped sentiment, using MFT Stamps Bitty Holiday Sentiments stamp set.


For the inside of my card, I created a pop-up card using the Gift Pivot Panels die set. I used colours inspired by the designer paper to add the presents to the pop-up panel.

The layers on the front and inside of my card were all die cut using the Rectangles - Crosshatch die set. I also added a white rectangle panel to the right side of my card for a place to write a personal greeting.

To finish off my card I added the "Merry Christmas" sentiment. This is a two line sentiment die, so I cut it apart to make it fit on my card.


Tuesday, October 11, 2022

Witching You A Happy Halloween


Hi Crafty Friends,

As Halloween is only a few weeks away now, I decided to share a fun Halloween themed card I created recently using products from Made To Surprise by Sam Calcott.


For my card today I created a Sliding Window or Sliding Pop-up Card using the 6 x 6 Circular Slider Card die set from Made To Surprise by Sam Calcott's Super Sliders Collection. About a couple of month or so ago Sam also released her first Halloween dies in her Turn and Reveal Collection, so this was an opportunity to use the stamps, dies and papers from this collection before it was too late for this year.


When you pull the tab at the top of the card, the main circle panel moves to the upright position revealing a secret message as it does. This die set comes with a scallop circle to add under the plain circle, but as I was using the circle for a moon, I decided to just layer using another plain circle.

The witch and cobwebs are both from the Haunting times stamp/die set, the die cut house, tombstones and pumpkins are from the Halloween Icons die set. I also added the tree beside the house which is from the Easy Edges die set.


Here is a side on photo of my card, so you can see the sentiment on the pull up panel of the card. All sentiments used on this card are from the Halloween Sentiments stamp set. I also added the stamped "Pull" to the top of the pull up panel using the Push Me Pull Me stamp set.


I kept this card as a flat card rather than adding it to a folded card, this way I can display it with the main circular panel upright.  I added the square panels to the back of the card. I added another sentiment from the Halloween Sentiments stamp set and the spiders from the Haunting Times stamp set.


Monday, October 10, 2022

Santa Easy Fold Card


Hi Crafty Friends,

Today I have a fun Christmas card to share with you all. This is a fun fold using Creative Craft Products Diamond Fold Easy Fold die set. I used this die last week to create a birthday card, adhering the front panel to a 5 x 7 card back. After finishing that card, I saw a card Sam Calcott made in her demo for these dies a few months ago where she used two of the fronts, adhering each to a 5 x 7 panel which had been folded in half. I loved the card so much and as I had my dies out already I decided to create a Christmas card using the technique.

To decorate my card I used stamps from Made To Surprise Santa Claus Stamp Set which was part of her Shutter Blind Collection a few months ago.


Here is a look at my card when it is opened. You can see the 5 x 7 inch panel in the centre of the card which has been folded in half. I used this area to add panels using Whimsy Stamps Mini Slim Notched and Mini Slim Notched Stitched die sets to add my sentiments. There is extra room on these panels to add a personal greeting when needed.

I finished decorated the inside by adding more of the images from the Santa Claus Stamp set and The Christmas Tree stamp set also from Made To Surprise.


Here is another view of the inside of my card, so you can see the folds a little better. There is one fold in the centre and then one either side of the red panel where the angled panels are adhered.

When closed, this card measures 5 x 7 so will fit in a 5 x 7 envelope.

Other Supplies:

Sentiments Jolly Stamp Set - Kaisercraft (discontinued)


Friday, October 7, 2022

Autumn Accordion Cards


Hi Crafty Friends,

Today I am sharing a couple of Accordion cards featuring products from Divinity Designs September release. Yes I know I am a month late! Unfortunately the postal services on both sides of the ocean are super slow right now, so it takes longer for my parcels to arrive. 


For my first card I have created an Accordion Card using the Accordion Card with Layers die set and the new Accordion Card Add-Ons die set. I love this addition, it gives the card a completely different look and I am looking forward to playing with it more in the future.

To decorate my card I used the Thanksgiving Gnomes Paper/Die Duo set ... I love the mix of papers and gnomes included in this set. I used the Double Stitched Ovals die set to add the layers to the three panels of my card.

For the sentiment I pulled out the new Happy Fall Stamp/Die Duo set. 


Here is a look at my card when it is closed, ready to be placed in an envelope. I alternated the layering of the patterned papers, so that the zig zag paper was the one seen when the card is closed.


For my second card, I have again created an Accordion Card using the Accordion Card with Layers and Accordion Card Add-Ons die sets.

This time around I used the Slimline Autumn Plaid Paper Pad for all the layers and decorated my card using the Happy Fall Stamp/Die Duo.

I also added a few leaves around the sentiment, which are from the Thanksgiving Gnomes Paper/Die Duo set.


Here is a look at my card when it is closed, ready to be placed in an envelope.


Thursday, October 6, 2022

When They Saw The Star


Hi Crafty Friends,

It's challenge time with my friends over on the CCEE Stampers challenge blog. Being a brand new month, it's time to introduce our new challenge hostess which is Lynn McAuley.

Apparently today is National Bring Your Bible to School Day. For today’s CCEE design, use a Bible scripture as the sentiment on your card.


As I wanted to make a Christmas card for today's challenge, I had to go searching my older Christmas cards to find a suitable sentiment for this challenge. I finally found one in a really old MFT Stamps stamp set ... Pure Innocence Precious Little Lamb Upon A Star stamp set. 

As the sentiment I decided to use referred to a star, it was the perfect opportunity to pull out my Creative Craft Products Perfect Flips Star die set and the coordinating stamp set.This is a 5 inch x 7 inch card.

 I used holographic cardstock for the layers of my star and sentiment panel, and silver embossed the stamp and sentiment.

I also die cut additional smaller stars from holographic and white glitter cardstock to add around the card.

I paper pieced the lambs clothing using patterned paper.


When you pull the card open, the star in the centre of the card, flips to show a sentiment on the other side of the star. 

Don't forget to check out the CCEE Stampers blog (goes live 12 AM EST) to see the rest of the creations the CCEE Stampers created this week. You can also see more details of their creations on their individual blogs:


Other Supplies:
Pure Innocence Precious Little Lamb - Upon a Star - MFT Stamps (discontinued)


Wednesday, October 5, 2022

Happy Birthday


Hi Crafty Friends,

Welcome to my blog, today I am sharing a card I created using one of the Creative Craft Products Easy Folds die sets. When I first saw these dies a few months ago, they reminded me of some fun templates I used to have that created unusual shaped cards. Dies are always much easier to use than templates, so of course I had to buy all four die sets. Two dies sets make 5 x 7 inch cards and the remaining two make 6 x 6 inch cards. I have included links to all four die sets in my supply list below. 

For my card today I used the 5 x 7 inch Diamond Fold Die set, keeping the design fairly simple. I die add a layer between the patterned paper and base of the card which was fairly simple to do, even with the odd shape. I have been wanting to use this patterned paper from Carta Bella for a while, and being that it was double sided I was able to make use of both sides for this card. You can see the reverse paper on the inner panel which shows when the card is closed.

I added a Happy Birthday sentiment using Waffle Flower Crafts' Happy Birthday Duo Foiling die set with coordinating dies. I foiled the sentiment using black foil. 

To finish off the front of the card I added some Pink Fresh Studio Champagne Metallic Pearls around the sentiment.


Here is a look at the inside of my card, after layering the patterned paper I used the layering die to die cut a white panel, trimming down the left side slightly and adhering to to the left side of my card. I then added a birthday sentiment using MFT Stamps Inside & Outside Birthday Greetings  stamp set.


Tuesday, October 4, 2022

October 2022 Karen Burniston Designer Challenge


Hi Crafty Friends, 

Welcome to our October Karen Burniston Designer Challenge.

Check out Karen Burniston's blog on Wednesday (US Time) when you will be able to see what all the designers created for the challenge this month, plus Karen will have an amazing video tutorial to share with us all.

Our challenge theme this month is ... "HALLOWEEN or FALL" - create a card with a Halloween or Fall theme.


As you can see by my photos above, I went with a Halloween theme so that I could play with a few of the new Halloween themed dies that were released last month ... the Skeleton & Bat and the Bats Slim Pattern Plates dies.

For my card today I created a 5 inch x 7 inch card, I am really enjoying this larger size rather than the standard A2 size. 

I added patterned paper to both sides of my card, they weren't long enough for a 7 inch tall card, but as I was added the graveyard scene from the Halloween Scene die set it didn't matter. I die cut the graveyard scene from dark grey cardstock and splattered black ink over it.

I created my pop up card using the Gifts Pivot Panels die set. I die cut the pivot panel using cardstock which was close to the color of the patterned paper, I then inked around the edge using black ink.

The moon in the top left corner was die cut using a circle from the Circle Tag Book Pop-up die set. 

Did you know a group of bats can be known as a Colony, Cauldron, Camp and Cloud. I used the new Bats Slim Pattern Plate to add the colony of bats to the background which are mostly on the upper right of my card. It is so easy to just separate a few of the bats from the background you die cut and add where you want them.

The larger bats, skeletons, black cat and pumpkin baskets are all from the new Skeleton and Bats die set. 

I also added the pumpkins, ghosts and BOO! using the Halloween Elements die set. 


I kept the front of the card fairly simple as the focus of this card is on the inside.

 I used the Bats Slim Pattern Plate again to create the background over the purple cardstock. I die cut the background twice from black cardstock and then trimmed off any excess.

The sentiment was created using the Happy Halloween die set, I die cut the sentiment from black and holographic card offsetting the black over the holographic slightly.

I die cut two circles using circle dies from both the Circles - Crosshatch die set and the Snowman Twist Circle die set. I then added the skeleton and pumpkin basket to the circle.


Monday, October 3, 2022

Fabulous Teacher


Hi Crafty Friends,

Today I am sharing another Teacher thank you card. December isn't all that far away now that it is already October, and I still have a few more teacher thank you cards to get made for my grandchildren to give to their teachers at the end of the school year.


When Lawn Fawn's most recent release came out at the end of August, I had no intention of buying their newest interactive card, the Peekaboo Pop-up die set which basically is a wiper card. I already had the Mama Elephant one from years ago, and I had just received all the ones from Made to Surprise. So I didn't order it. A few days after my order arrived and I kept seeing more cards made using this die set I decided it was different enough from the others and fortunately my local retailer still had it in stock. Hence today's card is a Peekaboo Pop-up using the new Lawn Fawn die set.
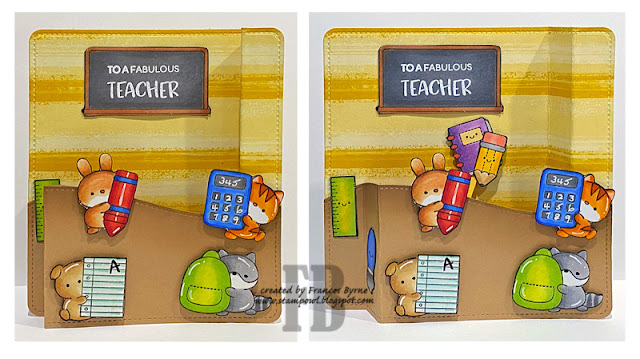

To decorate my card, I used two stamp sets from Clearly Besotted ... School Day Play and Stationery Plushies. I also pulled out an older Heffy Doodle Stamp Set for the blackboard called Teacher's Pet.

You can see how the book and pencil that you can see under the blackboard are revealed when you pull the sides out.


The Peekaboo Pop-up die set, comes with a rectangle panel to add to the back of the card. As I was adding mine to a white card base, I added a black layer between. 

All the sentiments on this card are from one of my go to teacher themed sentiment sets from Heffy Doodle called "Teach Me Words" it has so many different sentiments and even though I have other sentiment sets, this one often gets used on my cards.

I added to more images that I had left over from decorating the front of my card to finish the card.