

Hi Crafty Friends,
It's my turn to post a tutorial on the Elizabeth Craft Designs blog today. Being that Halloween is now only four weeks away, I decided to play with the new Krista Schneider Halloween Clear Stamp set. These stamps are perfect to create fun scenes with.

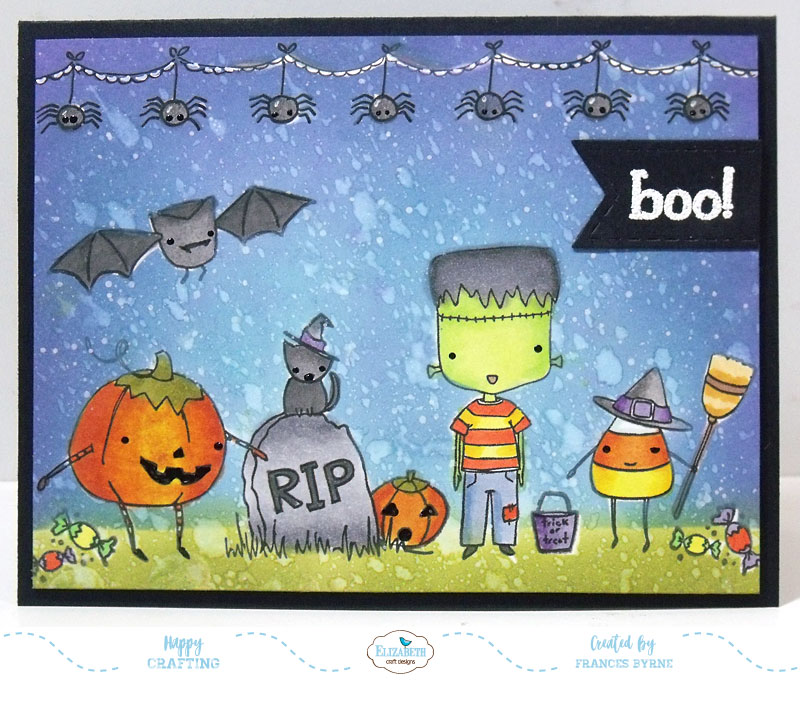
Here is how I created my card:

Step 1 -
- Cut a piece of White Soft Finish Cardstock so it measures 5 1/4 inches x 4 inches.
- Using black ink, stamp the large pumpkin, boy and Candy Corn onto the white cardstock. While you have the stamps out, stamp the images onto a piece of post it tape or similar to create masks. (Note - remember when cutting out images to be used for masks to cut on the line not outside the line).

- Place the mask you created for the pumpkin, over the pumpkin and then stamp the gravestone/cat, so that the arm of the pumpkin is slightly over the gravestone. Create a mask for this image.

- Stamp the spider garland at the top of the cardstock so that it is centred on your card at the top.

- Stamp the spider garland on either side of the centre image so that you have a row of spiders along the top. Create masks for the centre of the spiders.
- Place mask onto gravestone to stamp smaller pumpkin behind it.
- Stamp bat, trick or treat pail, and candies onto the card referring to photo above for placement.

- Place masks over all of the images. (Note you will need to cut the gravestone mask closer to the gravestone then seen in the photo above for when you add your grass to the card).

Step 2 -
- With the masks on all the images, sponge over the sky area of the background using Broken China Distress Oxide, be careful not to displace a mask when you are sponging over an image.
- Next apply Faded Jeans Distress Oxide to the outer edges of the cardstock, and finally Wilted Violet Distress Oxide. If need be sponge over some of the lighter colored ink to achieve a good blended look.
- Sponge over the grass area using Peel Paint Distress Oxide.
- Spritz some water over the entire card using a spray bottle, dry card using a heat tool.
- Add some Picket Fence Distress Paint to a paint palette, water down slightly and then pick up some of the paint using a paintbrush and flick the paint over the card. Allow to dry.
Step 3 -
- Remove masks and color as desired. Copic markers were used on this card.
Step 4 -
- Cut a piece of black cardstock so it measures 8 1/2 inches x 5 1/2 inches. Score and fold along the 8 1/2 inch sided at 4 1/4 inches to create a 4 1/4 inch x 5 1/2 inch top folding card.
- Adhere decorated panel to folded card.
Step 5 -
- Using the "boo!" sentiment from the set, stamp the sentiment onto black cardstock using VersaMark ink, cover with white embossing powder and heat set.
- Use one of the Stitched Fishtail Banners die to die cut the sentiment and adhere to the upper right hand side of card.

Step 6 - Inside of Card
- Cut a piece of White Soft Finish Cardstock to 4 inches x 5 1/4 inches and adhere to inside of card.
- Stamp the candy corn image to the lower right hand corner of card using black ink.
- Using the "Trick or Treat" sentiment from the Spooky Sentiments Clear Stamp set, stamp the sentiment onto orange cardstock using black ink. Die cut sentiment using coordinating die. Layer onto a black circle created using the Stitched Circles. Adhere to centre of card.
- Optional - add Black Ebony Gloss Nuvo Crystal Drops to add detail to the eyes. To do this add a little of the Nuvo Drops to a scrap of cardstock and dip a pin into the drops and then onto the eye.
Thanks for stopping by today, I hope you enjoyed my tutorial.
Supplies:
Elizabeth Craft Designs:

Other:
Cardstock - Black
Inks - Black; Broken China Distress Oxide; Faded Jeans Distress Oxide; Wilted Violet Distress Oxide; VersaMark Ink
White Embossing Powder
Heat Gun
Ebony Black Gloss Nuvo Crystal Drops
2 comments:
What a cute spooky scene you have created. Fun!
what a fabulously fun characters in the scene...love them
Post a Comment