Showing posts with label Scrappy Tails. Show all posts

Friday, April 4, 2025

Hoppy Easter Trifolds


Hi Crafty Friends,

With Easter only a few weeks away, I have two Easter Cards to share today. 

These cards using products from Spellbinders February 25 Club Kits, many of which are perfect for Easter Cards. I also used Scrappy Tail Crafts Trifold die set, I ordered this late last year and have been waiting for the perfect opportunity to play with it.

I made two cards, more of these the same but they both have a couple of differences to them. For the card with the blue covers, I made this one for my grandson and being a boy didn't want the cover to look too girly, so used the Embossing Folder of the Month called Wicker Basket.

The large chick on the left  panel is called Pip and is the freebie die you get when you order the Caboodle (all the sets).

When you completely open the two side flaps there is a in the centre which holds the pop-up portion of the card. On the front of the flap I added an Easter sentiment from an older Divinity Designs stamp set. "Bunny Kisses" sounded perfect for these cards.

Here is a look at the card when it is full open. For the background I used the Stencil of the Month, Nature's Canvas. As you can see I used this on each of the three panels x 2 cards ... that's 6 times. I added a panel of green card that had been die cut along the top using a grass edge. I used this to add my characters.

The Bunnies and all the eggs are from the Large Die of the Month for February, Hoppin' Bunnies Everywhere, this die set has so much in it and is amazing.

For my granddaughters card, I went with pink for the covers. This time round I used the 3D Embossing Folder of the Month for February, Petite Bow.

I die cut the three sizes of eggs, the bows, and paint pieces all from various colours of cardstock, so each card has different coloured eggs etc.

The "Sending Easter Blessings" sentiment on the top right hand panel is from the Betterpress Plate of the Month for February, Luxe Damask. The great things about Betterpress plates is that they can be foiled which is what I did here, using black foil on pink cardstock for the pink card and blue cardstock for the blue card.



For each of the cards, I positioned the bunnies in a different place. For the card above I put the girl bunny in front seeing it was for my granddaughter. The one for my grandson has the boy bunny in front.

When I first started making this I was thinking only to do the centre portion of the card, but when I asked my husband should I add the extra panels, he said yes! I am glad I did.


And finally one last photos of my cards, this time showing the front of both. As you can see I added the girl bunny to the girl card and the boy bunny to the boy.

For the sentiment here I used the "Hoppy Easter" die included in the Large Die of the month. I was recently watching a YouTube video by Nicole Sphor and she mentioned how you could glimmer those tiny sentiment dies that are included in so many die sets. So of course I decided to give it a go, and I will be doing this a lot more in the future, I love the look.


Friday, July 7, 2023

Congrat-Shoe-Lations!


Hi Crafty Friends,

Thanks for visiting my blog. Today I am sharing a trifold card using the Tri-Fold 5 x 7 Showstopper Card die set from Made to Surprise by Sam Calcott. There are a number of different ways you can fold or die cut this style of card to give you different looks. For this card I decided to fold the card so that the larger area is on the left side of the card, which gave me more room to decorate.

To decorate the card, I used Scrappy Tails Craft's A2 High Heel Shoe die set, die cutting the parts of the shoe from black, pink and holographic cardstocks. 


I used the Ovals and Filigree Ovals Nesting die sets from Creative Craft Products/Craft Stash to use as a place to add the shoe.

I also added a black bow to the top right hand corner of the card using another die from the shoe die set.

I added the birthday word die to the left edge of my card using black and holographic cardstock. This means my card is now wider than the 5 inches, it's closer to 6 inches. But I liked the look of something on the edge, so I went with it. 

I pulled out a very old Stampin' Up stamp set for the sentiment, as I wanted something "shoe" themed. I layered the sentiment to circles using the Circle Nesting die set from Creative Craft Products.


I added patterned paper to the left side of the back of the card. I added a white panel to the right side, which covers the tab where the "birthday" is and gave me a place to add a sentiment and a place for a personal greeting. The sentiment is. computer generated, so I could have another "shoe" themed sentiment.

Now because the front of the card has so many layers on the left side, it was having trouble standing up which was annoying me. To solve the problem, I die cut some more circles and stamped a shoe in the centre. I then added this to the lower portion of the left side of the card using a washer in between the circles. The washer is about the same thickness as foam tape. This helped balance the card out and it can now stand on its own. I probably won't be mailing this one, so the extra weight from the washer isn't an issue.


Other Supplies:
Steppin' Up - Stampin' Up (retired)


Friday, February 17, 2023

"Purse"- onally You're the Best


Hi Crafty Friends,

Today I am sharing a purse shaped card I created recently. Last month, Scrappy Tails had a new release and some of their new products were around "fashion" ... I thought a few things were cute, so I placed a small order.

As you can see above, one of the things I ordered was this purse die set. This die creates a purse card/bag, the flap opens so you can add a gift card, notes or small gifts.


I grabbed some patterned paper from an old paper pad, the red paper is glittery which gives the purse a nice look in real life.

I added a birthday sentiment to the tag on the left side of the purse, using a stamp set called Big News from Mama Elephant. The tag is pretty small and when I saw this stamp set I figured it would be perfect as all the sentiments are small.


The photo above shows the back of my purse, which is pretty much how the front looks without the purse flap etc.


As you can see, I added a sentiment to the inside flap of my card. If I had thought about it before assembling the purse, I would have stamped it directly to the flap ... but I didn't. The sentiment is an older stamp from Darcie's Rubber Stamps and of course is perfect for this card. I used Oval dies from. Creative Craft Products to layer the sentiment.

As I mentioned earlier in this post, this purse is perfect to put a gift card. I added a gold gift card from my stash into this purse which you can see in the photo above. 
You could also add a small note card, about the same size as a gift card if you wanted to as a place to add a sentiment and to write a personal message. I haven't done that as yet, but may end up doing that when I decide where this is going.

The purse folds flat and will fit in a 5 x 7 envelope for mailing.


Monday, July 4, 2022

Fairy Birthday Wishes

Hi Crafty Friends,

I have a fairy themed birthday card to share with you today.

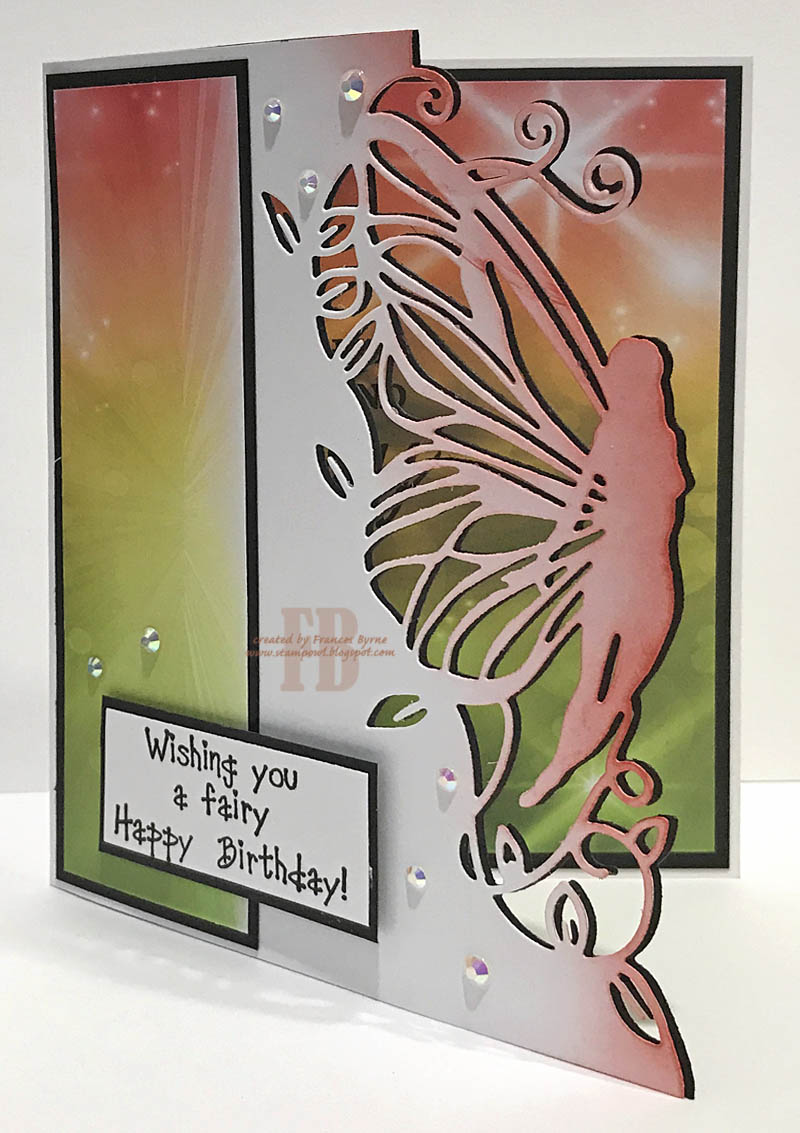
For my card I used Crafter's Companion's Woodland Fairy Edge'ables die. I die cut the fairy onto the edge of a white side folding card that measures 5 inches x 6 1/4 inches. I die cut the fairy again, this time from black cardstock and layered the black fairy panel under the white fairy, offsetting slightly to create a shadow.

I added patterned paper to the left edge of my card and also to the inside of my card.

I sponged Terracotta Catherine Pooler ink to the right edge of the fairy.

I pulled out an older Paper Pretties fairy stamp set for the birthday sentiment.

To finish off my card I added some glacier jewels around the card.

For the inside of my card, I added another fairy sentiment using stamps from Scrappy Tails Fairy Sentiments stamp set. The sentiment is stamped towards the left side of the card, so that it is hidden when the card is closed.

Other Supplies:
Fairy Special Stamp Set - Paper Pretties


Wednesday, February 9, 2022

Fairy Accordion Card


Hi Crafty Friends,

I have a fun fairy themed accordion card to share with you today.

I recently found some of the Creative Expressions Paper Cuts Collection Fairy Edger dies on sale. As I am loving this style of die, I had to add a few to my cart to include in my stash. All the recent cards I have made using the edger dies from this company, have been Slimline cards so I decided it was time to do something different this time around. While I was surfing the internet for ideas, I discovered a fun accordion fold card using this type of die. I decided upon a 2 Panel Accordion card, you can find a quick tutorial of how to create this card over on Jamie Rodgers blog

I didn't want mine to be as big as the one on his blog, so I adjusted the measurements to be 6 3/4 inches high x 8 3/4 inches, I scored the 8 3/4 inch side at 3/8 inch; 1 3/8 inch; 2 1/4 inch; 3 1/8  inch.


I used pink glitter cardstock to add the layers to each of the scored areas and also on the far right panel.

For the accordion panels I used Creative Expressions Paper Cuts Collection - Toadstool Dance Edger and Daisy Fairy Edger die sets, which I die cut from white cardstock.


For the sentiments, I pulled out Hero Arts My Monthly Hero Fairy stamp set from December 2018. I stamped each of the sentiments using Catherine Pooler Sparkling Berry.


I added stars around the sentiments using a star stamp from Altenew's Halftone Stars stamp set.


For the far right panel, I added a birthday sentiment using Scrappy Tails Crafts' Fairy Sentiments stamp set. I used oval dies from Hero Arts to create the oval layers.


Wednesday, December 29, 2021

Love You Anniversary Card


Hi Crafty Friends,

Earlier this month, my husband & I celebrated our 49th anniversary, of course I had to make him a special card. 

I have been having fun playing with Scappy Tails Craft Slimline Snow Globe die set, so I decided to pull it out to create my card for our anniversary.

I die cut the main frame die from the set four times from blue cardstock and two times from heart patterned paper. I layered two cardstock frames and one patterned paper frame together to create two decorated frames. One for the back and one for the front. I used the other dies included in the die set to assemble the snow globe as directed.

 I used the smaller of the oval panels included in the die set to create the centre spinner panel. To decorate the panel I added two hearts. I then added the "love" and "you" from Karen Burniston's Pop 'n Swap die set which I placed on each of the hearts.

 In between each of the hearts I added "49th" using the dies from Karen Burniston's Numbers die set. These were die cut from gold foil cardstock.


I placed my "Happy Anniversary" sentiment to the base of the snow globe, using Karen Burniston's Word Set 12 - Anniversary die set. 

To decorate the very top of the snow globe I added a bow using Spellbinders Christmas - Shopping Cart Holiday And Presents die set.


I created two centre panels exactly the same, sandwiching the twine that makes it spin between the panels. 

I kept the back fairly simple, added just the "XOXO" above the label, which gave me a place to write my personal greeting.


Monday, December 27, 2021

From Our Home To Yours


Hi Crafty Friends,

I still have a couple more Christmas cards to share with you that I created this year ... I am slowly getting through them all.

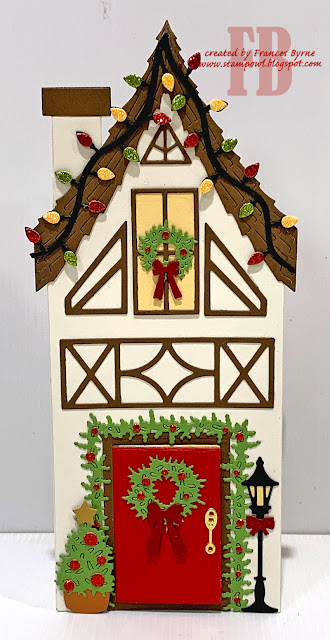
For my card today I have created a Slimline Pop-up card using dies from Scrappy Tails  Crafts. This is a German House ... when I googled German Houses the one I like the best was the cream and brown ones, so that is the colors I used for my card today.

I used the Slimline Birdhouse Pop-up die set to make the base of the card, which includes the house shape and side panels. The windows, door, roof, german house  trims, lamp and Christmas tree are all included in the German and American Christmas House Add-on die set.


The Christmas lights are from the Christmas House Roof Add-on die set. I also used the Slimline Neighbourhood House Add-on to add the chimney to the top of the roof.

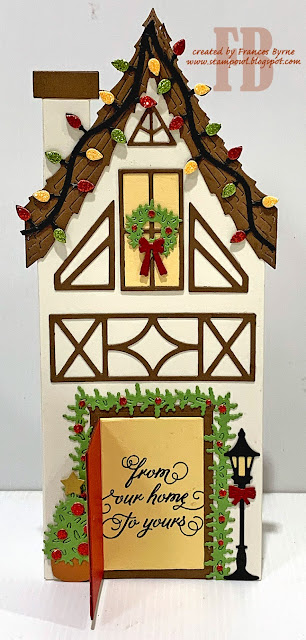
The door opens to reveal the sentiment "From Our Home To Yours" which is included in Waffle Flower Crafts A Home Made Christmas Stamp set.


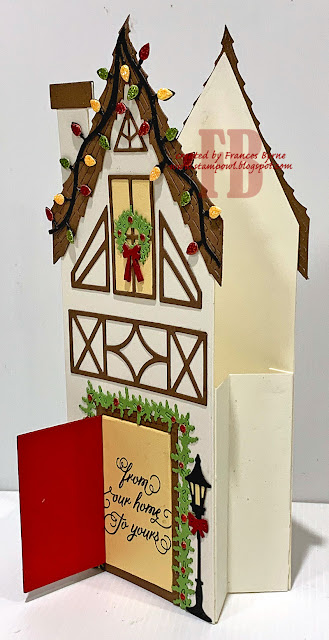
Here is a side view of my card, you can see how the side panels attaches to the back house panel to make this a pop-up card. You could add something to the inner back panel, but I left this one blank.


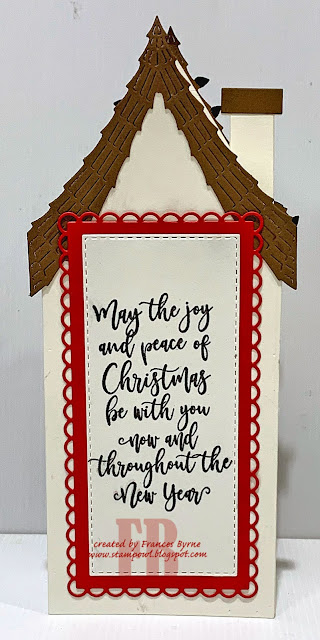
For the back of the house, I added another brown roof.

I added a Christmas sentiment using Divinity Designs' Christmas Wishes stamp set. This was layered to the back of the card using Trinity Stamps Mini-Slimline Stitched Layers Stack & Dainty Scallop Edge Mini Slimline die sets.


Saturday, December 25, 2021

Merry Christmas

Merry Christmas Everyone!!!

It's Christmas Day already down here in Australia! I must have been a good girl this year as I did very well 😀

There are many of you who visit my blog regularly, so I would like to take this opportunity to thank you all so much for your support throughout the year. Hope you all have a wonderful and safe Christmas!

For my card today I created a Slimline Snow Globe Pop up Shaker card using dies from Scrappy Tails. The main Snow Globe portion of the card uses dies from the Slimline Snow Globe Pop-up die set and the Christmas Tree and presents are from the Slimline Christmas Tree Spinner Add-On die set that works with the Slimline Snow Globe Pop-up.

To create the shaker portion of the card I added acetate to two of the slimline snow globe frames and then adhered them together after placing foam tape around one of the frames and of course sequins and glitter.


For the sentiments on this card, I used Pinkfresh Studio's Perfect Sentiments: Holiday Hot Glimmer plate. I used the negative portion of the gold foil that is left over when foiling the sentiments with the Solid Hot Foil Plate to get the gold foil around the outside of the letters and the white letters.

To create the snow bank at the bottom of the card I used Lawn Fawn's Stitched Hillside Borders die set.


Here is a look at my card when it has been shaken up and lying flat on my desk, so you can see the shaker effect.


For the back of my card I added a white panel, which is a left over piece from when I die cut a white Slimline Snow Globe Frame. I stamped a Christmas sentiment to this and also added another of the presents that I used on the front. 

There is also room here to add a personal greeting when I am ready to give it away.


Other Supplies:

Handwritten Holidays 2 - Stampers Anonymous/Tim Holtz - discontinued